Sales Orders
This feature allows sales orders to be created. After creation these orders can be dispatched, invoiced or written off.
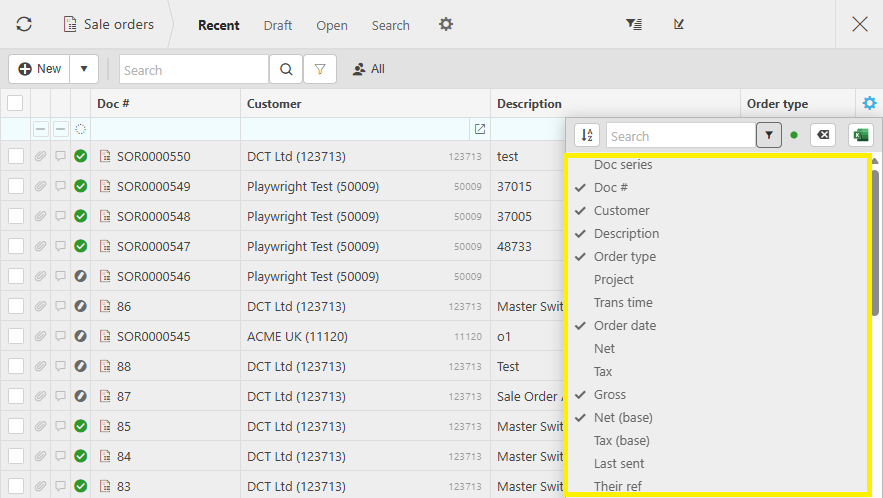
The screenshot below shows a sample grid of sales orders, which includes some key information.
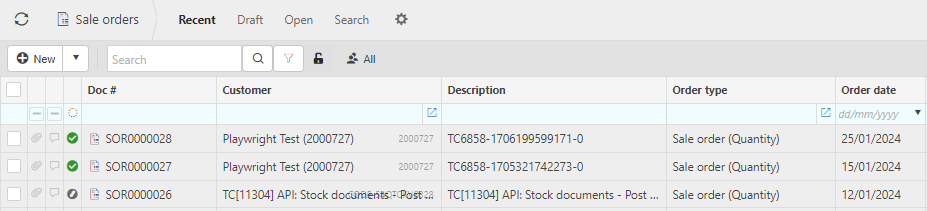
- Doc#: The code given to the document.
- Customer: The Customer that the order is for.
- Description: This will describe the order.
- Order type: Document type.
- Gross: Gross amount of the quote.
Tip
To modify the columns displayed, select
 on the top right of the page, then tick/untick the information you want to hide or display.
How to view Sales Orders
Viewing Sales Orders
Select Sales / Orders from the Main section of the pulse menu -
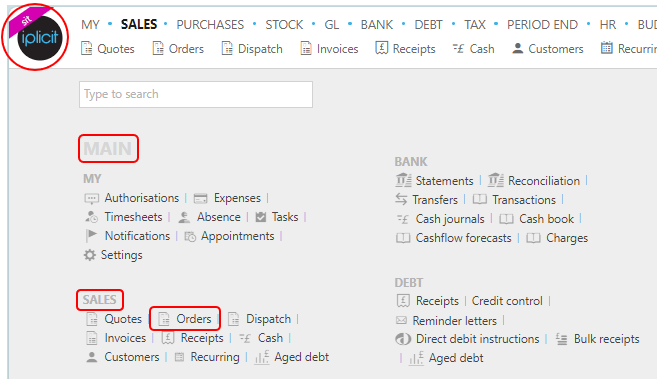
Note
This is an example screen shot of the pulse menu.
Position of the menu items within pulse will vary according to available options and dependant on personal screen resolution.
or from the Main Menu select Sales then Orders -

or enter Sales Orders in the Quick Launch Side Menu.

This will then show the Sales Orders on the system where normal customisation of Sets can be used. Also, depending on User roles, the My/All option will be showing.
Tip
To modify the columns displayed, select on the top right of the page, then tick/untick the information you want to hide or display.
How to create Sales Orders
Create a Sales Order
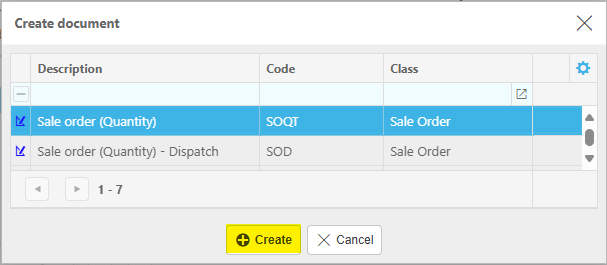
Select Sales Order from one of the options as shown above in Viewing Sales Order.
Select either New or New (from template) - from the drop-down menu.
Select the document required and select Create, or select the pre-existing template and then select Apply.
Enter data in the following as required -
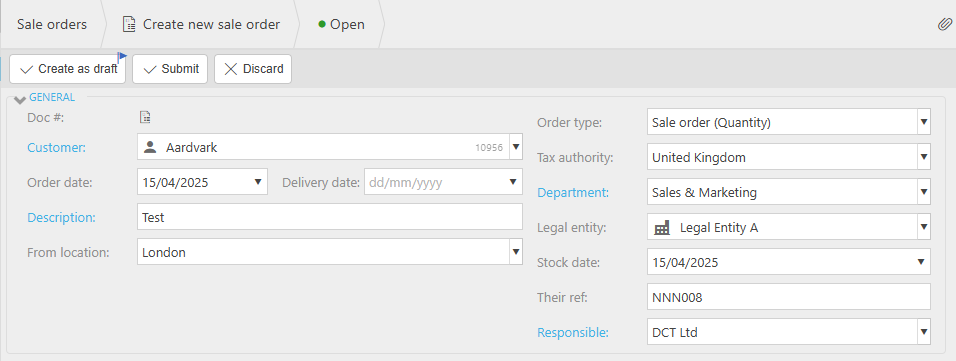
Customer: select from dropdown options.
Order date: This will be auto filled but this can be changed.
Note
This date will default to the current date unless the Don't default current date option is ticked in the Others tab within the Document type. In this case, when a user creates a new document, this date is left blank.
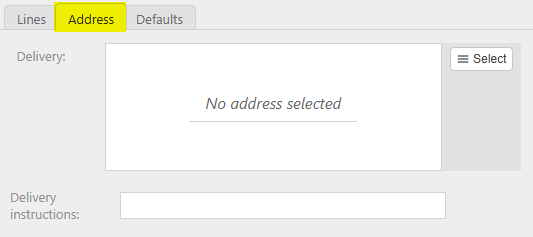
Delivery date: Complete this field if the order expires after a particular date.
Description: If Description required option has been ticked in the Document type, then this field will be mandatory. It will be automatically entered if a Default description was entered in the Document type.
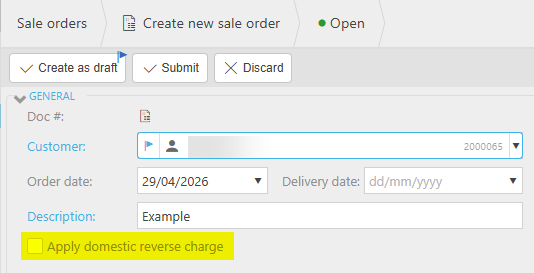
Apply domestic reverse charge: Tick box will only show if the Customer has Domestic reverse charge select in the Customer tab under the Tax section.
Order type: This will be auto filled with the Document type selected in step 3.
Department: Select from dropdown options.
Legal entity: Pre-populated with the default Legal entity set within Document types, but this can be overwritten.
Note
When a Customer with multi tax authority configured, then the Tax authority field will show.
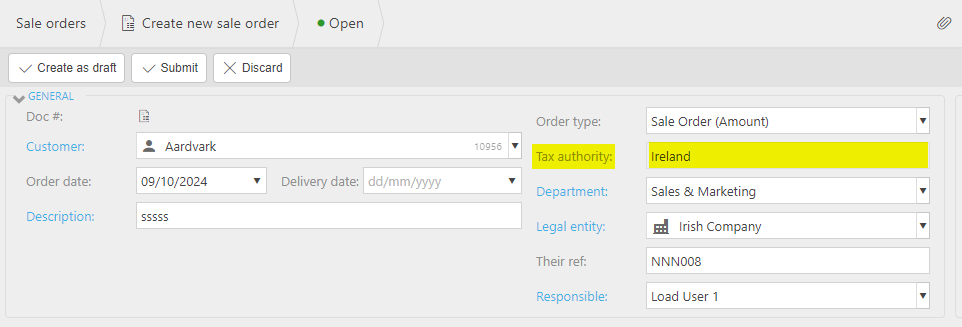
When converting to a Sales Invoice, the Tax authority is copied to the new document.
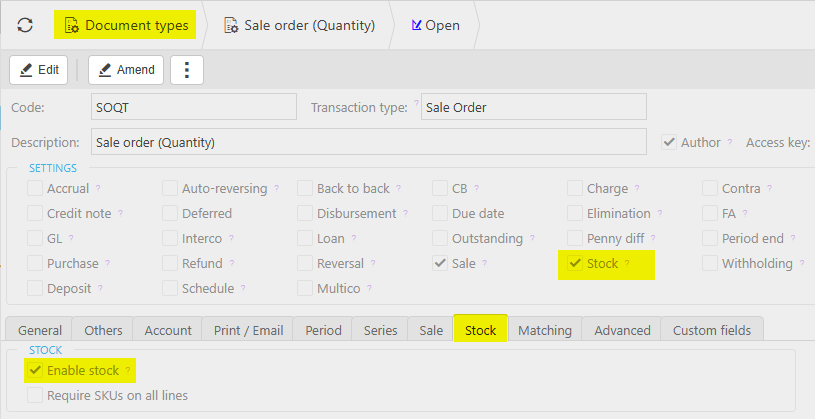
Stock date: This date will default to the Invoice date. It can be changed but will reset to the Invoice date if the latter is changed. If this date differs from the Invoice date, then a
 icon will show with a warning message saying Stock date / document date mismatch.
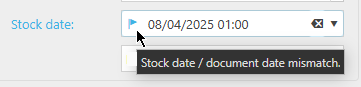
Note
Stock date will only show if the Document type has Stock option selected and Enable stock selected in the resulting Stock tab.
Their Ref: The unique reference given to identify the document. If Their ref required option has been ticked in the Document type, then this field will be mandatory.
Responsible: Selecting a User to be responsible will log the sales order under their name. This is useful for Workflows.
Note
If a
 icon shows on the Customer field, this indicates the data entry control connection.
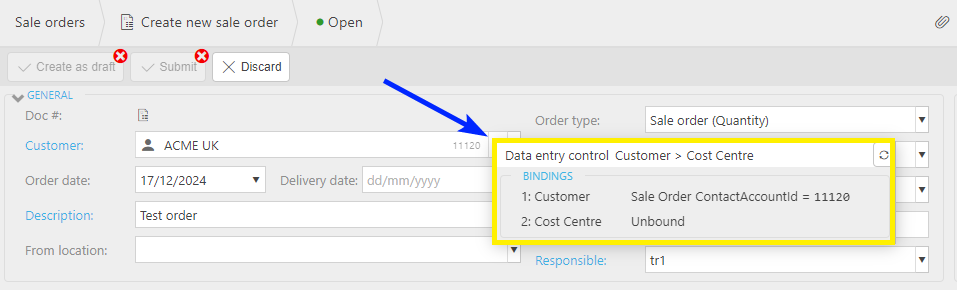
A similar
icon appears in the posting attributes section.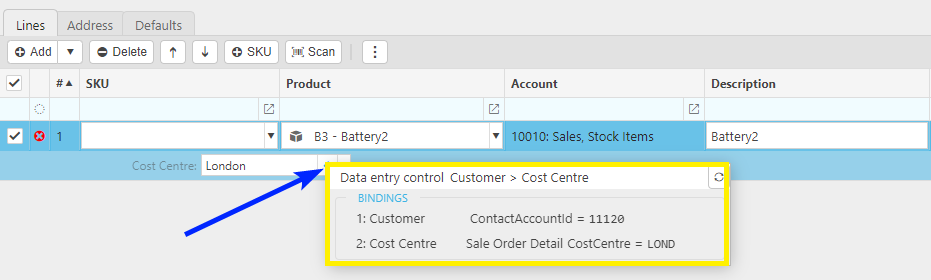

Lines
Stock date: If this date differs from the Stock date in the header section, then a
icon will show with a warning message saying Line stock date / document stock date mismatch.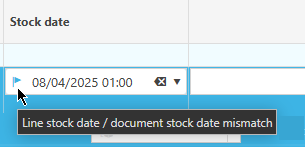
Product: This is the Product being ordered.
Account: If a Product is being used, this will be auto-completed and read only, otherwise, select an Account from available list.
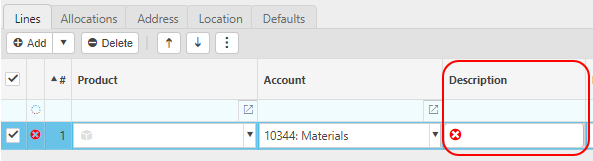
Description: Depending on the Force change setting in Chart of Accounts.

If the Force change is not ticked, then the Description field will be auto filled ...
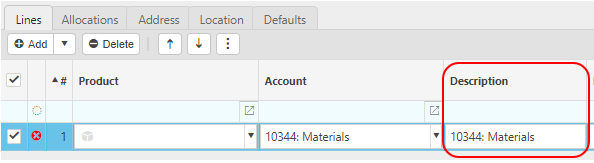
... however, it can be edited.

If the Force change is ticked, then the Description field will be blank, and you will be forced to enter a description.
Project: You can link the order to a project.
Unit: This is the unit to measure the of product.
Qty: This is the quantity of the product you are ordering.
Unit price: This is the price per unit of the product.
Posting attributes
The posting attributes are derived from the chart of account rules related to the account code. Common attributes include cost centre and department but can also include custom attributes.
Note
Deferred Income
This item will appear depending on the settings for the Invoice type selected - see Deferred income guide for further information.
Also, this item may or may not be ticked, depending on the Customer's Ignore deferred income setting - see the Defaults section on the Customer tab in the Customers guide for further information.
If there is a requirement to sell to a Customer and have the goods delivered where the tax authority treatment is different, then set the Customer up as a Multi Tax Authority Customer.
Select either Submit once happy with details or Create as draft to be able to edit further before submitting.
Note
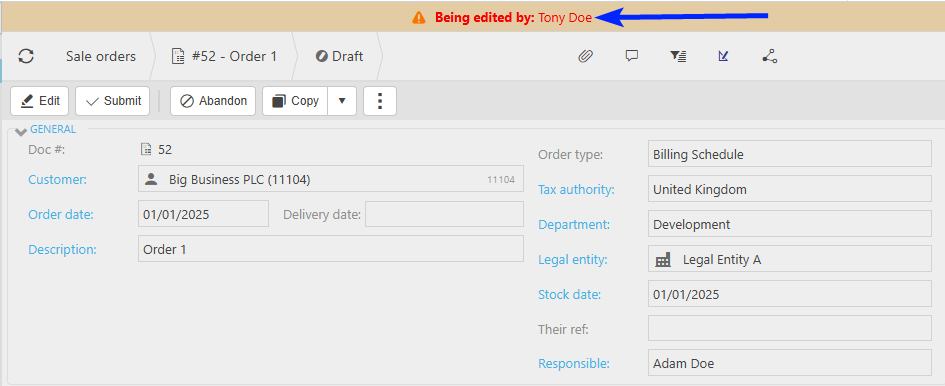
Returning to this document via the Edit option will notify other users viewing the same document that it is being edited.
Once the Sales order has been submitted it will be ready to be converted into a Sales invoice.
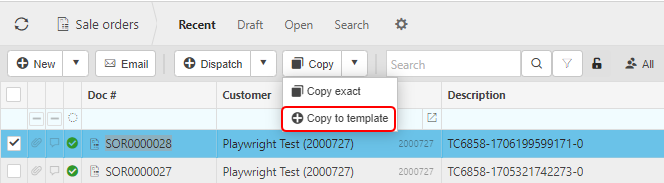
Tip
If you are going to be creating the same order on a regular basis Copy to template.
How to create a back-to-back Sales Order
Create a back-to-back Sales Order
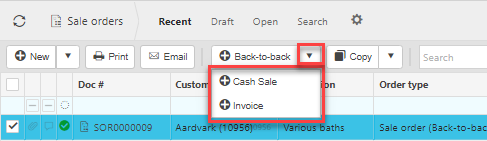
To perform a back-to-back order first start by creating a Sales Orders then Submitting it.
Now select the sales order in the finder and press Back-to-back.

Enter a Supplier then press Submit.
Tip
If you are sending the goods from multiple suppliers, you can delete lines then re-do the Back-to-back process and select different suppliers each time for each line.
Now press either Cash sale or Invoice.
How to create Sales Order with Billing Schedule
Create a Sales Order with Billing Schedule
The Billing Schedule feature in iplicit automates the process of generating invoices and related financial documents from a Sales order over a defined period. It works by creating a schedule of billing events linked to the original Sales order, which can include standard Invoices, Deposits, and Deferred income postings.
Once enabled in the environment settings, users can configure document types, set defaults for accounts, and activate automations for billing, deposits, and deferred income. The schedule can also create associated projects if required.
After setup, the system automatically produces invoices according to the schedule, while allowing flexibility to amend dates, values, or even pause deposit invoicing independently. This approach ensures accurate revenue recognition and streamlined recurring billing without manual intervention, while still providing control for adjustments when needed.
Note
Certain Prerequisite settings need to be set to allow this process to work.
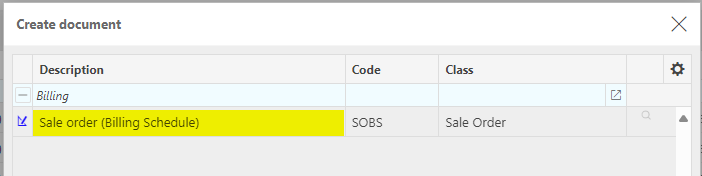
Select Sales Order from one of the options as shown above in Viewing Sales Orders.
Select New.
Select Sale order (Billing Schedule) document and then select Create.
Enter data in the following as required -
Customer: select a Customer that has Billing Schedule set - see the Prerequisite notes.
Order date: This will be auto filled with the current date,however, this can be changed.
Delivery expiry: Complete this field if the order expires after a particular date.
Description: If Description required option has been ticked in the Document type, then this field will be mandatory. It will be automatically entered if a Default description was entered in the Document type.
Order type: This will be auto filled with the Document type selected in step 3.
Department: Select from dropdown options.
Legal entity: Pre-populated with the default Legal entity set within Document types, but this can be overwritten.
Their Ref: The unique reference given to identify the document. If Their ref required option has been ticked in the Document type, then this field will be mandatory.
Responsible: Selecting a User to be responsible will log the sales order under their name. This is useful for Workflows.
Add Lines and posting attributes.
Lines
Product: Select a Product that has an Account with Schedule option selected - see the Prerequisite notes.
Account: If a Product is being used, this will be auto-completed and read only, otherwise, select an Account from the available list that has the Schedule option selected - see the Prerequisite notes.
Description: Depending on the Force change setting in Chart of Accounts.
If the Force change is not ticked, then the Description field will be auto filled ...
... however, it can be edited.
If the Force change is ticked, then the Description field will be blank, and you will be forced to enter a description.
Project: You can link the order to a project.
Unit: This is the unit of measure of the product.
Qty: This is the quantity of the product you are ordering.
Unit price: This is the price per unit of the product.
Posting attributes
The posting attributes are derived from the chart of account rules related to the Account code. Common attributes include Cost centre and Department but can also include custom attributes.
As Billing Schedule has been selected, Schedule line will appear.
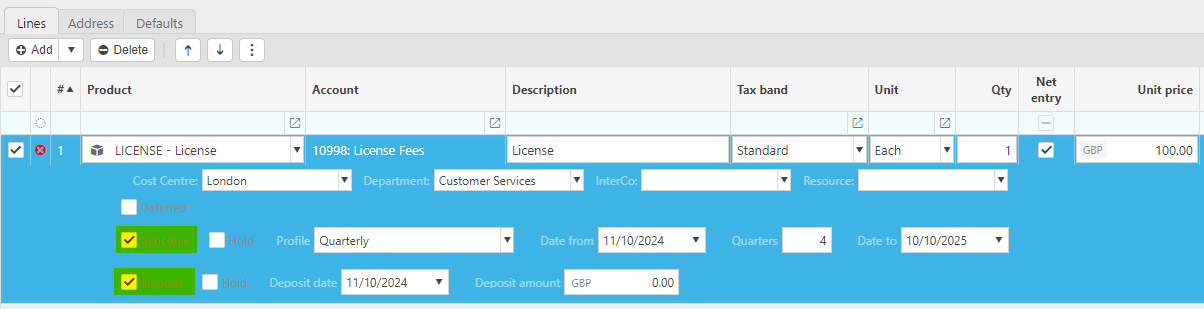
On the Schedule line, enter a period in the Profile option e.g. Monthly.
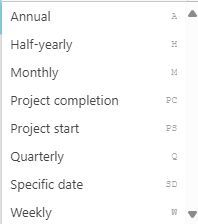
Depending on this value, will determine the options that appear e.g.
For Monthly there is the option to enter the number of months e.g. 12. The Date to will then auto populate depending on the Date from.

Note
Changing the Date from will automatically adjust the Date to.
Changing the Months will automatically adjust the Date to.
Changing the Date to will automatically adjust the Months.
Similar scenarios happen for the other profiles -
For Specific Date, Project start and Project completion, there is a field just for From date.

Selecting the Schedule Hold option will enable you to control when the schedule is invoiced. If the option is ticked, then no invoices will be created when Billing Schedule is run, they will if the option is unticked.
There will also be a Deposit line.
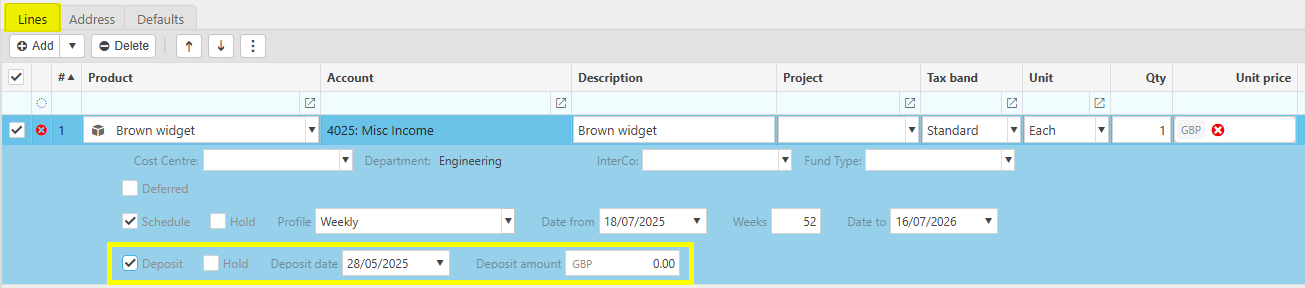
A Deposit amount and date can be entered. This amount will show on the Schedule tab on the Sales order with the Schedule payment amounts being adjusted accordingly.
Selecting the Deposit Hold option will prevent deposits being created when the deposit automation is run.
When the Deposit Hold option is not ticked, then when the sale deposit automation is run, the deposit is created.
Press Submit to save details.
The sales order will now be ready to be converted into a Sales invoice.
Selecting and opening the Sales Order just created will now have a Schedule tab. This gives you the summary and the details of the Billing schedule just created.
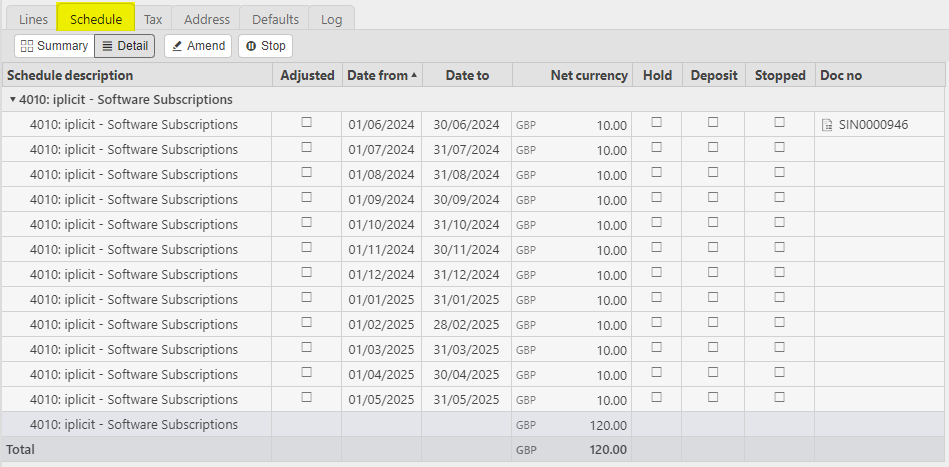
Schedule description: This is the line-item description.
Adjusted: This will be ticked if the Amend option has been selected and any amendment has made on the Billing Schedule.
Hold: If this is selected it means that the whole schedule has been put on is being held and no Sale invoices will be generated for this Schedule.
Deposit: If any deposits have been made, then there will be a Deposit line with this tick box ticked.
Note
If a Deposit amount is added, then the Schedule payment amounts will be adjusted accordingly.
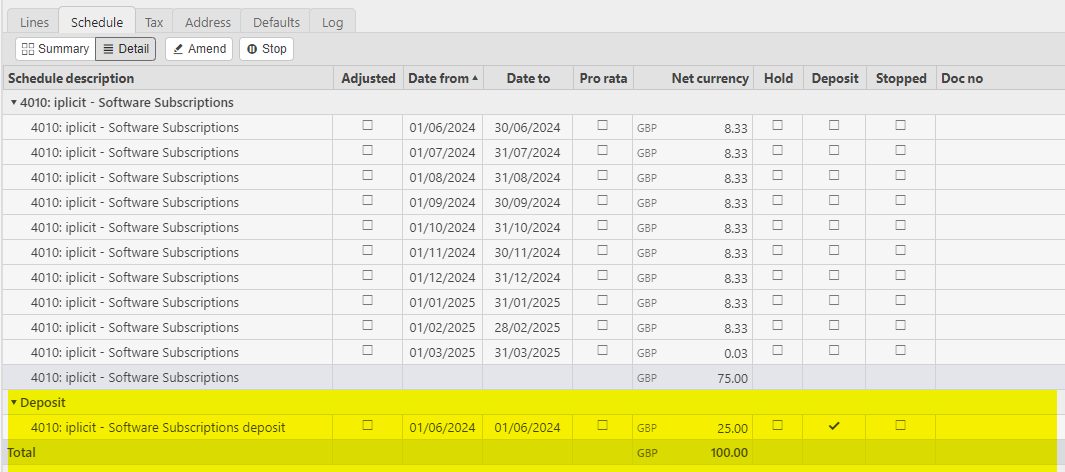
Stopped: Individual schedules can be controlled so a Sales invoice is not generated for that particular line, but it will be generated for any others in the future.


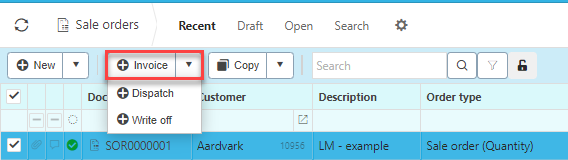
How to convert a Sales Order into an Invoice
Convert a Sales Order into an Invoice
Sales orders can be processed into Invoices as per business process.
To do so, select the order that you would like to Invoice.
Select the
 icon on the Dispatch (No stock) option.
Press Invoice (If the invoice button is not available, it needs to be configured on the Document type).
Note
These dropdown options will be the options selected in Matching tab in Document types.
Press Submit.

How to convert a Sales Order into a Dispatch
Convert a Sales Order into a dispatch
Sales orders can be processed into Dispatches as per business process.
To do so, select the order that you would like to Dispatch.
Select the
icon on the Dispatch (No stock) option.Press Dispatch (If the dispatch button is not available, it needs to be configured on the Document type).
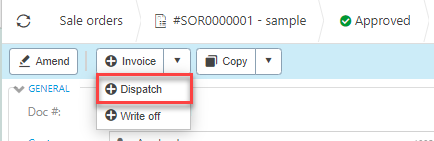
Press Submit.
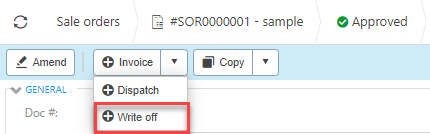
How to write-off a Sales Order
Write off a Sales Order
Select and open the Works order that you would like to write off.
Select the
icon on the Dispatch (No stock) option.Select Write off.
How to export Sales Orders
Exporting Sales Orders
Select Sales Orders from one of the options as shown above in Viewing Sales Orders.
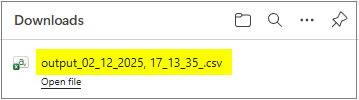
Select the
icon on the righthand side of the attribute columns.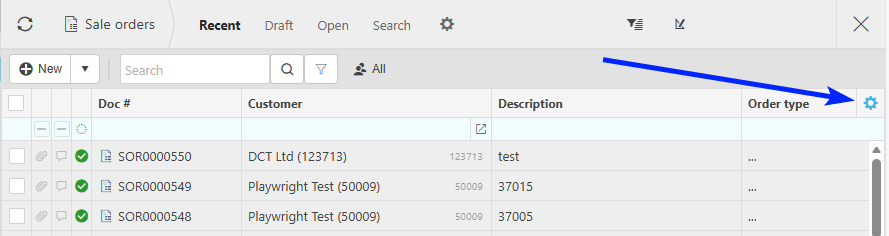
Tick the attributes to display and which will be exported.
Select the
 icon to Export the selected data to an Excel file on the local system.
Updated April 2026