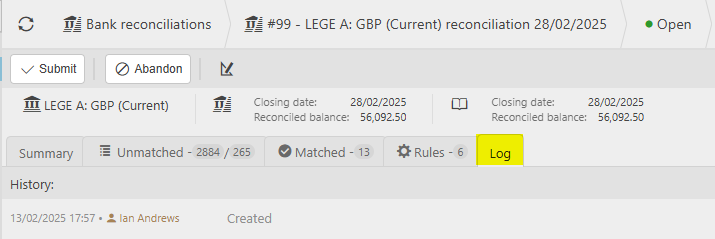
Bank reconciliation
Bank reconciliations are operations to reconcile the system entry lines relating to their respective bank account statement (which can be created using different methods covered separately).
As with all reconciliations, the aim is to reconcile all transactions to justify whether they have been cleared or reported as outstanding at the end of the Period being reconciled.
The method of reconciling is a simple matching process where values must equal each other to become a match, this can be on a 'one to one' or 'many to many' basis.
There can only be one reconciliation in operation at a time, a warning will display if a new reconciliation is attempted while there is one in progress.
There are various reports for the reconciliation which can be run at any time including past reconciliation.
Prerequisites
Prior to undertaking Bank reconciliations there are various settings on other parts of the system, these are:
Quick Cash Book Templates (Optional)
Transfers (Optional)
How to view Bank Reconciliations
Viewing a Bank Reconciliation
Either select Reconciliation from the Bank section in the pulse menu -

Note
This is an example screen shot of the pulse menu.
Position of the menu items within pulse will vary according to available options and dependant on personal screen resolution.
or from the Main Menu select Bank then Reconciliation -

or enter Bank reconciliation in the Quick Launch Side Menu.

This will then show the Bank reconciliations on the system where normal customisation of Sets can be used and viewing using the Trees options.

Tip
To modify the columns displayed, select
 on the top right of the page, then tick/untick the information you want to hide or display.
How to start a Bank Reconciliation
Start a new bank reconciliation
Start a new bank reconciliation
Select Bank reconciliation from one of the options as shown above in Viewing a Bank Reconciliation and it will list existing bank reconciliations.
Press the New button.
The Create a new reconciliation screen will open where the relevant bank account can be selected.
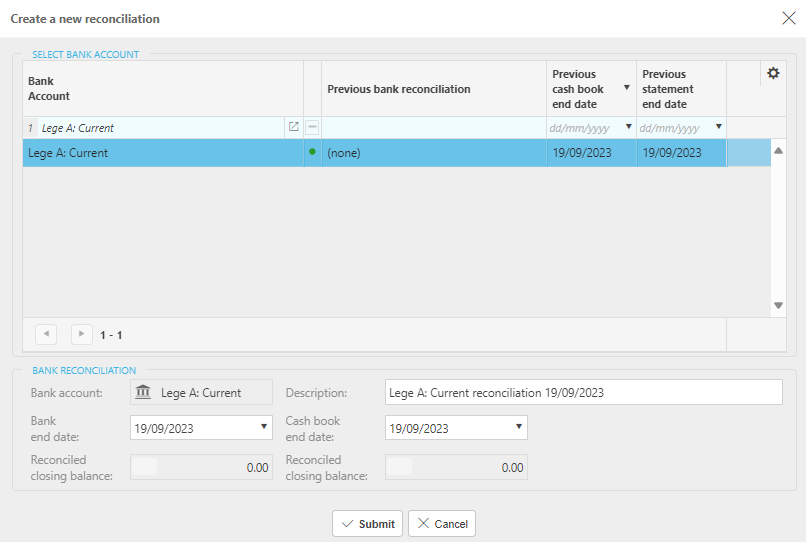
The details of the currently selected bank account will display at the bottom of the screen with the following fields shown:
- Description - Automatically pre-populates the Title for the reconciliation with today’s date which can be over-written if an alternative description is preferred.
- Bank end date - Defaults to today’s date to list all transaction up to this date on the Bank section of the reconciliation screen.
- Cash book end date - Defaults to today’s date to list all transaction up to this date on the cash book section of the reconciliation screen.
- Reconciled closing balances - The current reconciled balance for the bank Account & Cash Book which should always equal each other.
Select Submit to create the Bank Reconciliation and opens the Reconciliation page.
The main tabs of the Reconciliation page will display relevant information relating to the reconciliation.
Displays summary details of the values for the reconciliation, which automatically update throughout the duration of the operation when changes are made.

Making Manual Adjustments
If you want to check the figures in lieu of something being posted in the bank or on the bank statement, you have the option of making Manual adjustments.
To make a Manual adjustment on either the Bank statement or the cashbook, select the
 icon on either of the closing date fields on the Summary tab.
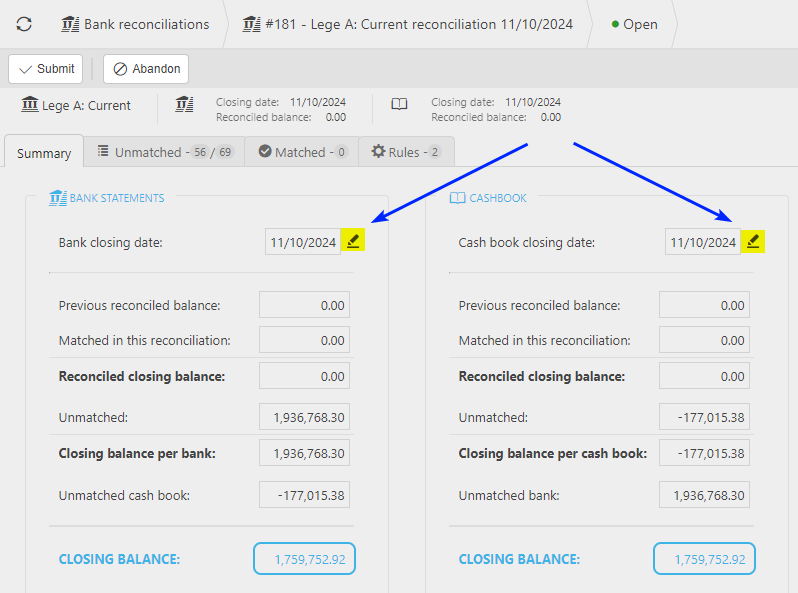
Enter a manual adjustment for the bank or cash side of the bank rec, then select Apply.
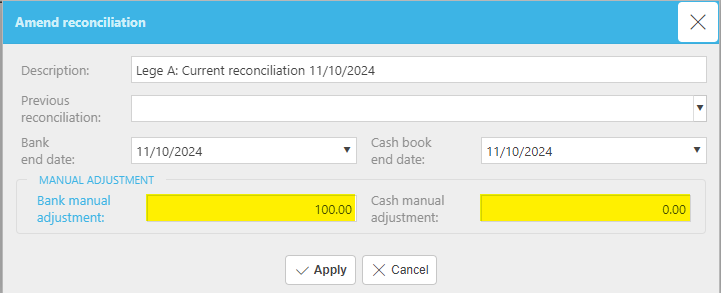
Any adjustments made will then show on the Summary tab.
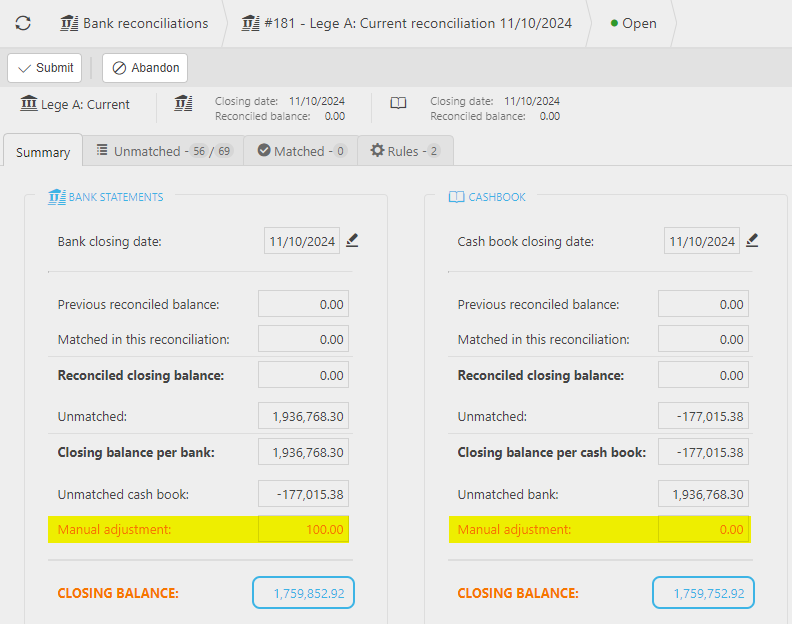
These adjustments will not make any postings in the system and so it is purely used for changing the figures on the summary screen.
How to match Bank Transactions
Matching Transactions
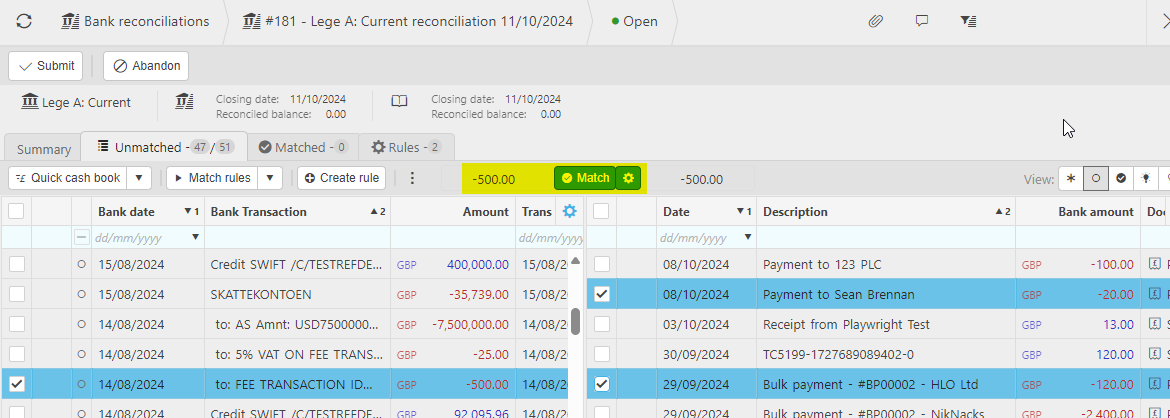
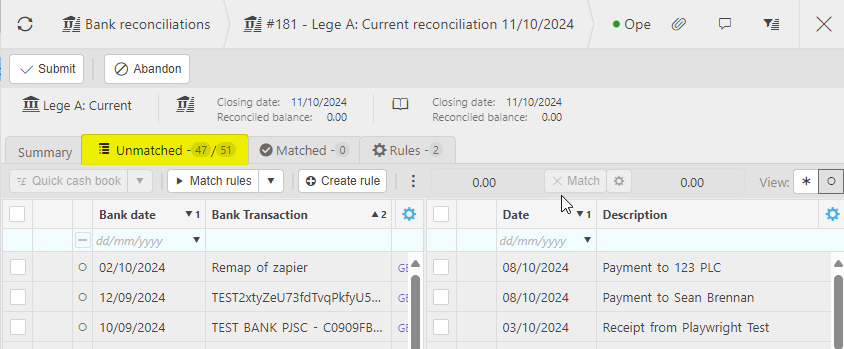
The process for the bank reconciliation is to match entries on each panel.

Selecting a transaction on the Bank Statement will show the amount in the heading panel and, in amber text, the amount that needs to match from the Cash book column.

Selecting a match from the Cash book column where there is an equal balance the Match button becomes available. This could simply be a one-to-one transaction on each panel or a many-to-one transaction.
Tip
You can also create a match within the same section, e.g. transactions that were reversed in the 'Cash Book' or 'In & Out' entries on the bank statement such as bounced cheques.
Selecting the Match button
 will confirm the reconciliation and the related transactions, they will then move to the Matched tab.
Where the system can identify any transactions on both columns that could be a possible match, they will display the findings with a lightbulb icon
 (any numbers displaying alongside the icon
  shows how many possible matches there could be).
Clicking on the lightbulb will filter the opposite list to the possible Matches.

Note
Clicking on the X will remove the filter.
Any transactions that have been moved to the 'Matched' tab can be retrieved by selecting the appropriate line and then selecting the Unmatch button, this will return them to the Unmatched tab.

The columns can be filtered, sorted or searched using the header line on each column.
How to make Foreign Payment Adjustments
Foreign Payment Adjustments
If there any differences at the time of matching foreign transactions the Foreign Exchange Gain or Loss can be adjusted without having to leave the screen. This is only allowable if the settings on the Bank account allow for this and the difference is within the tolerance limit - select Bank Account to view these settings.
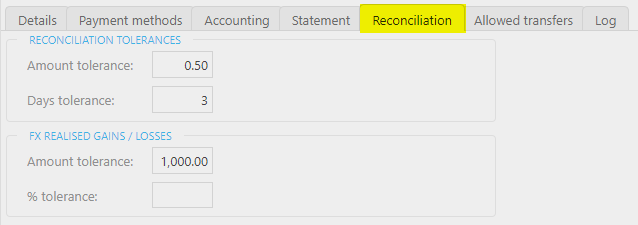
With both sides of the transaction matched, if the amount is within the tolerance the matched balance will display in Amber, signifying there is a match, but the balance does not equal zero.

Clicking on the Amber FX button
 will display the Match + Realised FX screen which will be pre-populated with the information from the Cash Book and Matched transactions.
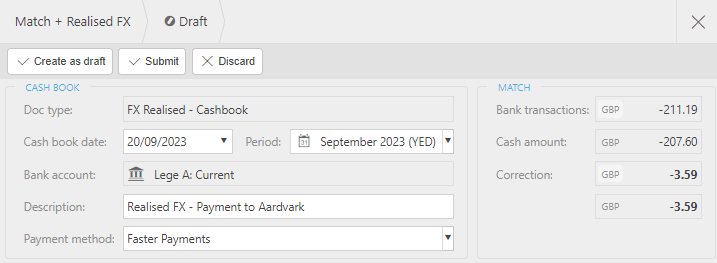
Once Created this will complete the nominated document type transaction which will be created, posted and the relevant transactions will move to the Matched tab.
How to create Transactions Directly from the Bank Reconciliation screen
Creating Transactions Directly from the Bank Reconciliation screen
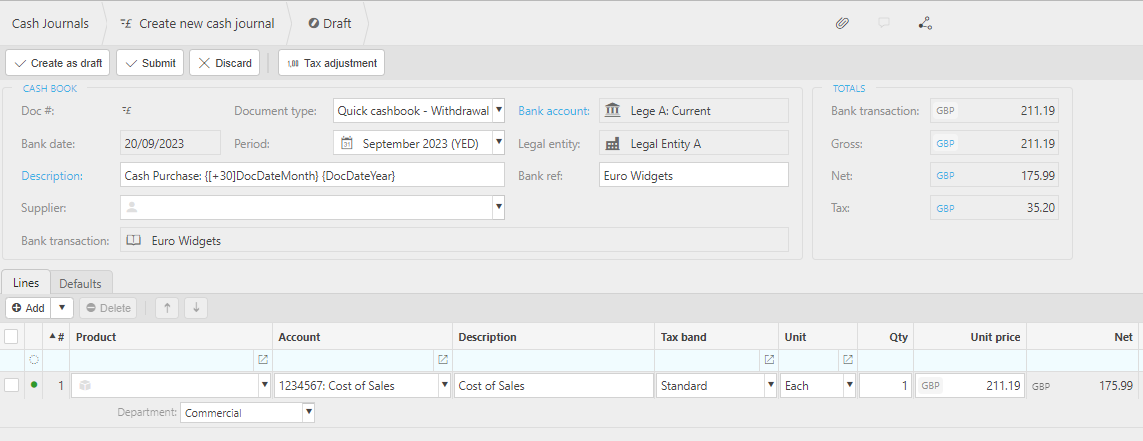
Selecting the Quick cash book button displays any previously created quick cashbook templates for selection with their respective pre-populated details.


Selecting one of these templates will then show a Cash Journal with fields pre-populated. e.g.
Tip
The system will only display income or expense type templates depending on whether the highlighted bank line is a Deposit or Withdrawal. If the Bank description matches the template description it will apply a filter to save searching for the correct one.
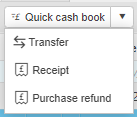
Selecting the down arrow on Quick cash book will display the options to create a bank Transfer, Receipt, Cash sale or Purchase refund -
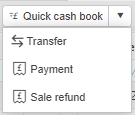
or Transfer, Payment, Cash sale or Sales refund -
depending whether the highlighted line is a deposit or withdrawal.
Transfers: These can only be created from/to bank accounts with the relevant Allowed transfers set on the Bank account - select Bank Account to view these settings.

Receipts or Payments: These will display the normal input screen. Depending on the settings they may require an allocation as part of the entry.
Cash sale or Cash purchase: If the User has Cash Sale/Cash purchase create permissions, these can be processed directly from this bank rec. (rather than the cash sale/cash purchase being created separately and then matched to the bank transaction).
How to create Write Offs
Write offs
Although generally the bank amount should equal to the penny the amount of the transaction there may be occasions where the difference is a simple write-off, such as in the case of a customer underpaying by pence which was not picked up at the time of entry but where it is simply not worth un-allocating transactions and leaving penny balances on account.
Therefore, as part of the bank reconciliation the amounts can be written off without having to leave the screen. This is only allowable if the settings on the Bank account allow for this and the difference is within the tolerance limit - select Bank Account to view these settings.

With both sides of the transaction matched, if the amount is within the tolerance the matched balance will display in Amber signifying there is a match, but the balance does not equal zero.

Clicking on the Amber Match button will display the Match + Penny Difference screen which will be pre-populated with the information from the cash book and match fields.

Once Created this will complete the nominated document type transaction which will be created, posted and the relevant transactions will move to the Matched tab.

How to create Reconciliation rules
Reconciliation rules
Rules can be created to simplify the matching process for regular transactions that cannot readily be identified to each other. As an example, this may be a payment on the cashbook as 'British Telecom' which has a description on the bank statement as 'BT'.
Selecting the Create rule button on the Unmatched tab displays the screen for the relevant information to be entered.

The mandatory Amount & Bank Date lines will already be displayed with the default settings from the bank account for the Tolerance & Days (this can be amended).
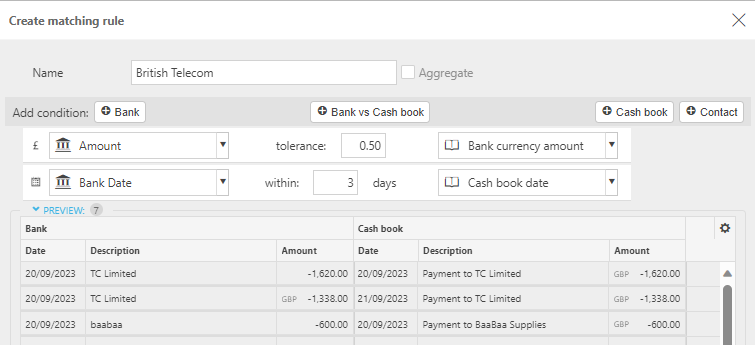
Additional lines for the Rules can be added by selecting any of the Conditions.
- Bank
- Merchant
- Bank vs Cash book
- Cash book
- Contact
The parameter and details can be added for the condition.
- Equals
- Contains
- Starts with
- Ends with
The Preview section will display any lines on the current reconciliation where the lines meet the specific criteria.
Selecting Apply creates the Rule and if applicable Matches any lines in the preview section.
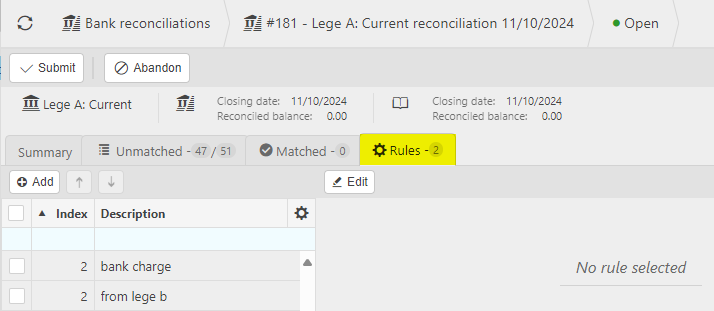
Each time a new bank reconciliation is created selecting the Match rules button will identify & match any transactions as per the existing rules.
Tip
Rather than key the information in manually. Highlight the appropriate rows on the bank reconciliation screen and select the Create rule button. This way more of the information is pre-populated.
Selecting the down arrow will display the Match suggestions button. If selected this will try to identify any similar transactions and highlight them in green. Selecting the Match rules button will complete the process.
Rules can be removed if no longer required by highlighting the relevant line and selecting Delete.
Updated October 2025
 .
.

 .
.
 .
.