Email Accounts
Email accounts are required to be able to Communicate from the system to both internal and external contacts e.g. Sale invoice to a Customer or an email notification of outstanding Authorisation Tasks.
The email used will vary depending upon the Communication e.g. sales invoices sent from accounts@domain.example and credit control sent from creditcontrol@domain.example.
Upon sending an email, both the Communication log and Email log will be populated.
How to view email accounts
View email accounts
To view Email accounts, either select Email accounts from Email & Communications in the Settings section from the pulse menu -

Note
This is an example screen shot of the pulse menu.
Position of the menu items within the pulse will vary according to available options and dependant on personal screen resolution.
or enter Email accounts in the Quick Launch Side Menu.

The screenshot below shows a sample grid of the Email accounts, which includes some key information.

Information shown is self-explanatory.
Tip
To modify the columns displayed, select
 on the top right of the page, then tick/untick the information you want to hide or display.
How to create email accounts
Create a new email account
Open the Email accounts menu from View Email accounts above.
Click New on the email account finder.

Fill in the Description.
Note
This can be an email or just a description, as you prefer.
Select the email Provider:

Warning
The existing process to send emails via SMTP is due to be disabled by Microsoft in 2025. So, to prepare for this it is recommended that users stop using their existing provider in favour of the GraphAPI one.
Note
If the Provider is read only then you need to Revoke the authorisation, amend the provider and re-authorise the email account.
Change consent to allow iplicit to send emails on your behalf by entering your preferred provider and making the changes.
Gmail

Outlook, Microsoft 365

Enter a Valid from date. This is the date that the email will be available from
Enter a Valid until if applicable. This will typically be left blank.
Select the Availability.

Tip
Availability options:
Environment: This setting will allow the email account to be hard-coded on a communication
Legal Entity: This will restrict this email for use only with "Communication FROM parameters"
User: This is an email account which can be used specifically for a user.
Fill in the Send from field. The email chosen here will be the email address used to send emails from the system (typically this will be the company finance email).

Include CC and Include BCC: This will be the email addresses that receive a carbon copy of outgoing emails. This is a useful tool for ensuring emails are formatted correctly.
Log only box: If this box is ticked, emails on this setting will not be sent however they will be logged on the email log.
Override: This feature can be used to redirect all outgoing emails to a specified email. This feature should be used when testing the email settings are setup correctly, or in a sandbox or training environment to ensure no emails are being sent accidentally while testing.
Select Save
Select Authorise

Tip
You can authorise as yourself without needing the email credentials of the email account being setup.
How to set up the Office 365 Graph API email provider in Microsoft Entra ID
Setting up the Office 365 Graph API
Grant and manage consent to iplicit for Outlook Mail app permissions
- This document outlines the process of granting admin consent for the iplicit for Outlook Mail app in Microsoft Entra ID and setting up users to access it.
Prerequisites: You must be a Global Administrator or Privileged Role Administrator in your Microsoft Entra tenant.
Register the application and granting Admin Consent:
Copy the following link into your application.
Replace the {TenantId} value with the tenant id of your Entra AD tenant.
To find your tenant ID:
Go to the Azure portal.
Search for and select Microsoft Entra ID.
Your Tenant ID will be displayed under Basic information.
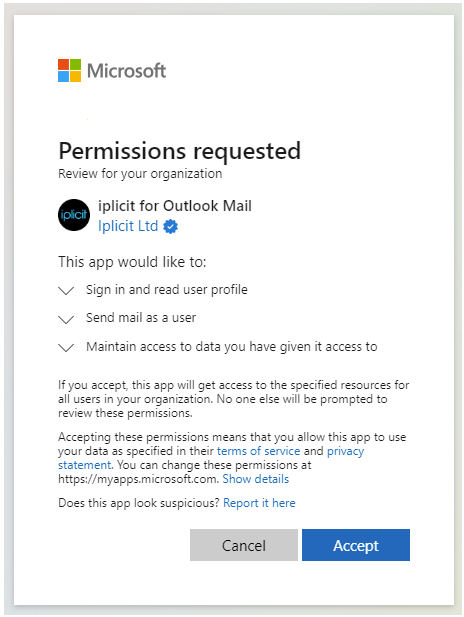
On opening the link, you’ll be presented with a screen to grant consent.
Note
The user granting consent will need the Global Administrator or Privileged Role Administrator role.
Click Accept to add the iplicit for Outlook Mail application to your tenant. The browser tab can now be closed. Note the permissions required:
Sign in and read user profile: Allows the iplicit mail provider to sign in as the user to send email.
Send mail as a user: Required to send email as the user.
Maintain access to data you have given it access to: Allows sending email without requiring the user to be logged in.

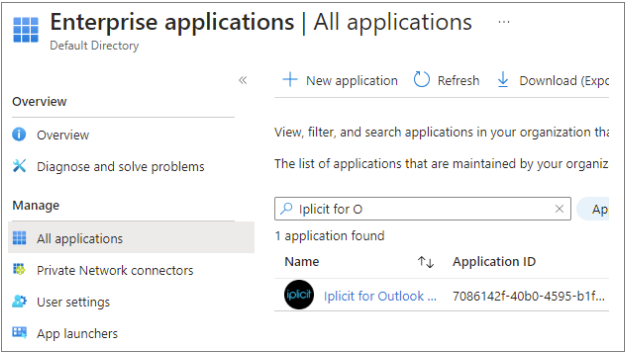
Once the permissions have been accepted, the iplicit for Outlook Mail application will appear in the list of enterprise application in your Entra Directory.

Setting Up Users
Once admin consent is granted, you can set up users to access the application. Follow these steps to ensure only authorized users or groups can send mail via iplicit:
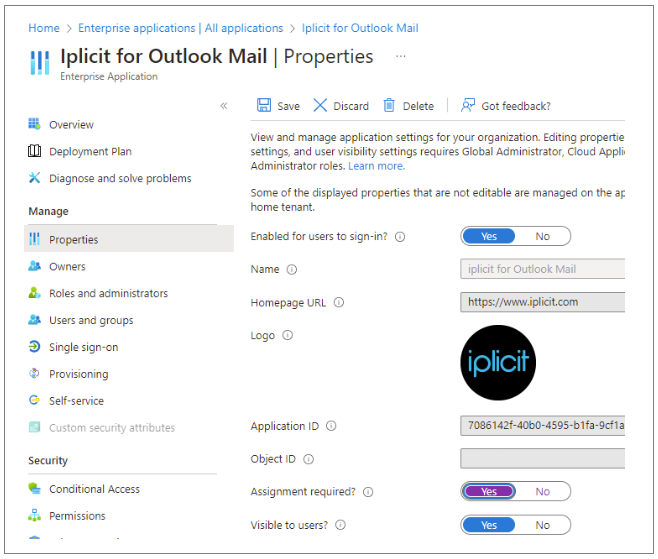
Set the Assignment required Property:
Go to the properties of the enterprise application.
Select Yes for the Assignment required option and click Save.
Add Users or Groups:
Navigate to the Users and groups property.
Click on Add user/group.
Choose the users or groups you want to assign to the application. These users will need to complete the rest of the setup via the iplicit website.
Click Assign.

The necessary permissions have now been setup in Entra AD for the Office 365 Graph API.
Authorising an Email Account in iplicit
Once the iplicit for Outlook Mail app has been granted the necessary permissions (consented to by an administrator), any user with access to the app can authorise it to send emails — provided they have access to the mailbox from which the emails will be sent.

If the authorising user is not the same as the "Send from" user (i.e., the mailbox that will send the email), ensure that the authorising user has the appropriate "Send As" or "Send on Behalf" permissions for that mailbox. These permissions can typically be configured in the Microsoft 365 admin centre or via PowerShell.

Additionally, the authorising user must have a valid licence that permits sending email, such as an Exchange Online licence.
How to test email accounts
Test an email account
- You may want to test an email account for security or operational purposes e.g. making sure certain emails are not being sent externally.
Tick the Use override box -

Enter the email address that will receive the test emails and include any other testing addresses in the email cc and email bcc fields.
Tip
You can set a subject prefix and a subject suffix that will appear at the beginning and end of the subject of the email for easier and more effective testing.
How to set the default email address
Set the default email address
- Where there are multiple email accounts setup, you will probably want to create a default email account for communications.
Select the email setting you would like to set as default.
Press Set default.

How to lock email accounts
Lock an email account
If you no longer wish to send emails from an email account, you can Lock it. This will disable the email account from there on.
Select the account to Lock, then press the
 icon.
icon.Press Lock.

How to delete email accounts
Delete an email account
Select the locked email account you would like to delete.
Select the
 icon, then select Delete.
How to search email accounts
Search for an email account
Use the search bar in the email account finder.

Enter the email account description that you are trying to find.
How to edit email accounts
Edit an email account
Select and open the email account you want to edit.
Tip
You can use the search bar to find a user.

Press Edit.

You can now make changes to the fields that turn white.
Updated August 2025