Budgeting
Prerequisites
For a User to be able to create and update the budgets and budget templates, or so that they only have access to update budgets from existing templates or create a budget from a previous budget, then they must have the Budget Supervisor V2 User role assigned - see User roles.
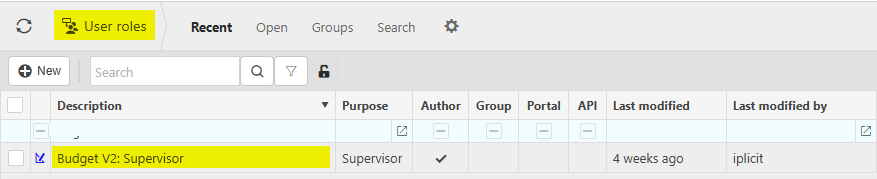
Budget Supervisor V2
This User role will have access to:
- Create budget templates
- Create new budgets
- Create a budget from a template
- Create a budget from a previous budget
- Update budget templates
How to view Budgets
Viewing Budgets
Select Budgeting / Budgeting from the Main section of the pulse menu -
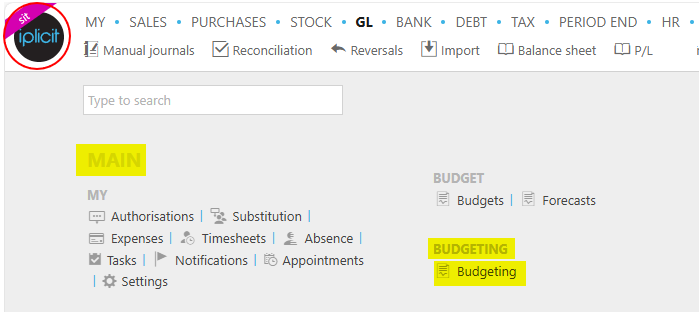
Note
This is an example screen shot of the pulse menu.
Position of the menu items within pulse will vary according to available options and dependant on personal screen resolution.
or from the Main Menu select Budgeting then Budgeting -

or enter Budgeting in the Quick Launch Side Menu.

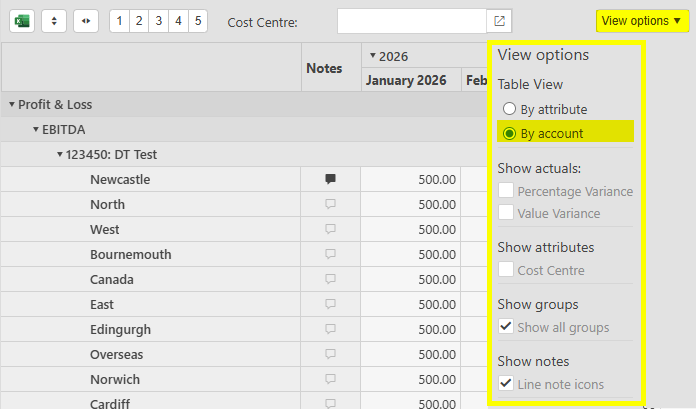
This will then show the Budgets on the system where normal customisation of Sets can be used.
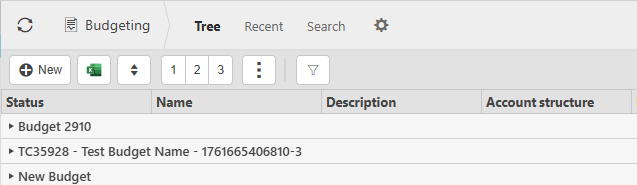
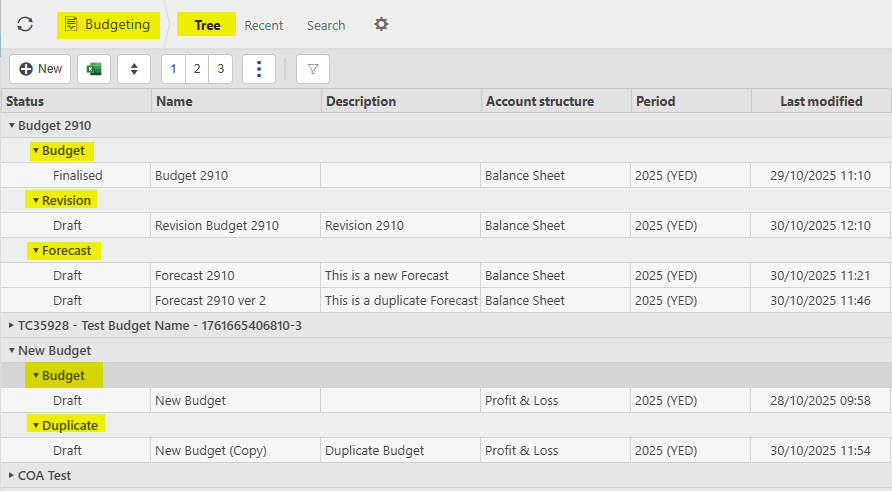
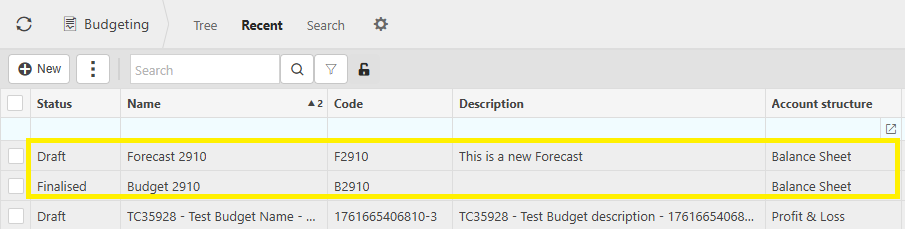
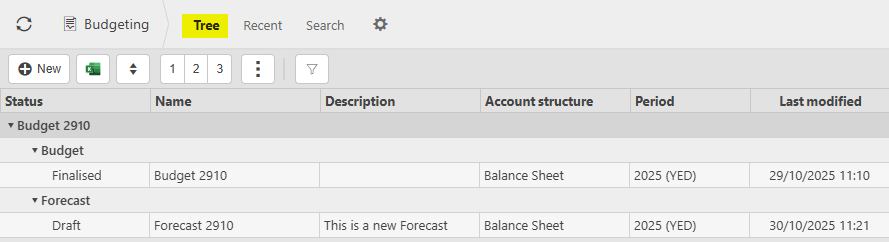
Selecting Tree will show a breakdown of Budgets along with any associated Forecasts, Duplicates or Revisions.
Tip
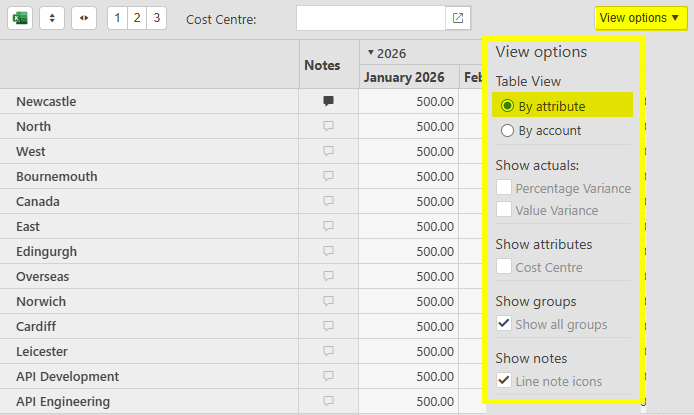
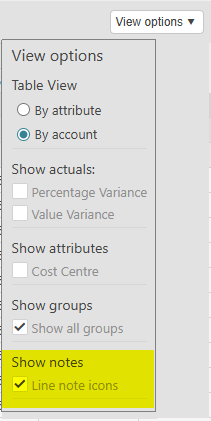
To modify the columns displayed, select  icon on the top right of the page, then tick/untick the information you want to hide or display. Select the
  icon to sort these in alphabetical order.
The following Default fields will show.
- Status (Draft, Pending authorisation, Finalised, Closed)
- Name
- Description
- Account structure
- Period
Other fields are available via the
icon.- Approved on
- Archived date
- Attributes
- Code
- Created date
- Currency
- Financial year group
- Last modified
- Last modified by
- Legal entity
- Special periods included
- Version
Any column customisations of settings will remain when logging out and back in again.

How to create a new Budget
Creating Budgets
Select Budgeting from one of the options as shown above in Viewing Budgeting.
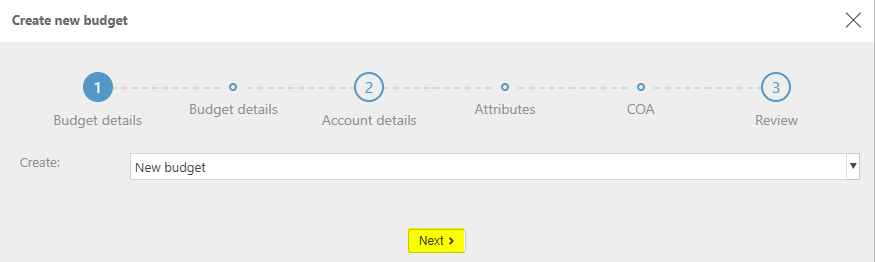
Select New.

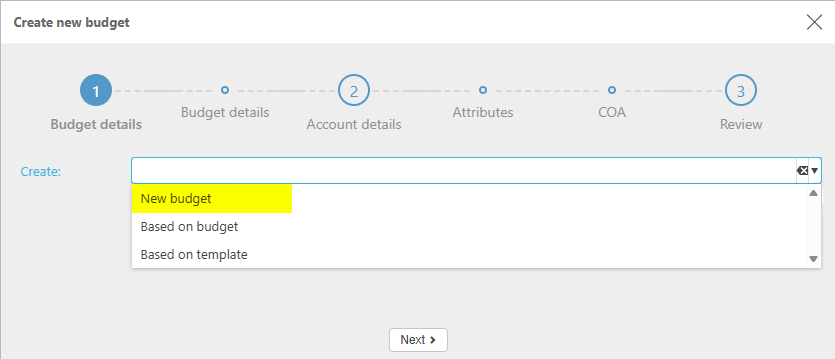
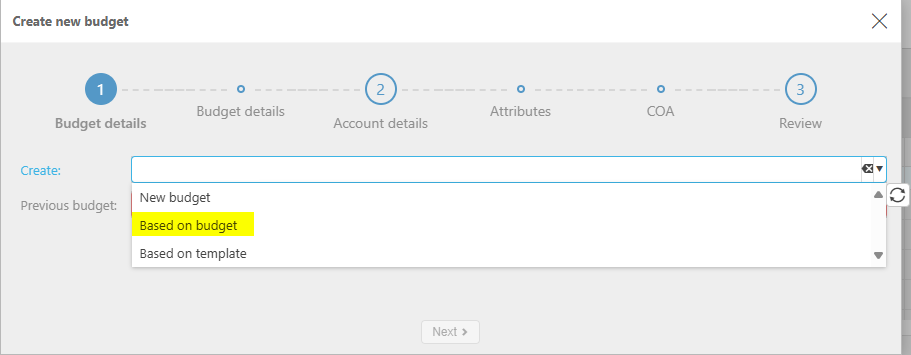
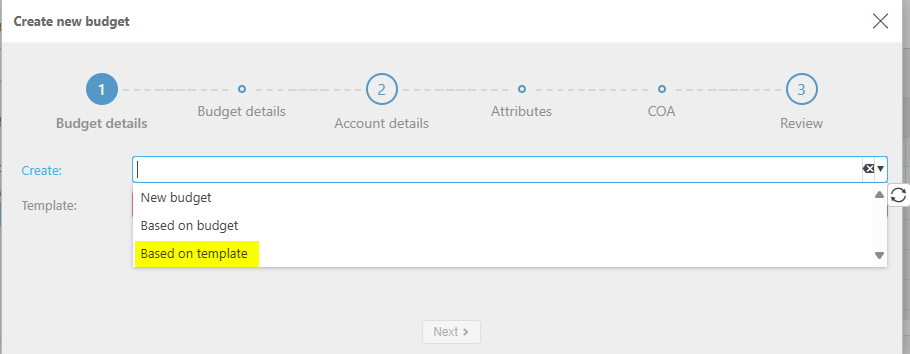
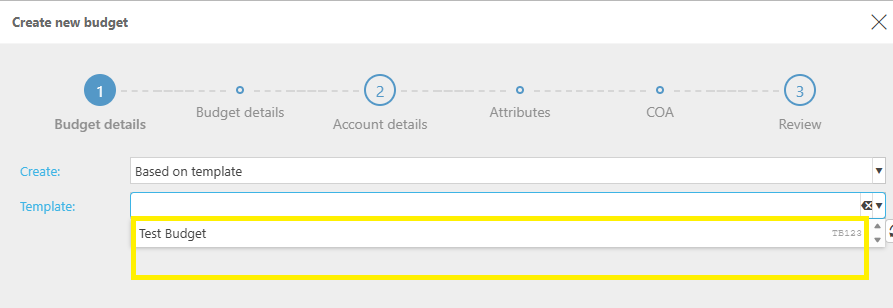
From the budget wizard, select one of the following options on Create.
Select Next.
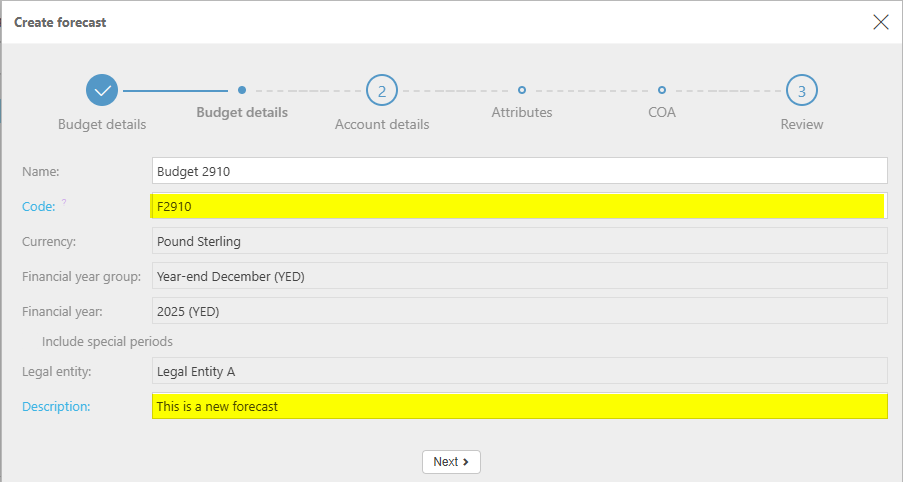
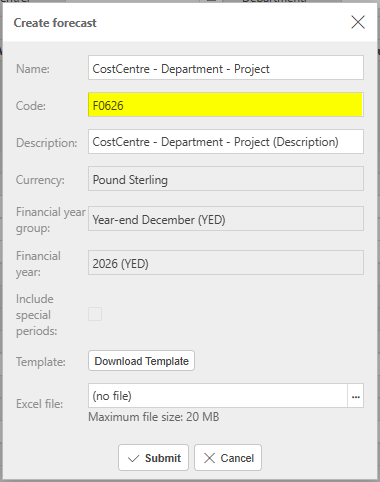
Enter the Budget details.
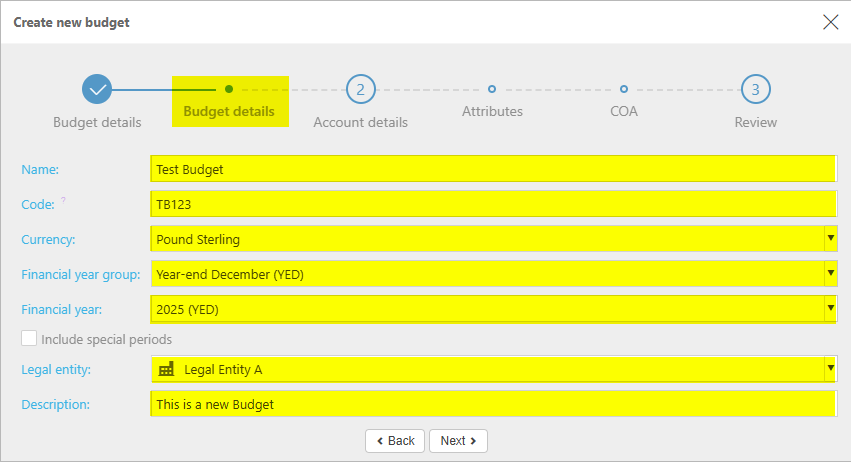
Name (Mandatory): Free text field (100 characters).
Code (Mandatory): Unique free text field (50 characters).
Note
Code must be unique for new budgets throughout iplicit.
If the Code is not unique, then when the Next button is selected the following message appears.
Please enter a unique code
Currency (Mandatory): Select currency from
 dropdown options.
Financial year group (Mandatory): Select group from
dropdown options.Financial year (Mandatory): Select year from
dropdown options.Include special periods: Tick box to include special periods - default is unticked.
Legal entity (Mandatory): Select from
dropdown options.Only Legal entities that the User has access to will be available. Legal Entity access is configured via DAC.
Note
Only Legal entities with the same currency as selected in the currency dropdown and those that are in the Financial year group selected will be shown.
Locked Legal entities will not show.
Description (Mandatory): Free text field (250 characters).
Select Next.
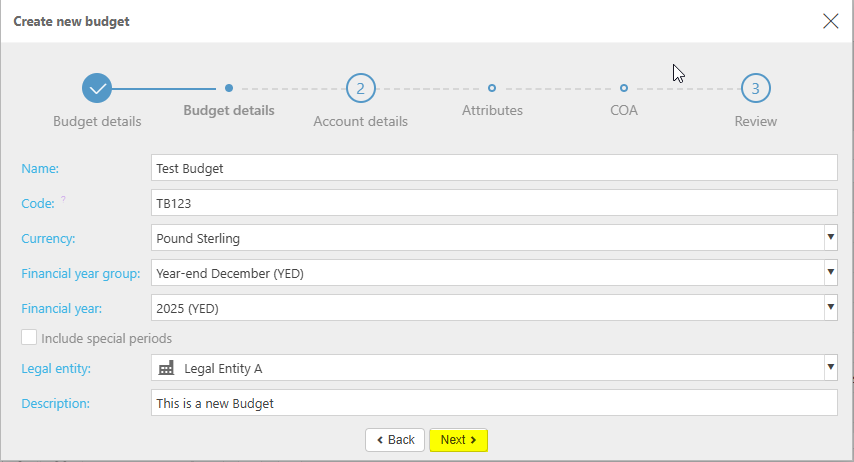
There is also the option to return to the previous screen by using the Back option.
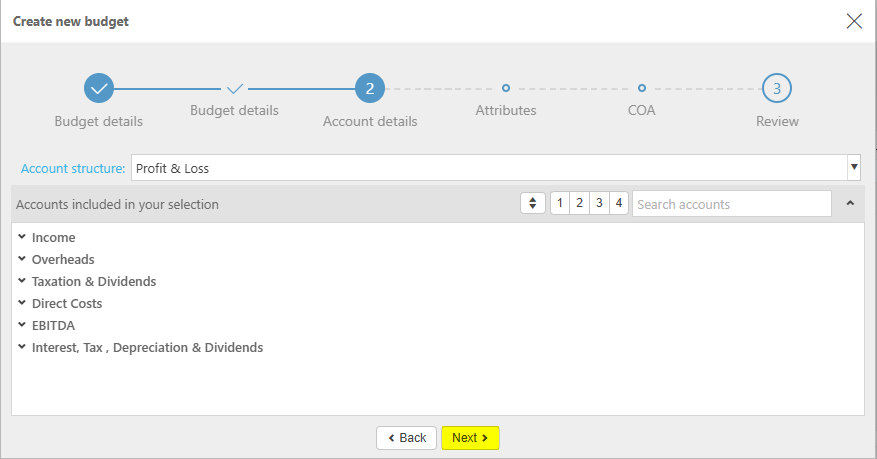
From the
dropdown options, select one of the accounting structures that the customer has set up within iplicit.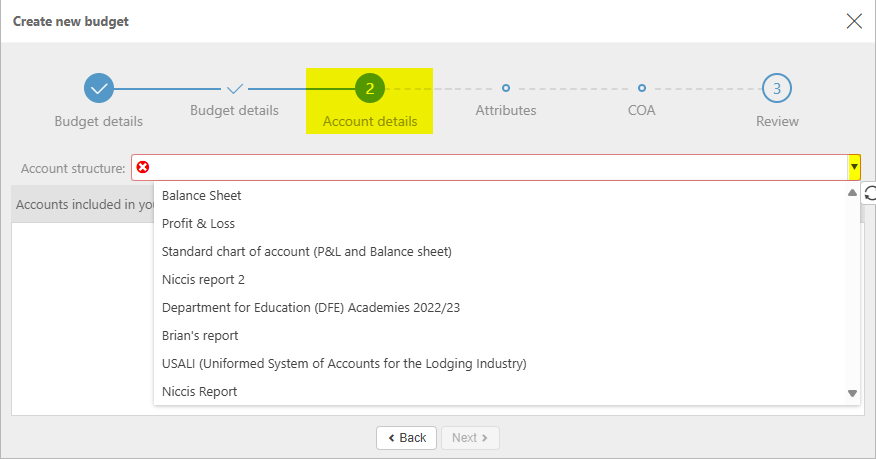
A read only view of the accounts of the selected structure will show with expand and collapse options to see more details.
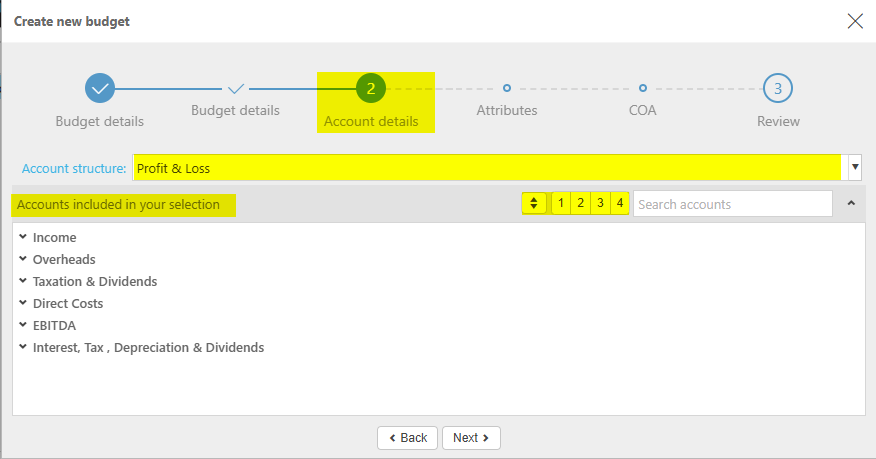
Select Next.
The next screen allows the selection of an attribute if required to budget at that level. This step is optional. Select Skip if no attribute is required.
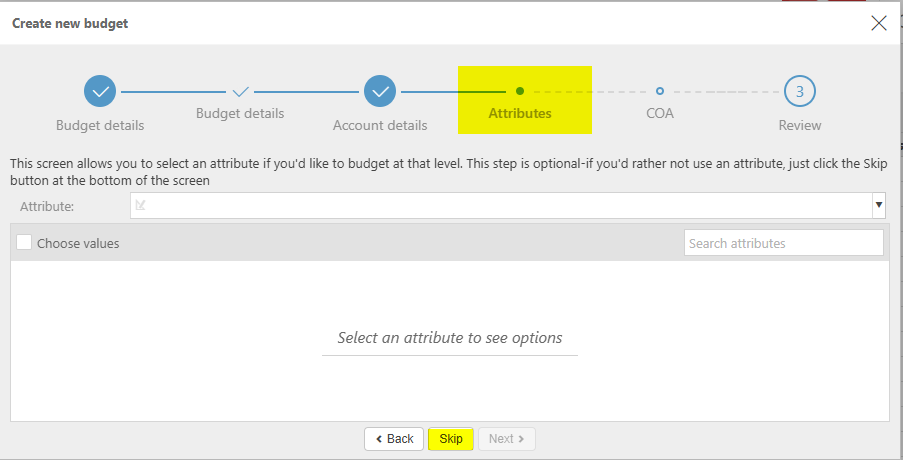
Select the
dropdown option to show the attributes that have been set up in iplicit i.e. Cost centre, Department, Project.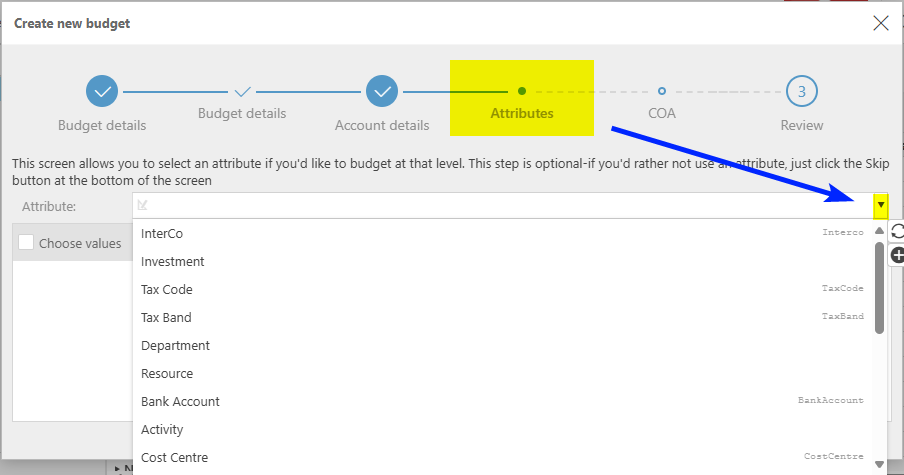
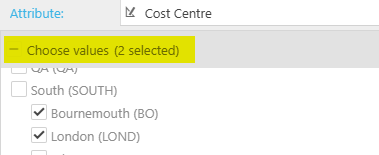
Once an attribute has been selected it will show a table with all the relevant values as set up in iplicit. The table will include the structure where Parent/ Grandparent exists.
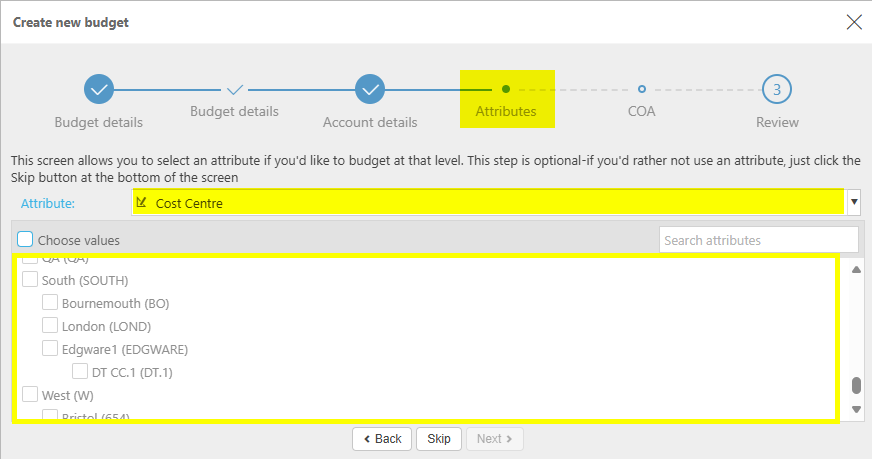
A search option is available to limit the values returned.
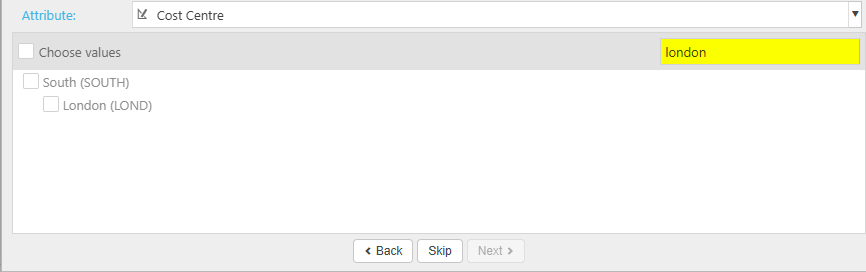
All values will include a check box so that multiple items can be selected -
Select all - shows a count of values selected

or select individual values - shows a count of values selected
Select Next - Next button will only be available once a selection has been made.

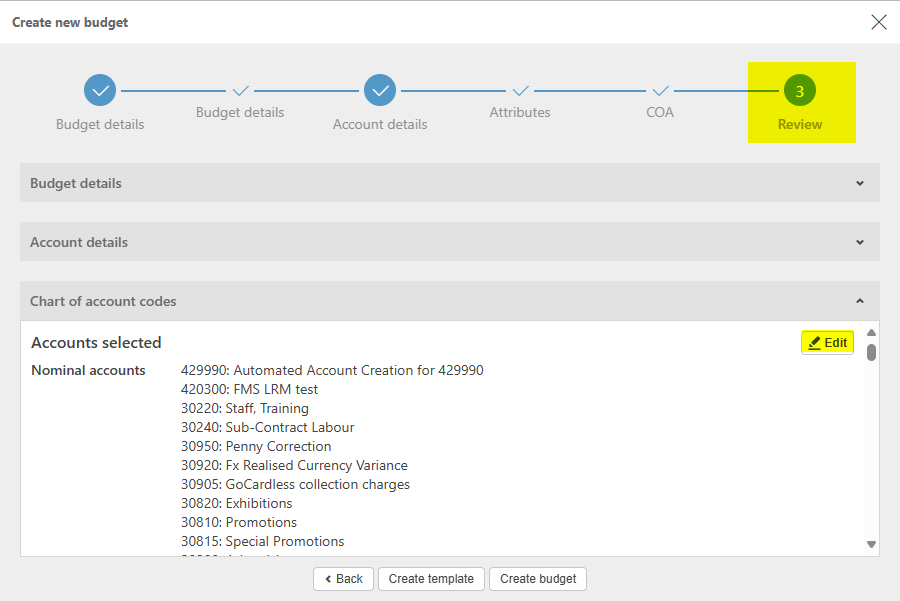
Select the nominal accounts to budget against, so that reporting can be consistent.
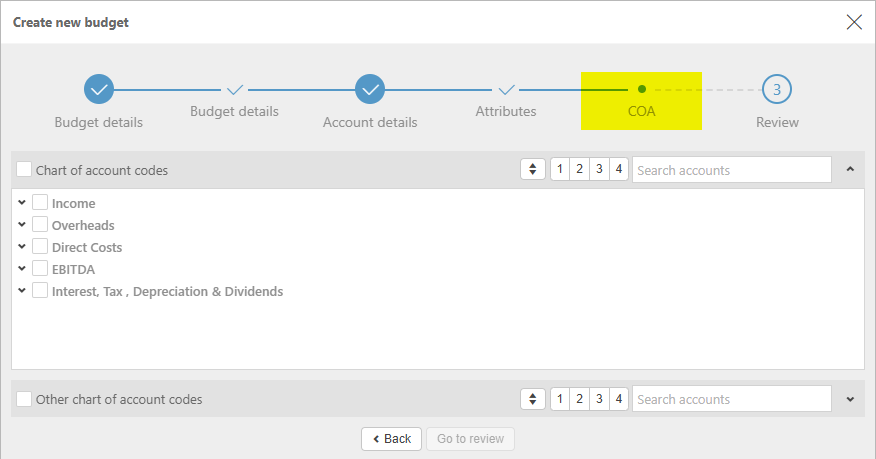
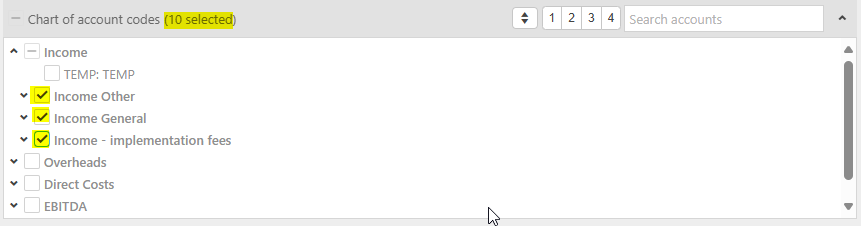
Chart of account codes
These two sections show a list of the chart of account codes, relevant to the account structure that was selected. The top section shows accounts that use the selected attribute within the Chart of Account rule; the bottom section shows those that don't.
It includes any nesting and tree structures relevant to the attribute selected with tick boxes to be ticked if required.
There is also a search option and the normal 'Collapse'/'Expand' chevrons.
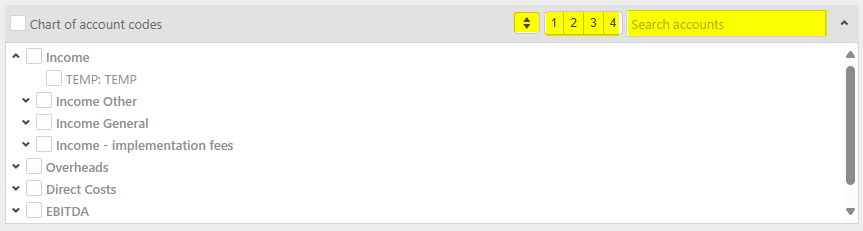
Chart of Accounts will include a check box so that multiple items can be selected -
Select all - shows a count of Chart of Accounts selected

or select individual Chart of Accounts - shows a count of Chart of Accounts selected
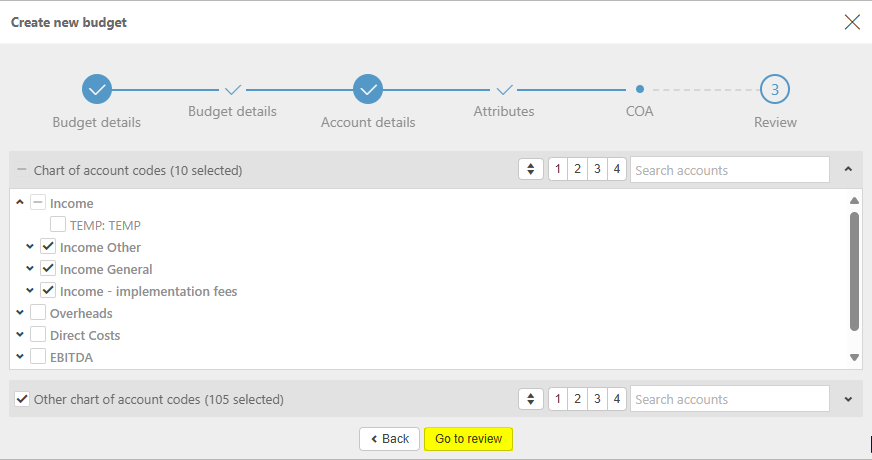
Other chart of account codes
This includes a list of all nominal accounts that are not included in the top section and, by default, will be in a collapsed state. The number of nominals selected will be shown in brackets.
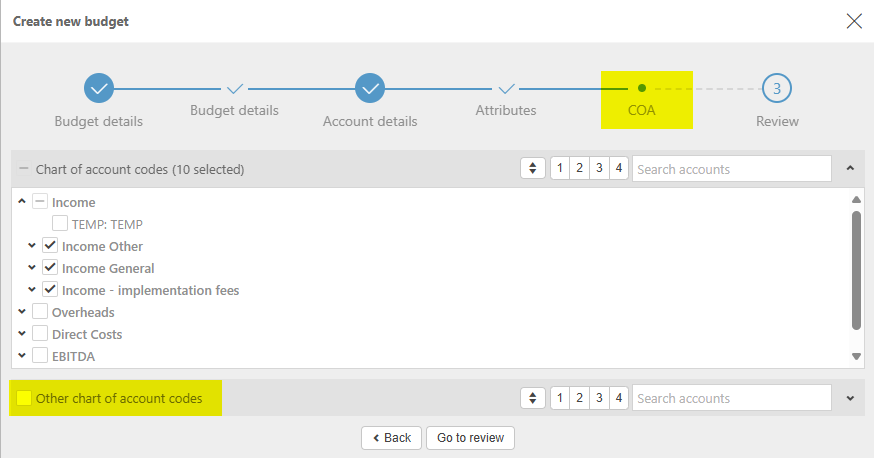
There is also a search option and the normal 'Collapse'/'Expand' chevrons.
Accounts are displayed in a tree structure with tick boxes on the left.
Where a grandparent is selected the parent and children will be marked as selected.
Children accounts may be deselected; this will not deselect the parent/ grandparent.
Where a child account is selected, the parent is not selected.
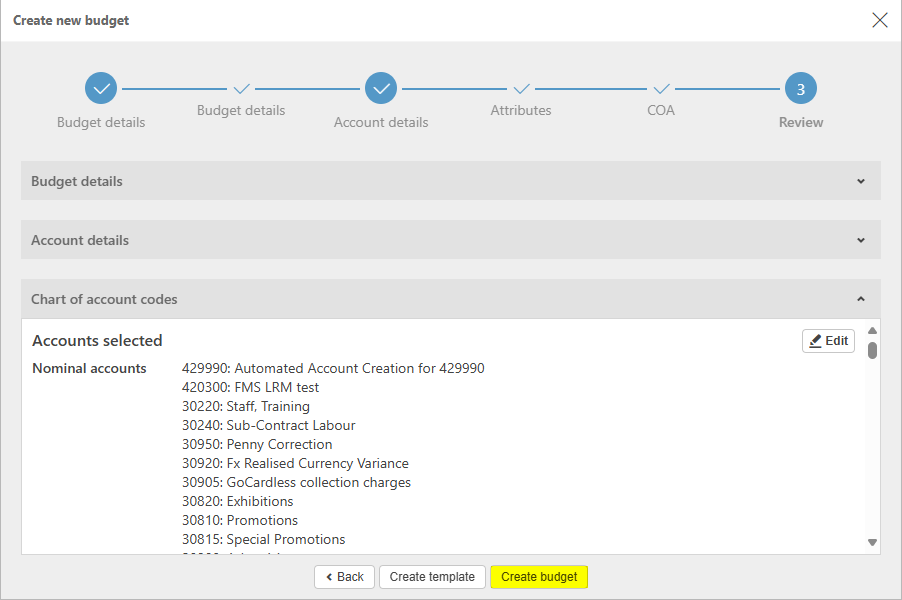
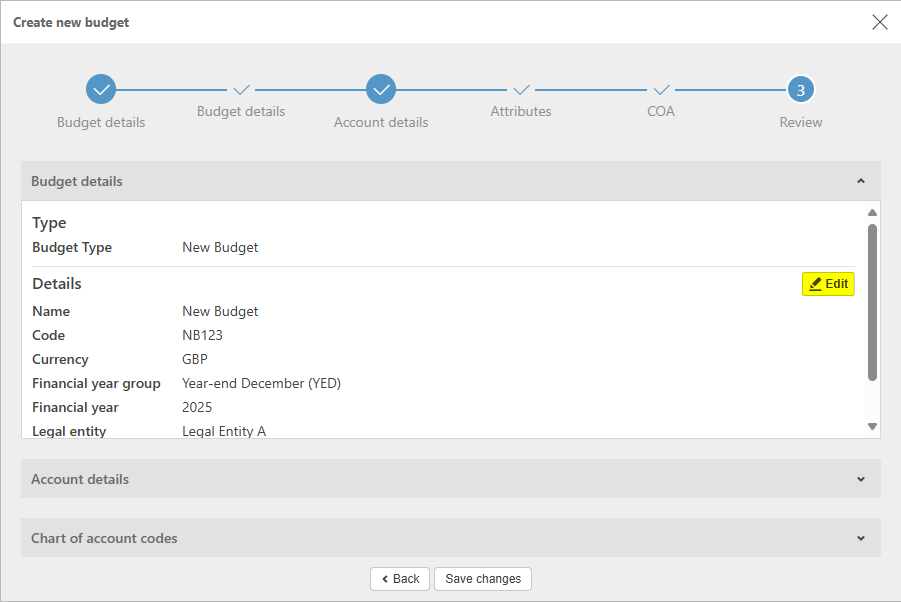
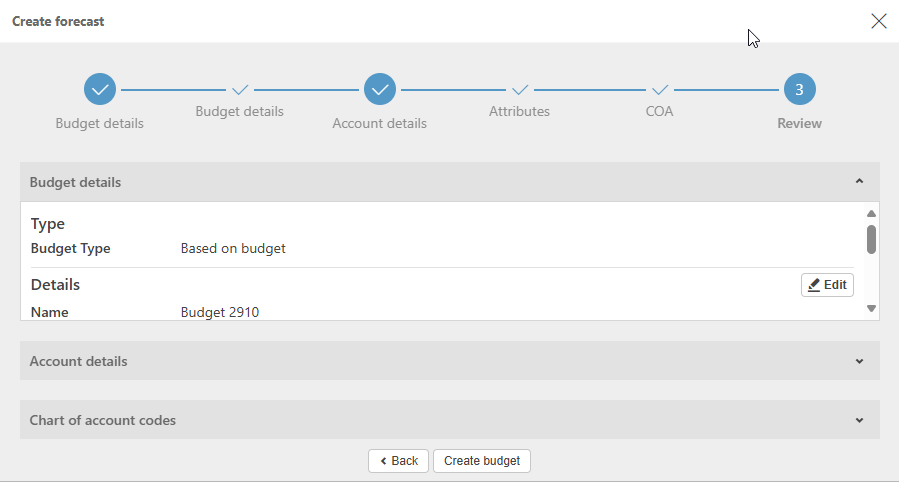
Select Go to review.
Review section shows all requirements entered and allows for any editing before the final creation.
Budget details
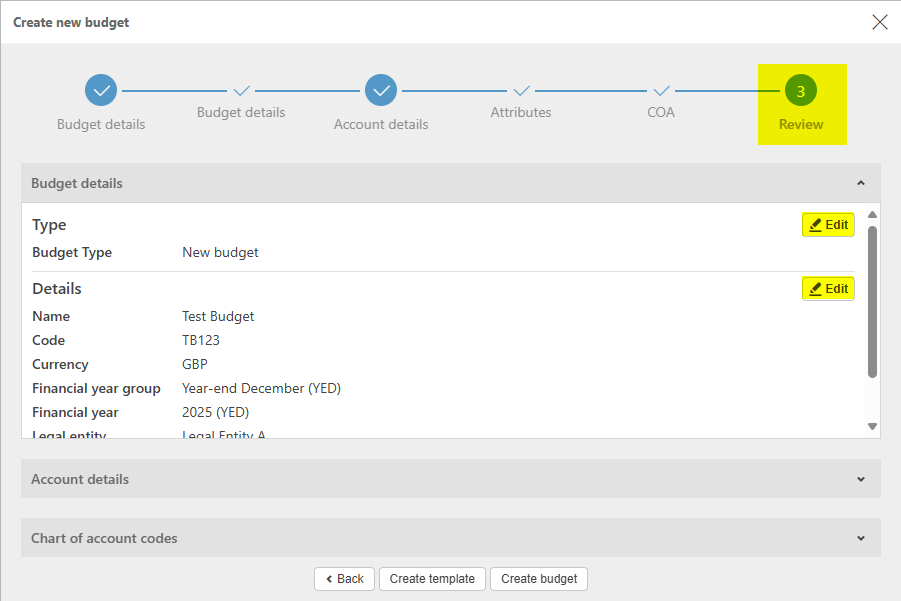
- Use side scroll bar to see all data.
Account details
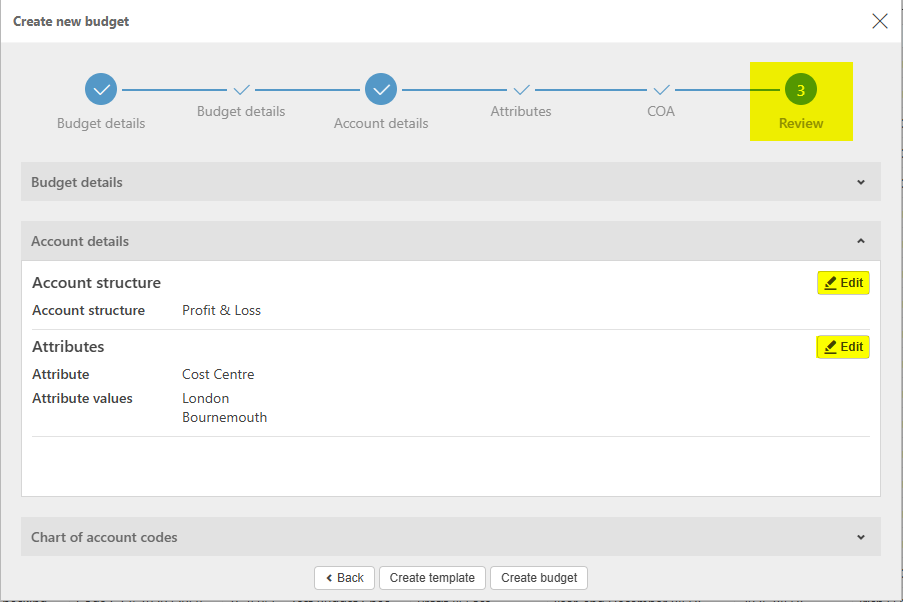
Chart of Accounts
Select Create budget.
or select Create template ...
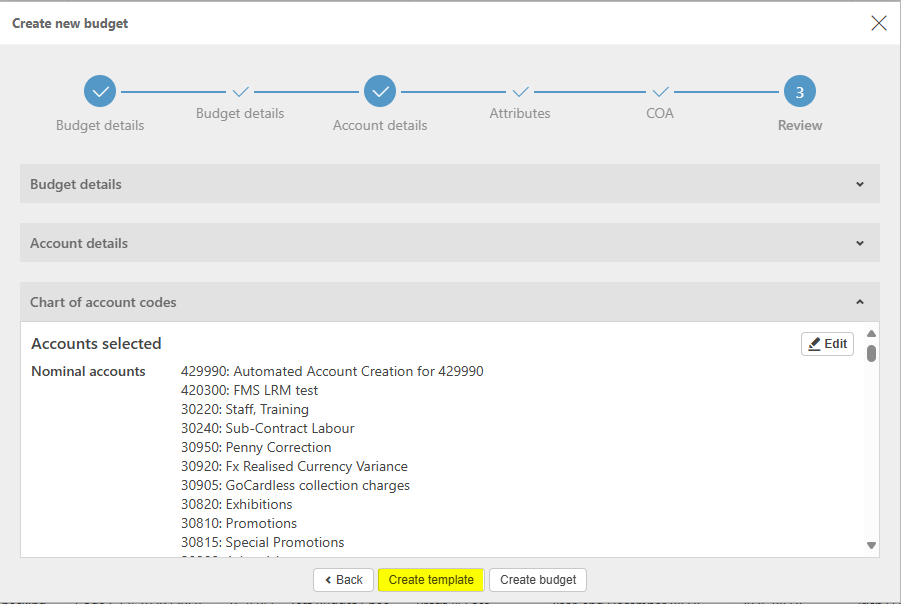
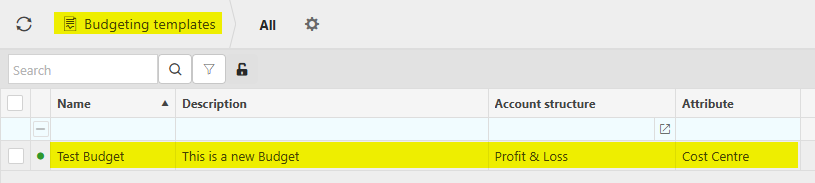
to create a template which will then be seen via the Budgeting templates finder menu.

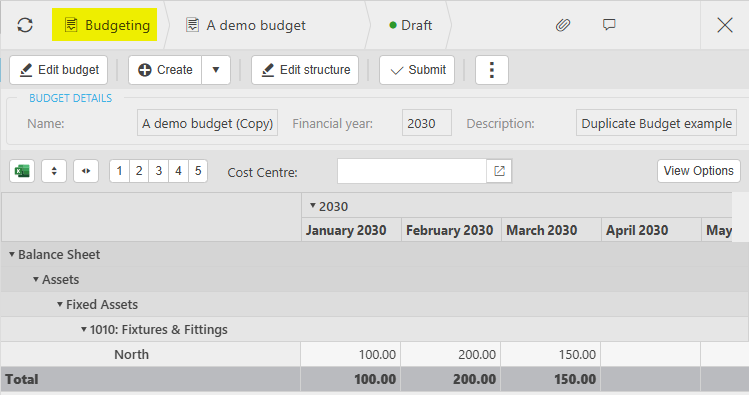
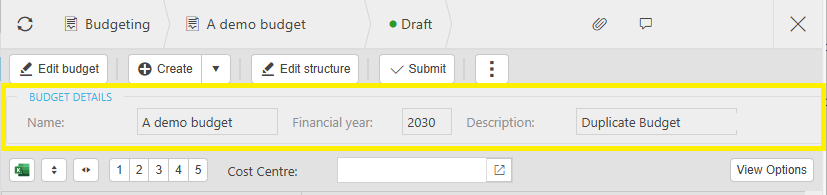
How to create a Duplicate Budget
Create Duplicate Budgets
Select Budgeting from one of the options as shown above in Viewing Budgeting.
Select and open the draft Budget to duplicate.
Select Duplicate from the
option on Create - Forecast will be greyed out as it is only available on a finalised budget.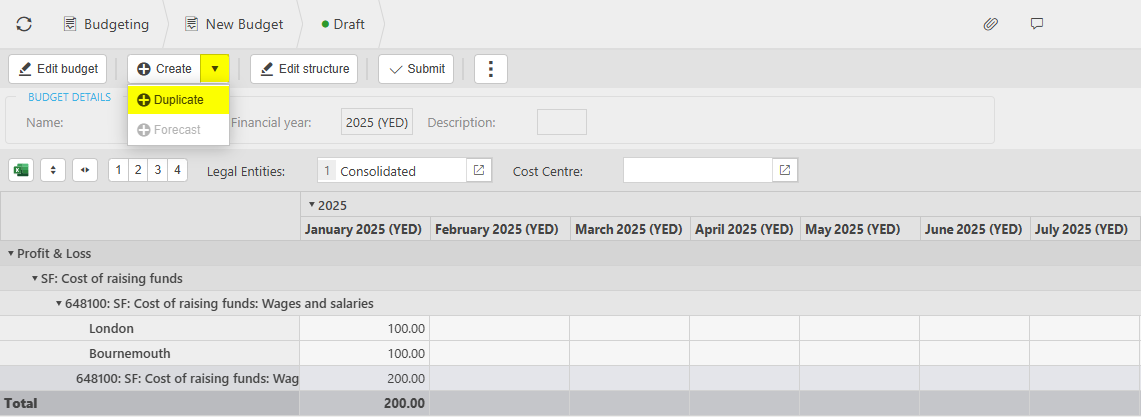
Next screen prompts for a unique code, and this has to be entered to be able to progress further.
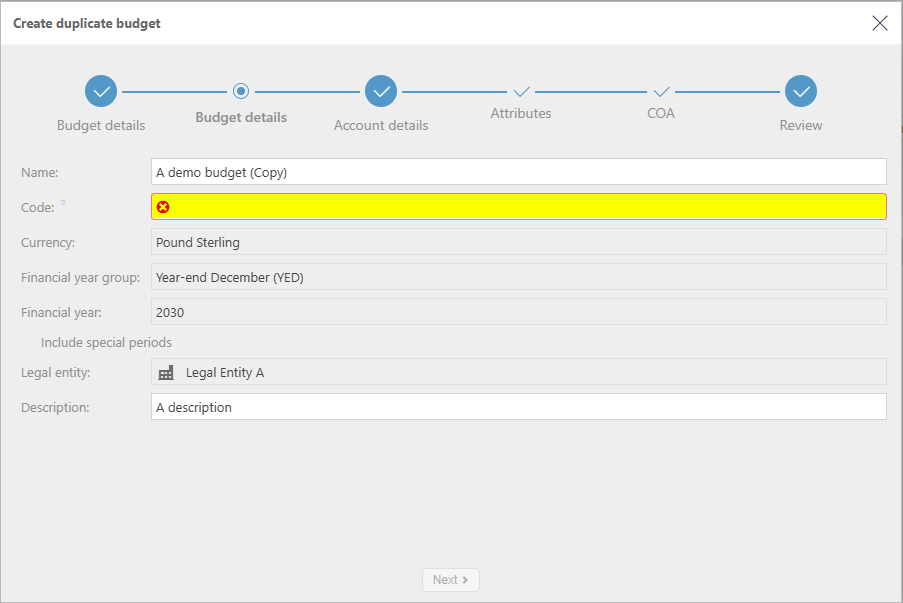
Enter a Code, a new Description, then select Next.
Move through the Budget wizard and edit Budget details for this new duplicated budget.
Select Create budget and the Duplicated Budget will now show in the finder menu.
Warning
If there is already a finalised budget within the same group, then the following message will show, and you will be returned to the budget input page.
A finalised budget already exists for this Financial year group, period/s and legal entity/ies. Use the revision option to create a new finalised budget
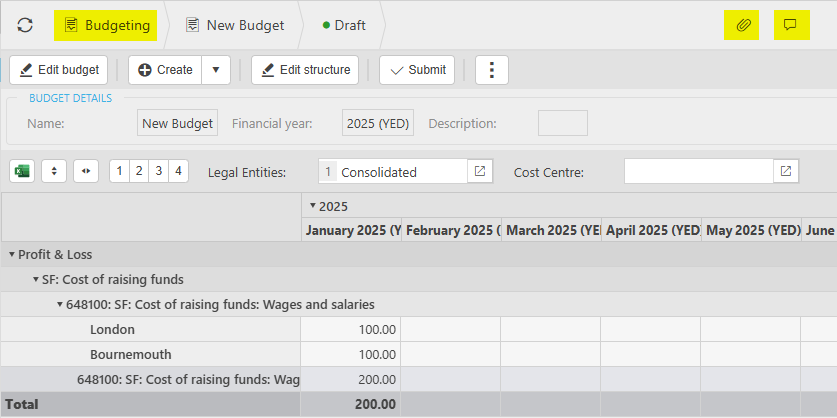
How to edit Budgets
Budget editor
Select Budgeting from one of the options as shown above in Viewing Budgeting.
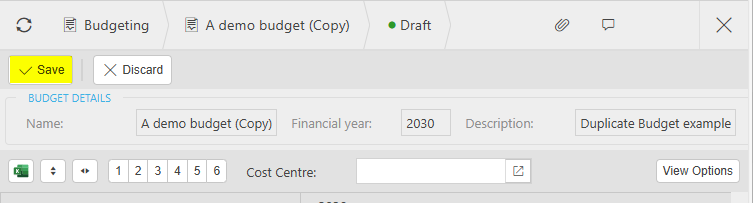
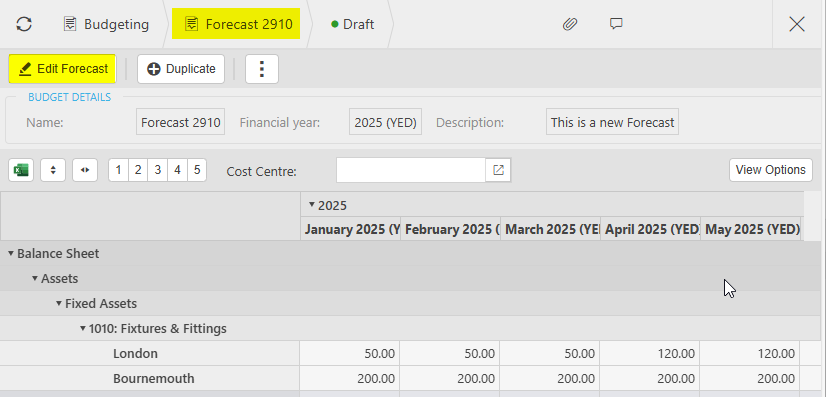
Select and open the Draft Budget to edit - The same screen will show once Create budget is selected from creating a new Budget.
If data has already been entered, then the Submit option will also show.
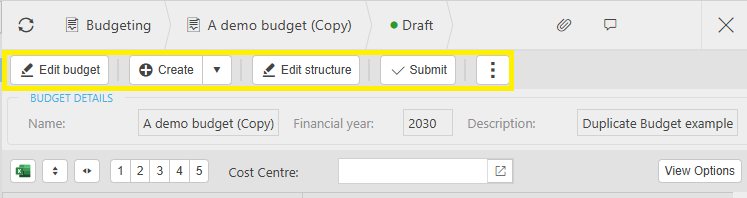
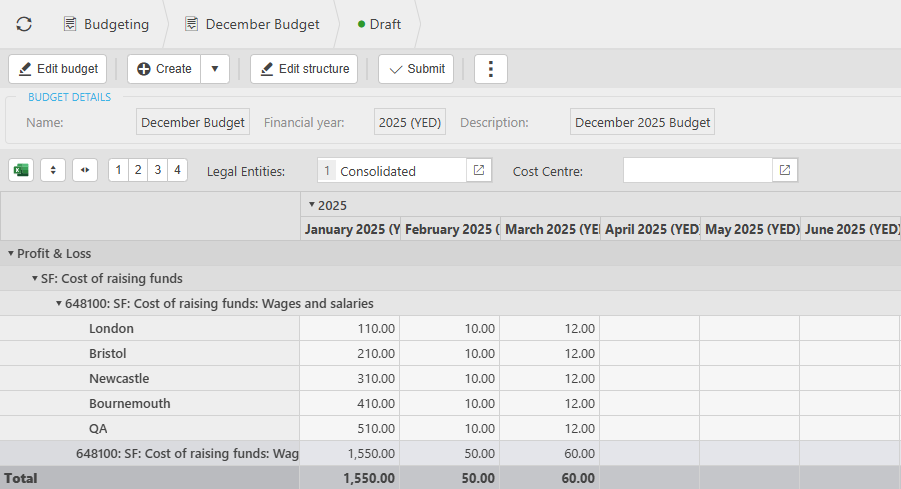
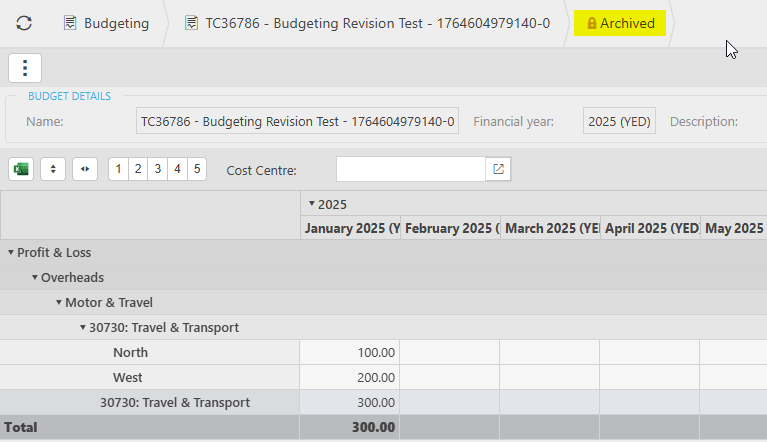
Edit budget: This option opens a screen to allow values to be entered.
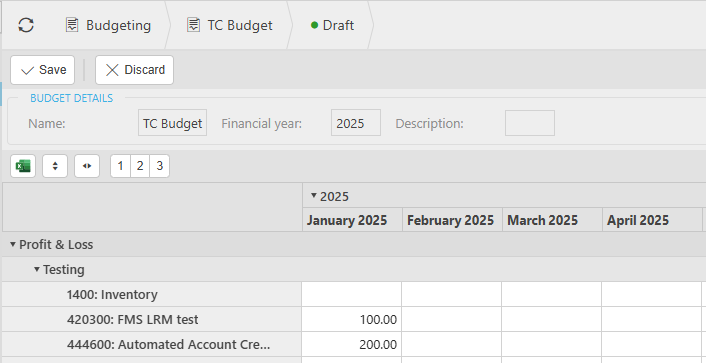
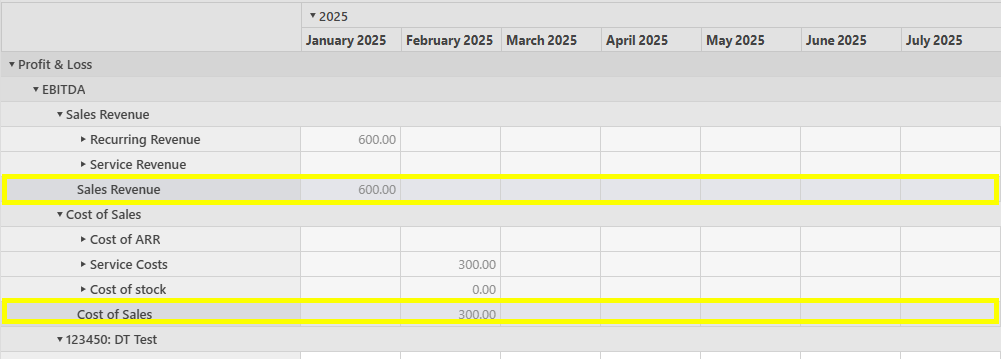
Enter Budget values manually in the appropriate cells.
To add an amount into the budget which then copies to all adjacent cells, so they do not need to be entered individually, use the
 option on the Action Bar.
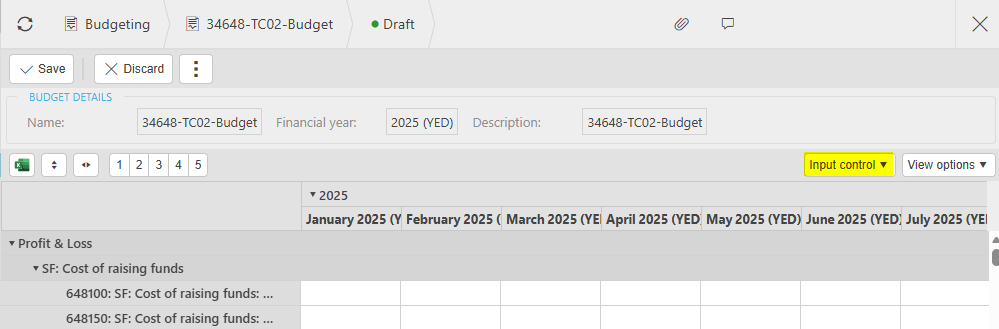
- Manual: Default option.
- Total spread: - Enter a value in the total column and it is divided equally across the periods.
- Spread across periods: Enter a value in a period column and it will be copied to all remaining columns.
Subtotals will show for groups if groups are shown.
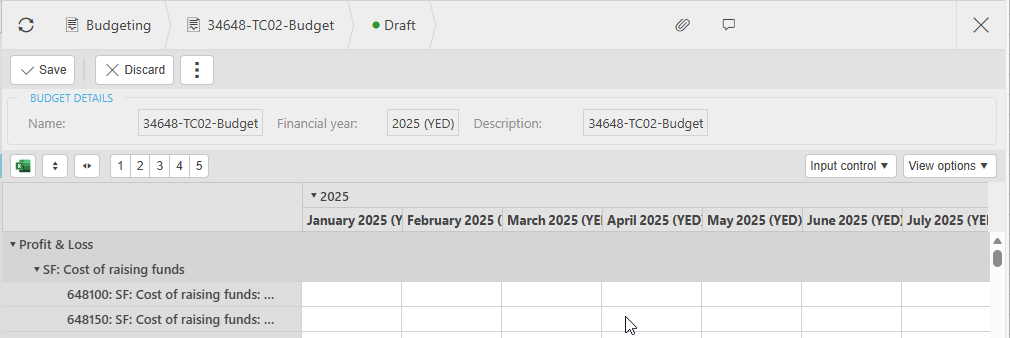
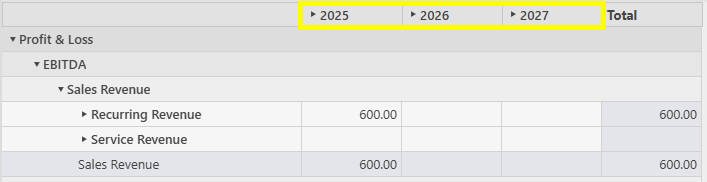
Column titles show the financial year ...
... with a dropdown which opens a row below, showing the periods as set up in iplicit.
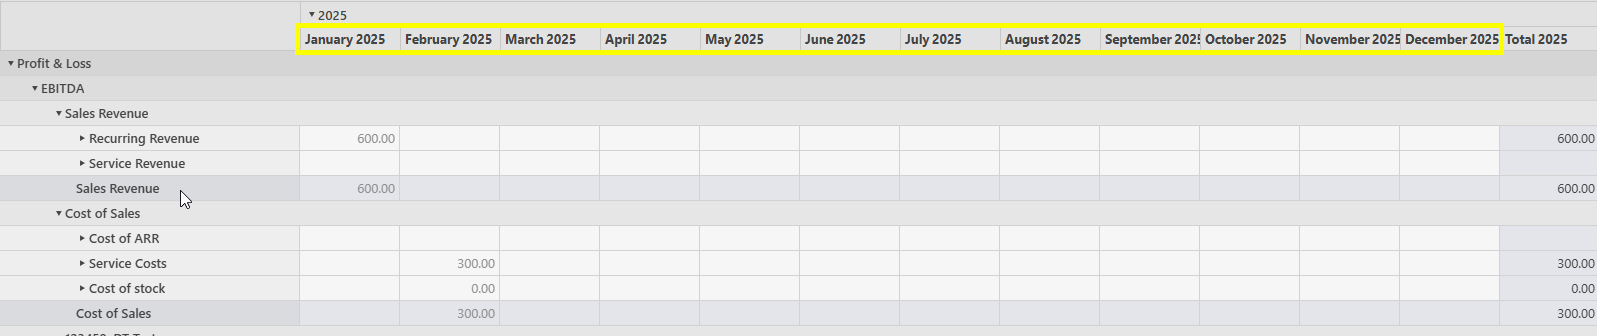
Final column shows the total for the financial year, showing the total for each row.
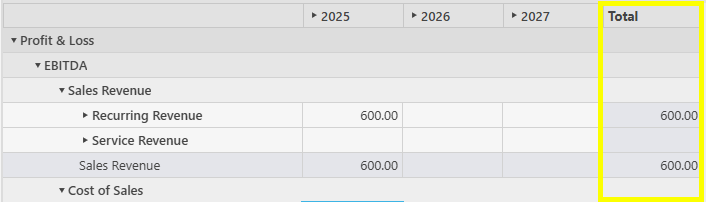
Opening up the tree structure, allows value input at grandparent/parent/child level.
Select Save when value entry is complete.
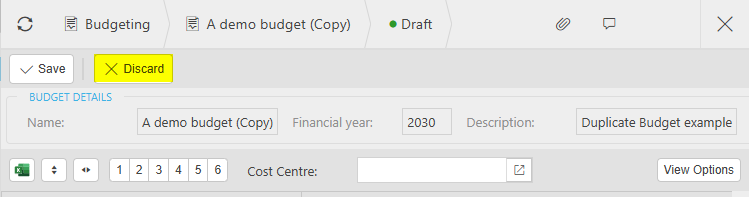
Note
To discard any changes, there is the Discard option.
Create: Selecting the
option -- Duplicate:
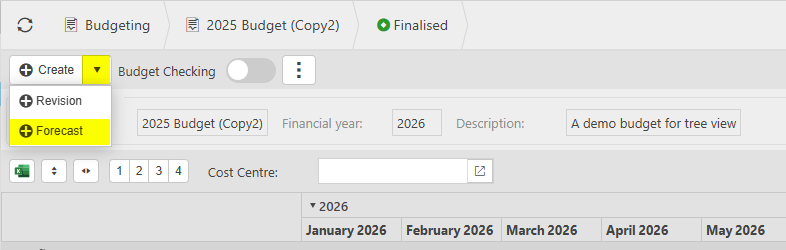
- Forecast: This is only available for Finalised budgets. It will be greyed out if the Budget is not the correct type for Forecast.
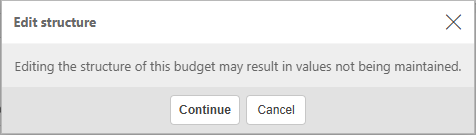
Edit structure: Takes you back into the wizard to edit the budget layout.
Warning
If the create budget had been completed and had values added to the input page but not saved, once the Edit structure option is selected the following warning message will show.
Only allows for attributes or chart of account codes to be added or removed from the budget.
The description can be updated.
The user will not be able to edit currency, financial year group, financial period or legal entity. A new budget will need to be created to update these items as data could be corrupted or lost depending on changes made.
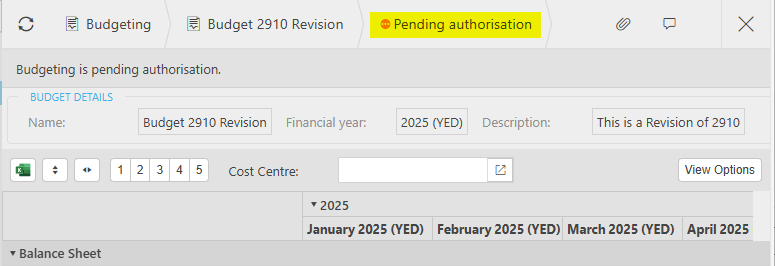
Submit: The Budget will be sent for approval as specified in the Authorisation workflows and will show as Pending authorisation.
Tip
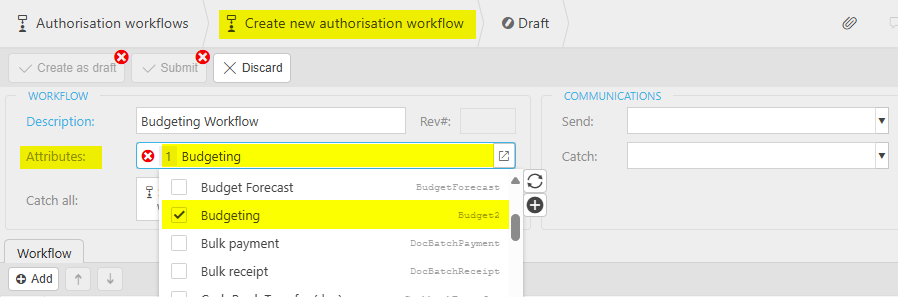
Creating the Authorisation workflow -
Select the Budgeting attribute.
Selecting the Send to button allows the option to select the following -
- Authorisation roles
- User groups
- Individual users
Available rules are -
- Attribute
- Cost centre
- Currency
- Department
- Financial year
- Financial year group
- Fund
- Last modified
- Last modified by
- Legal entity
- Project
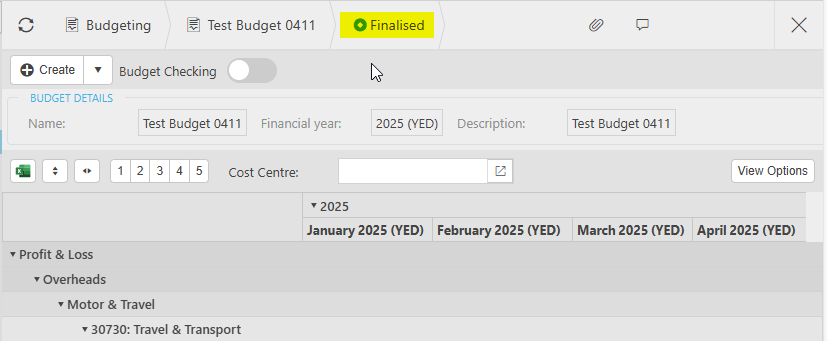
If an Authorisation workflow is not set up, then the Budget will be marked as Finalised.
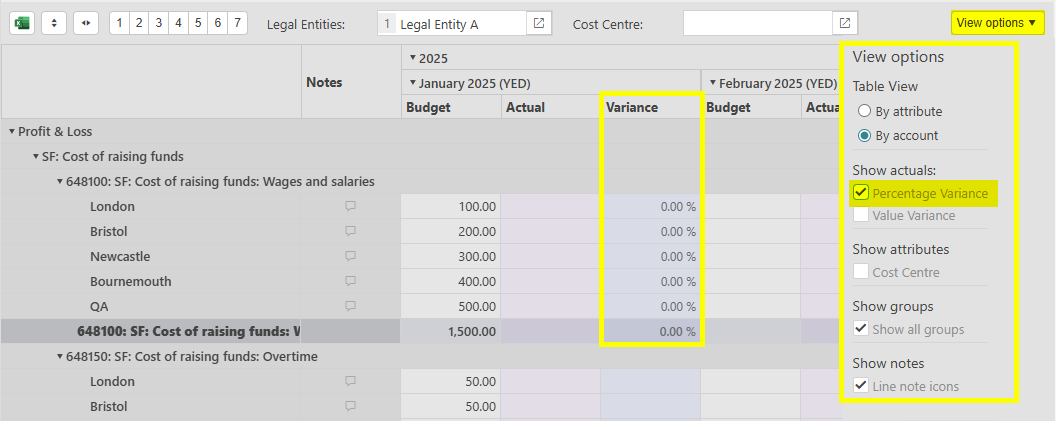
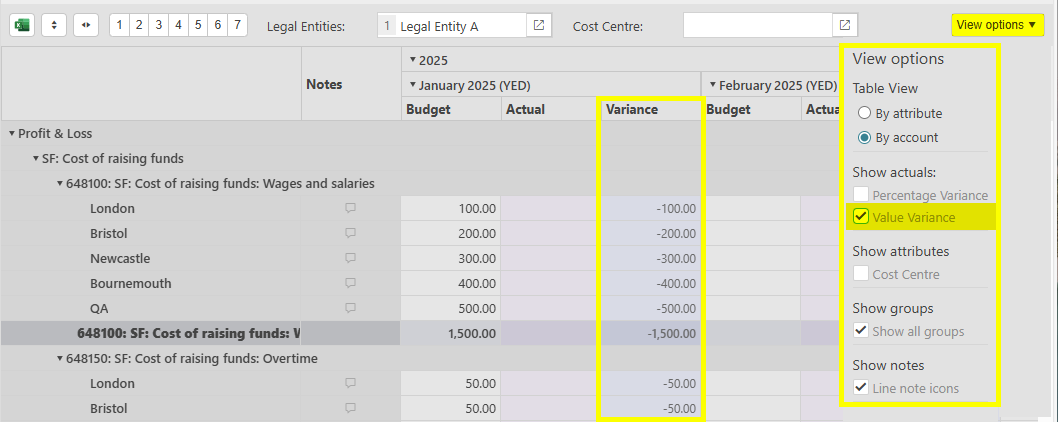
Buttons will vary depending on the status of the budget selected.
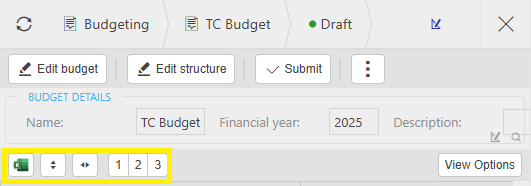
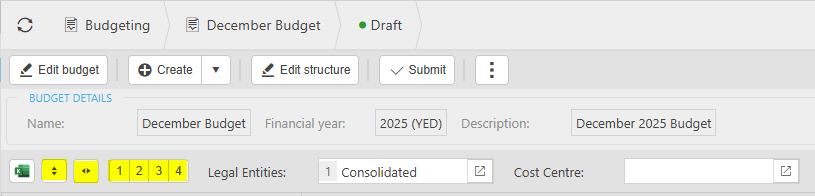
 option allows exporting the data to Excel.
 options toggles to expand rows and columns.
 option configures how the budget information is displayed.
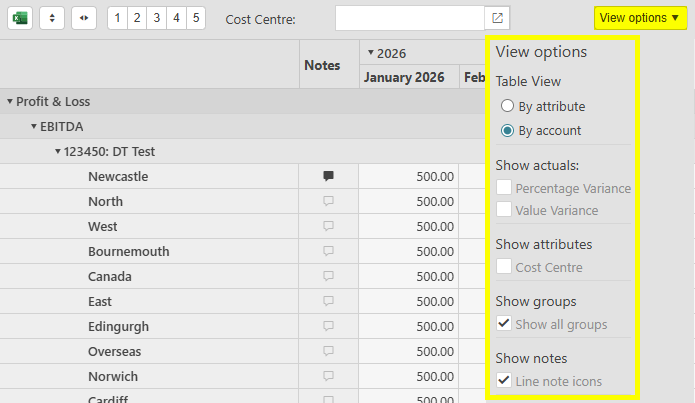
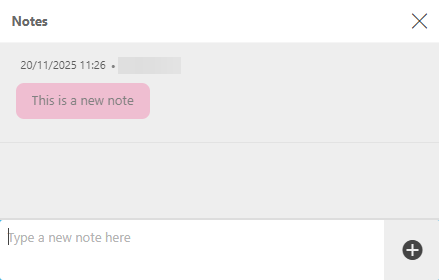
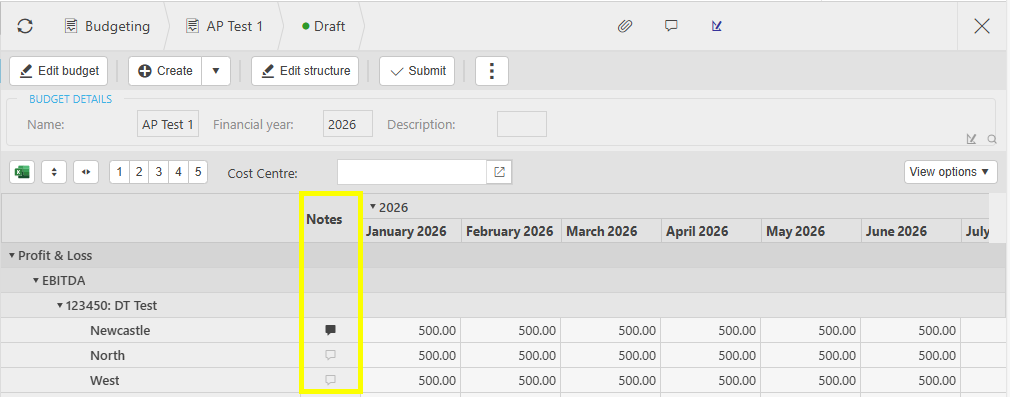
Notes and Attachments on Budgets
Notes and Attachments on Budgets
Select Budgeting from one of the options as shown above in Viewing Budgeting.
Select and open a Budget.
Select the
 icon to add or show any Attachments - Bold icon means attachments are already added.
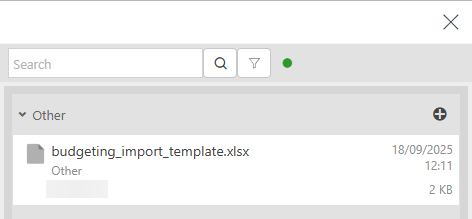
Any Attachments already added will show, or new Attachments can be added using the
 icon.
icon.
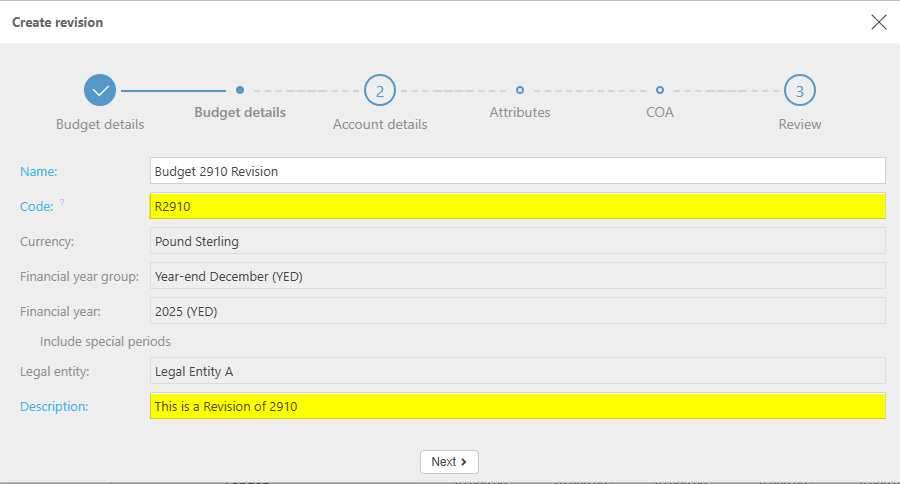
How to create Revision or Forecast from a Finalised Budget
Creating Revision or Forecast
Select Budgeting from one of the options as shown above in Viewing Budgeting.
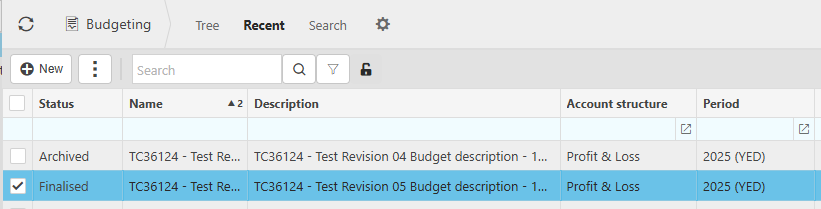
Select and open a Finalised Budget.
Where original budget created via manual wizard
Creating a Revision from an existing Budget that was created via the manual wizard, so that changes can be made to a Finalised budget, and when approved will replace the existing Budget.
Select Revision via the
option on Create.
Enter a unique Code and a Description, then select Next.
Progress through the wizard to edit values for Account details, Attributes and Chart of Accounts.
Select Go to review, then Create budget if all is correct.
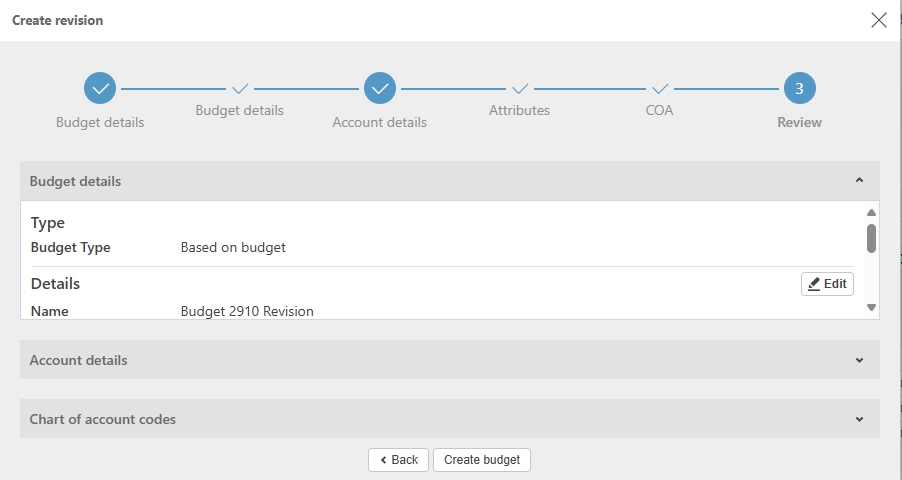
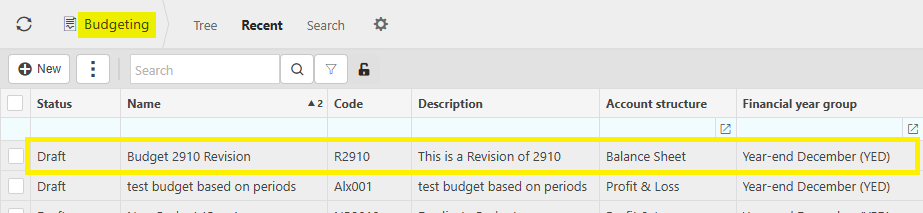
This Revision will now show on the Budgeting finder.
Select and open this Revision and Edit in the same way as a normal Budget.
Where original budget created via Excel Import
Creating a Revision from an existing Budget that was created via an Excel Import, so that changes can be made to a Finalised budget, and when approved will replace the existing Budget.
Select Revision via the
option on Create.Enter a unique Code, then select Submit.
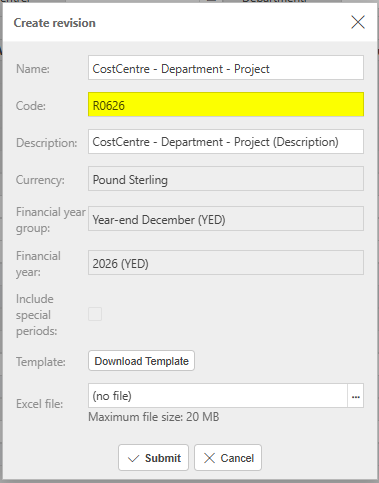
If no Excel file is selected, the system creates the Revision using the same budget structure as the source budget, including legal entities, accounts, attributes, periods, and currency.
For Revisions created without an import file, budget values are initialised from the source budget and are fully editable via the budget entry screen.
If an Excel file is selected, the existing import behaviour, validations, and data mapping rules apply.
This Revision will now show on the Budgeting finder.
Select and open this Revision and Edit in the same way as a normal Budget.
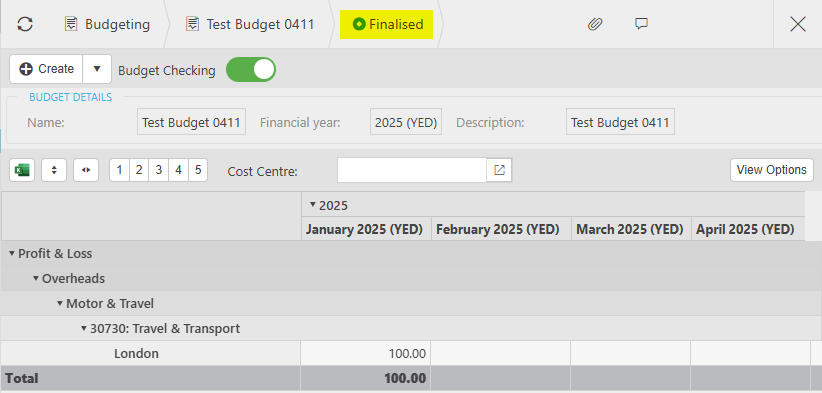
How to set Budget checking for a Finalised Budget
Budget checking
Select Budgeting from one of the options as shown above in Viewing Budgeting.
Select and open a Finalised Budget.
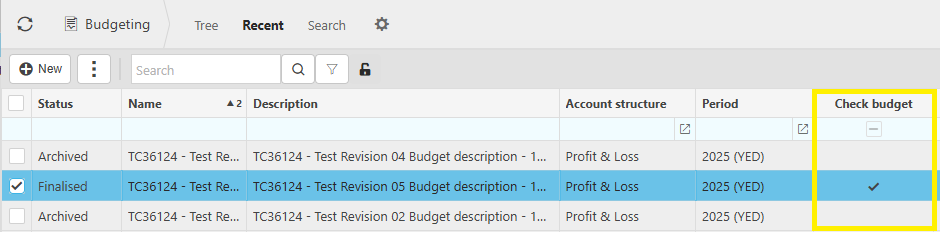
There is an option to mark the Budget as available for Budget checking, so that it is clear which budget is allocated for checking.

The Budgeting section in Environment defaults needs to be set so that the appropriate methods and levels are used.

Budget checking method:

This setting will determine if the budget checking on a Purchase order will use the Total budget or the Budget per period.
Budget checking level:
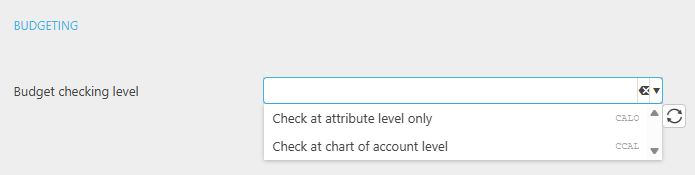
This setting will determine if the budget checking looks at the Chart of account level, or the Attribute level in order to display the warning that a Purchase order is over budget.
This will then show on the Budgeting finder menu as a column named Check budget.
Warning
If another Budget is marked for Budget checking that has the same Legal entity(s) and Period(s) then the following error message is displayed.
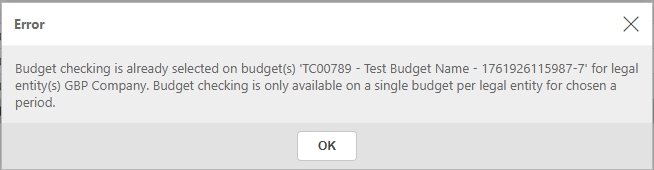
Marking the Budget for Budget checking will not be possible.
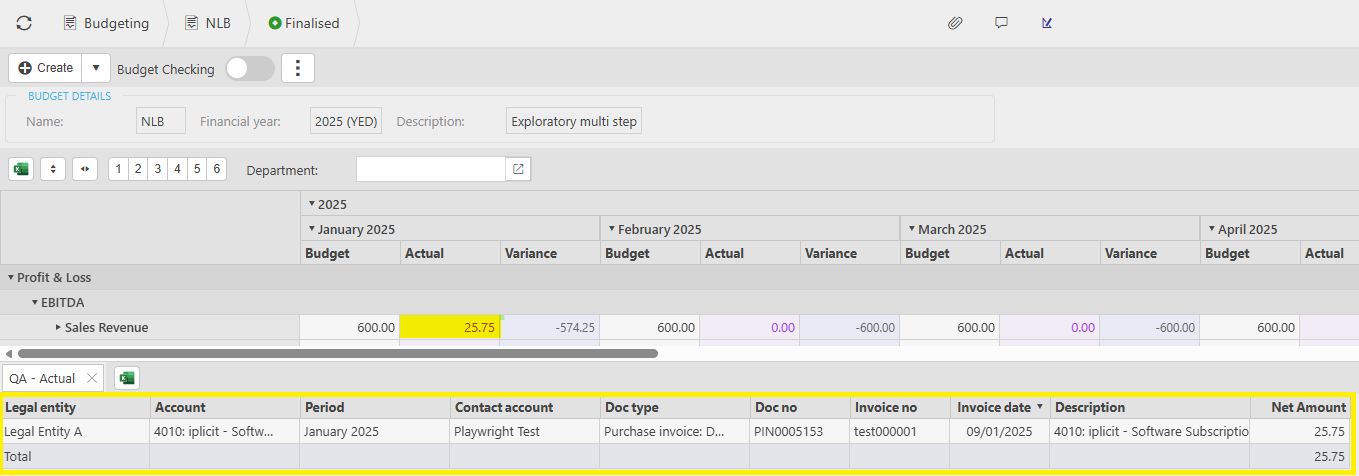
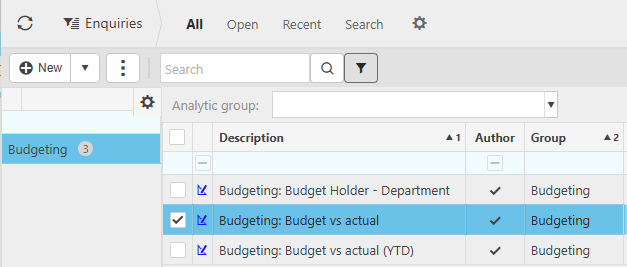
How to view Budgets via Enquiries
Viewing Budget via Enquiries
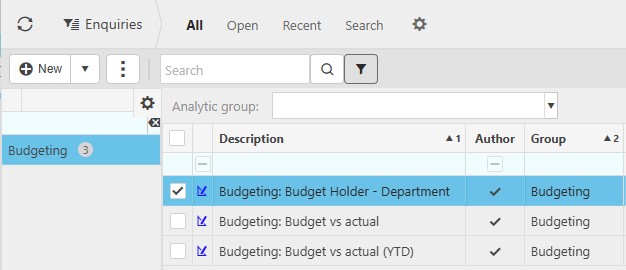
Select Enquiries from one of the options as shown in Enquiries.
Select and open the Budget Holder - Department enquiry.
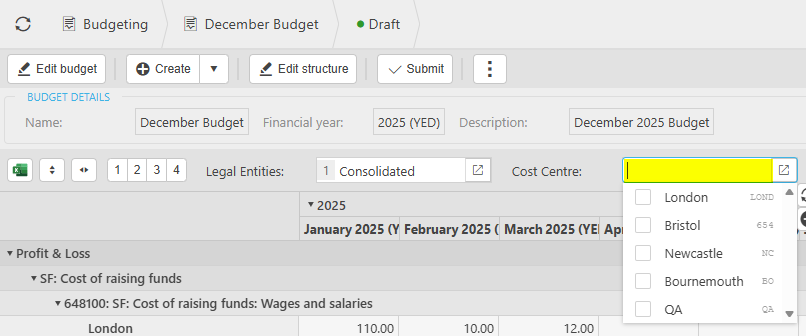
Enter mandatory field for Budget and Period. Other options, Legal entities, Department, Cost centre and Fund, can be entered to narrow down the data returned.
Tick the appropriate options to change the view to show -
- Include deferred income and prepayments as commitments
- Show full year
- Show YTD
- Show Current month
- Include adjustment periods
The data needs to be refreshed once the above options have been entered.
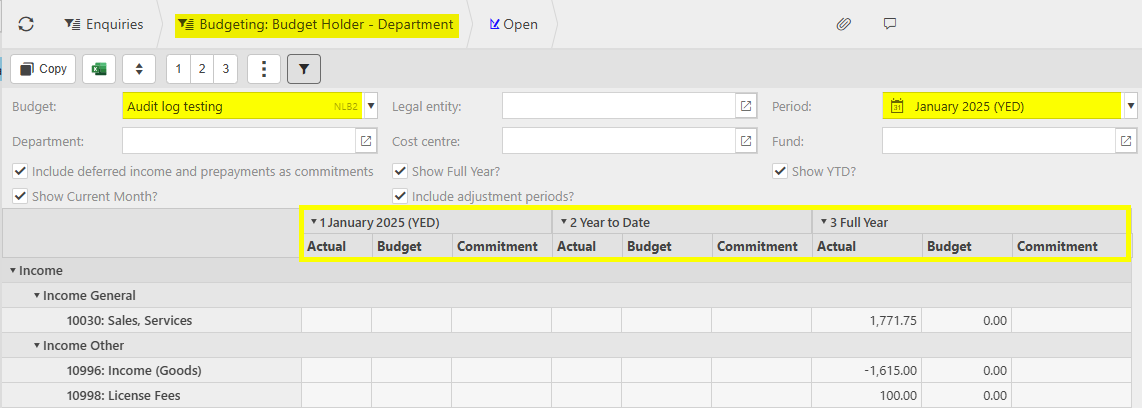
- Depending on the options ticked, this will now show Actual, Budget, Commitment and Left to spend for Month (if selected) / Year to date (if selected) / Full year (if selected).
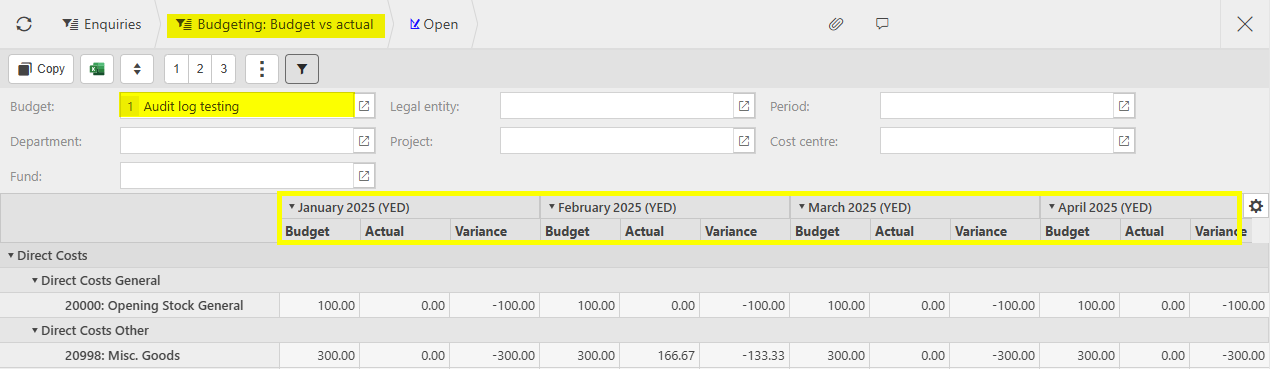
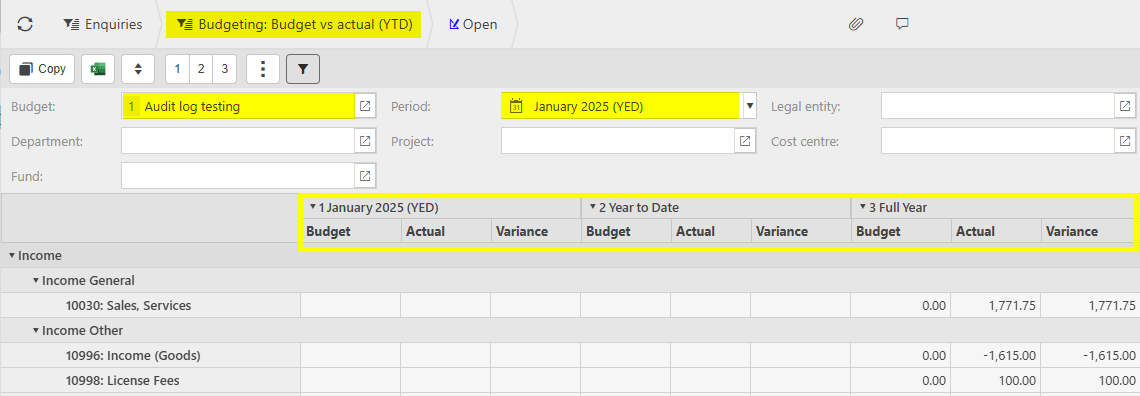
For further details see Enquiries.
Archived Budgets
Archived Budgets
Select Budgeting from one of the options as shown above in Viewing Budgets.
Select and open an Archived Budget.
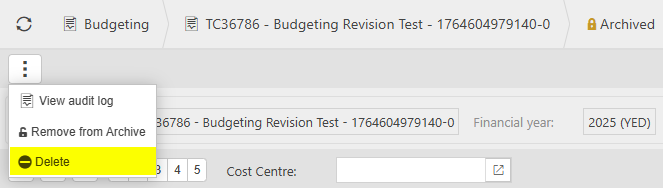
To view the Audit log, select View audit log via the
 option.
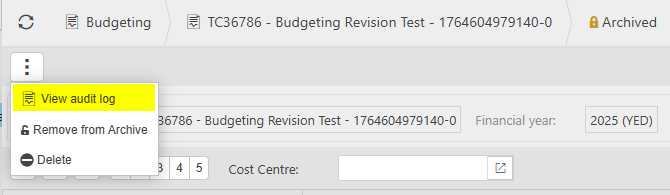
For further Audit log details see How to view Audit Logs below.
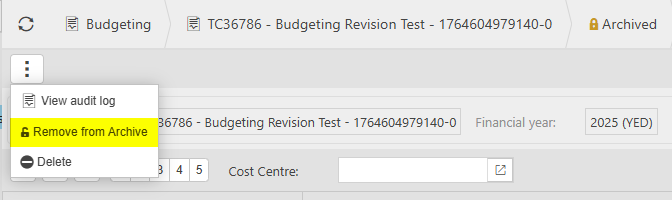
To remove the Budget from Archived state and return to Draft state, select Remove from Archive via the
option.To delete the Budget, select Delete via the
option.
How to Import Budgets from Excel
Importing Budgets from Excel
Select Budgeting from one of the options as shown above in Viewing Budgeting.
Select Import from Excel via the
option.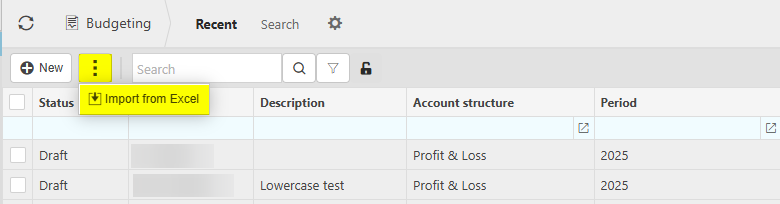
Select Download Template.

Selecting this option downloads an Excel Template.
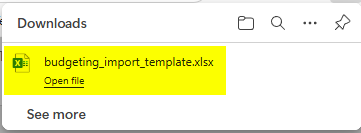
Open this template to add data to import, then save the template.
Enter the name of the Budget where the data will be imported to.
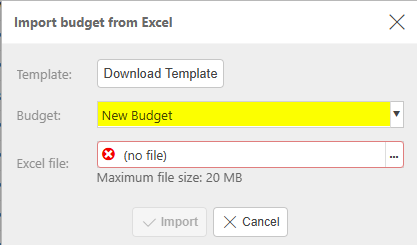
Enter the name of the Excel file holding the data to be imported.
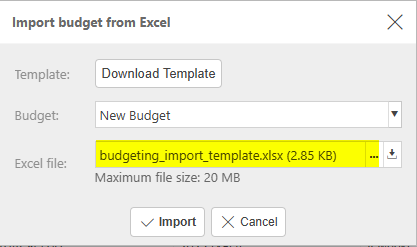
Note
Maximum Excel file size is 20MB
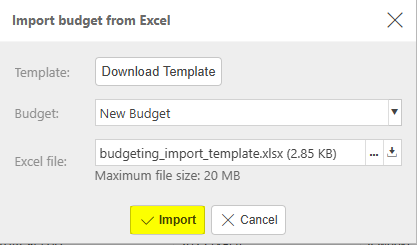
Select Import.
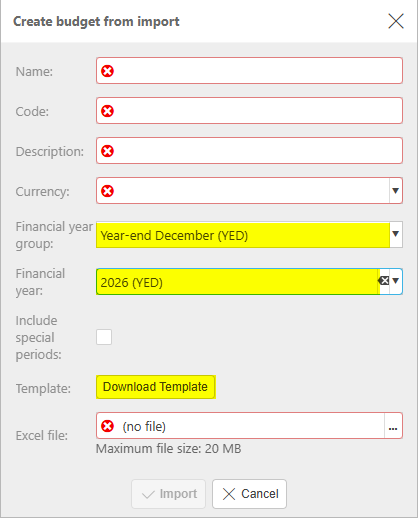
How to Create Budgets from Import
Creating Budget from import
This imports budget details without having to first create a budget configuration, so that the budget process is quick and simple and the budget configuration created is only for those required for the budgeting values in the file.
The import budget file allows for multiple attributes, so that the User can manage and analyse budgets across multiple dimensions without manual restructuring.
Select Budgeting from one of the options as shown above in Viewing Budgeting.
Select Create budget from import via the
option.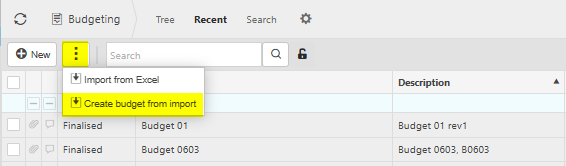
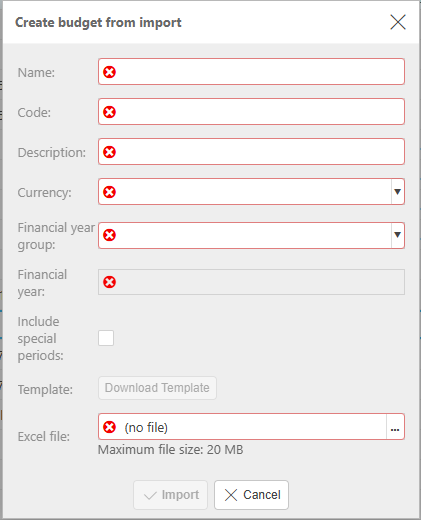
To download a template for details to import, first enter the following two fields.
- Financial year group: Select from dropdown list.
- Financial year / period: Select from dropdown list.
Then select Download Template option - this option will not be available until the two fields above are populated.
Open the resulting download file.
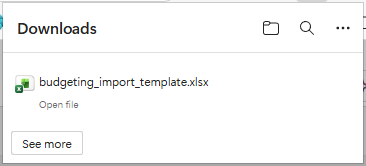
This opens an Excel template.
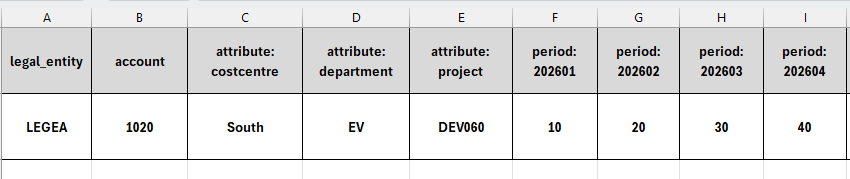
Save the template once 'import' data has been added.
Enter data in the following mandatory fields to complete the import.
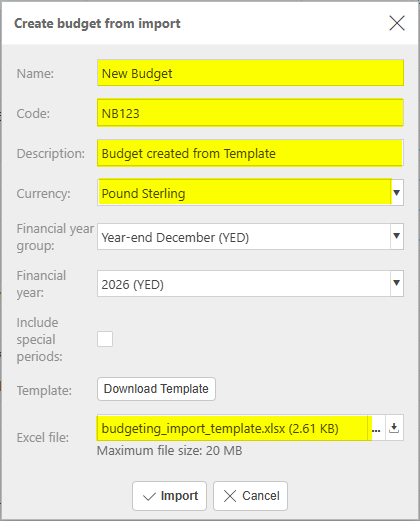
- Name: Unique free text.
- Code: Unique free text.
- Name: Free text.
- Description: Free text.
- Currency: Select from dropdown list.
- Include special periods: Optional.
- Excel file: Select the file to import that was created above.
Select Import.
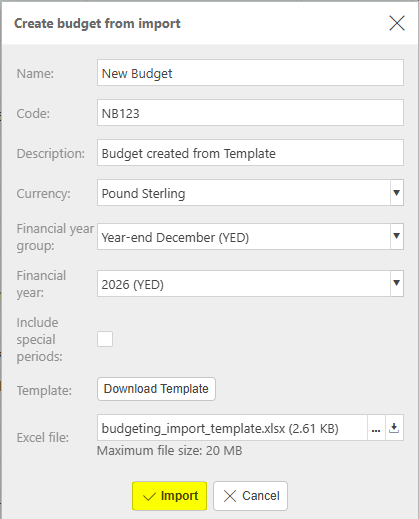
Note
Maximum Excel file size is 20MB
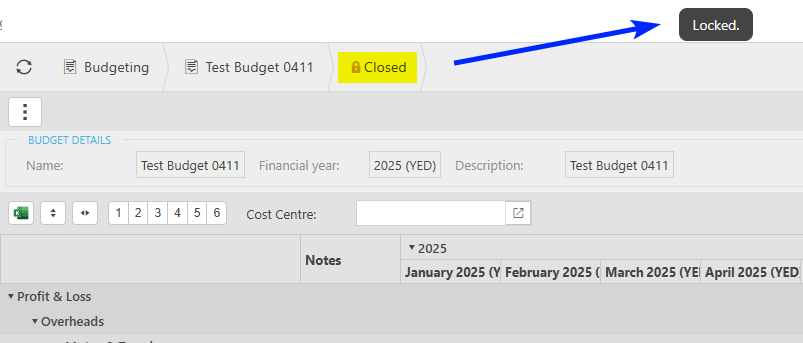
How to Lock, Unlock or Delete a finalised Budget
Lock, Unlock or Delete a finalised Budget
Select Budgeting from one of the options as shown above in Viewing Budgeting.
Select an individual finalised Budget to be locked, unlocked or deleted.
Lock
Select Lock via the
option on the Action Bar.
A message saying Locked will appear for a few seconds, then the Budget will show as Closed.
Unlock, if previously locked
Select Unlock via the
option on the Action Bar. As the Budget is Locked, only the option will be available.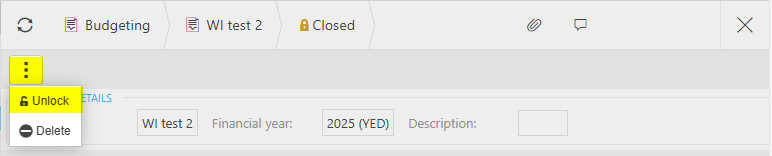
Delete, only if locked
Select Delete via the
option on the Action Bar. As the Budget is Locked, only the option will be available.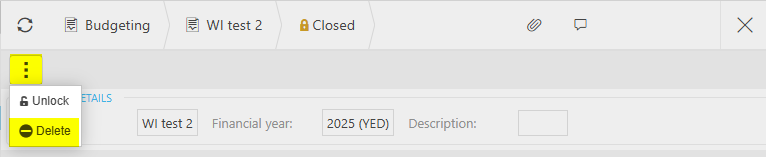
A warning message will show to confirm deletion.
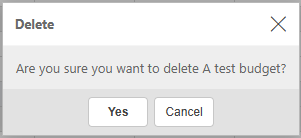
Only Supervisor or Admin users will have the option to delete.
How to view Audit Logs
Viewing Audit Logs
Select Budgeting from one of the options as shown above in Viewing Budgeting.
Select an individual Budget to view the Audit logs.
Select View audit log via the
option.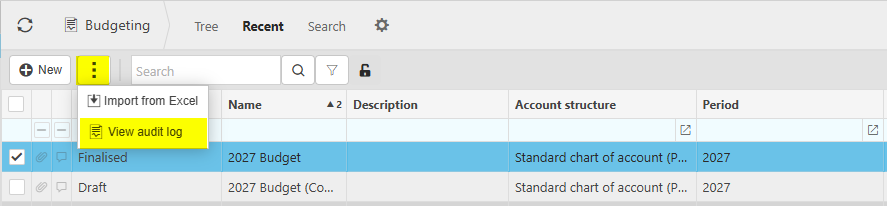
This will then show an Audit log.

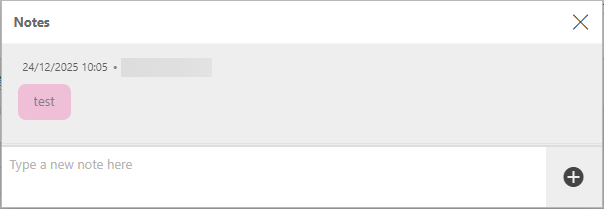
Any Notes about the Audit log can be added.
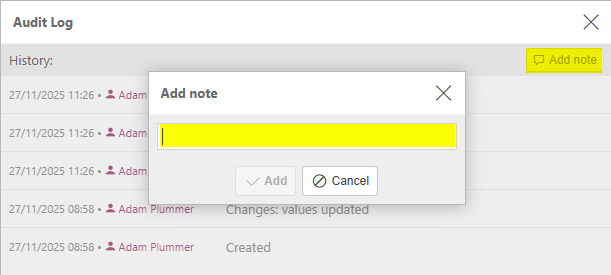
Adding a note will be highlighted on the Budget finder menu with the
 icon.
icon.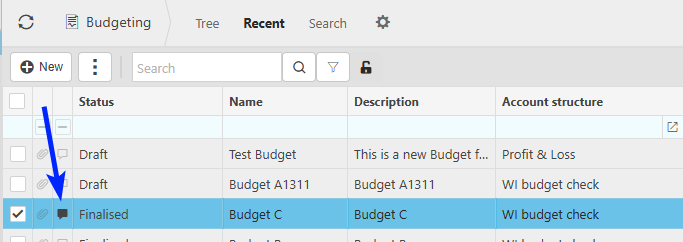
Note
If the individual Budget is already selected and opened, then viewing the Audit log can also be seen via the
option.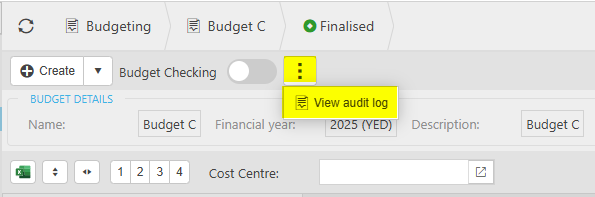
Updated June 2026