Environment Defaults
Environment settings are used to assign default values for use throughout the system.
How to view Environment defaults
Viewing Environment defaults
Select Environment / Environment defaults from the Settings section of the pulse menu -

Note
This is an example screen shot of the pulse menu.
Position of the menu items within pulse will vary according to available options and dependant on personal screen resolution.
or enter Environment defaults in the Quick Launch Side Menu.

This will then show the Environment defaults on the system - this is not the full list.

How to setup Environment defaults
Absence

Access restrictions
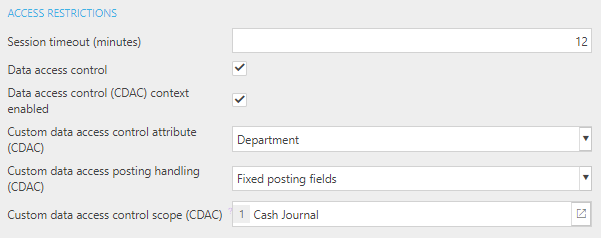
Session timeout (minutes): this is how many minutes a user can sit idle before their session times out. A timeout requires them to re-enter their password to resume.
Data access control: this needs to be ticked for Data Access Control.
Data access control context enables:
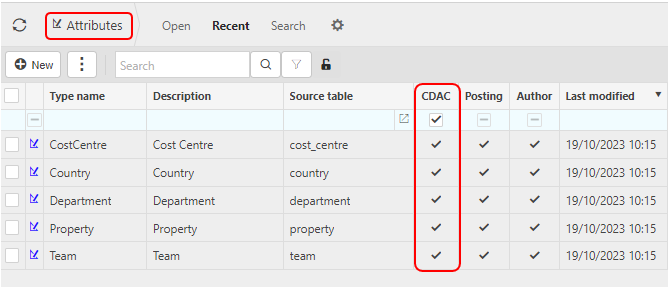
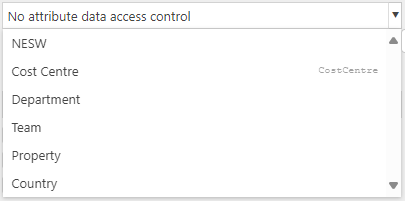
Custom data access control attribute (CDAC): this is the Attribute you wish to use for CDAC - a column called CDAC is in Attributes and needs to be ticked if it is to be a CDAC Attribute. Users must be assigned to CDAC Groups per attribute value.
Custom data access posting handling (CDAC): this is the behaviour of the CDAC value on the posting lines.
Available options -

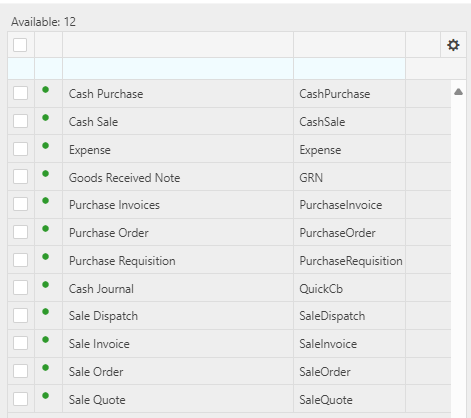
Custom data access control scope (CDAC): these are the classes you wish to use for CDAC.
Available document types -
Data access control budget context enabled: Tick to enabled Data Access Control (DAC) budget contents.
Custom data access control budget attribute: Select the attributes to use for budget Data Access Control (DAC). Users must be assigned to budget Data Access Control (DAC) groups per attribute value.
Available attributes types -
AI Detect

Turn off duplicate invoice detection: Tick to turn off the detection of potential duplicate invoices.
Turn off new supplier detection: Tick to turn off the detection of invoices from new suppliers.
Turn off after hours detection: Tick to turn off the detection of invoices created after hours.
Days for duplicate invoice detection: Set the number of days to look back when detecting duplicate invoices. If left empty, a default of 30 days is used.
Start time for after hours detection: Set the start time for after-hours detection. If left empty, the default is 20:00. Time is recorded in UTC.
End time for after hours dection: Set the end time for after-hours detection. If left empty, the default is 04:00. Time is recorded in UTC.
Assets

Stop full depreciation within useful life: tick this checkbox if you wish to stop the asset fully depreciating within its useful life.
NBV deduct residual: tick this checkbox if you wish to deduct the residual amount from the 1st year NBV e.g. for Reducing Balance depreciation.
NBV deduct residual annually: tick this checkbox and the NBV deduct residual checkbox if you wish to continually deduct the residual for each financial year.
Note
These 3 checkbox options are only applicable to Reducing balance and Double declining depreciation methods.
Authorisation

Default workflow catch actions: Select User(s) and/or Authorisation role to be used for workflow steps which don't find a valid user.

When this happens, the workflow step will go to the users as described here with RESTART and CANCEL actions.
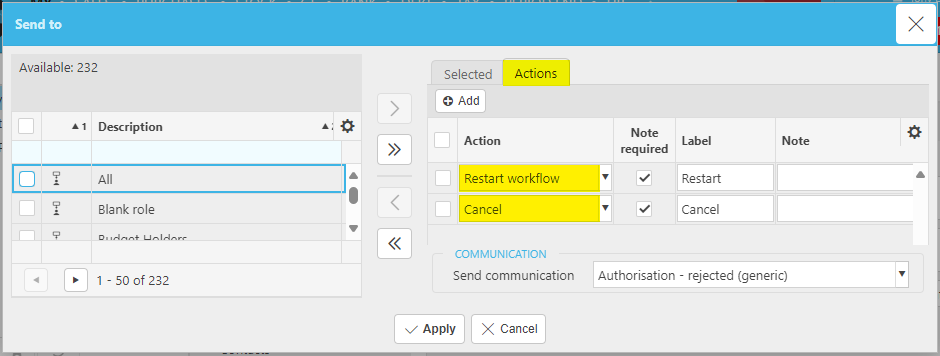
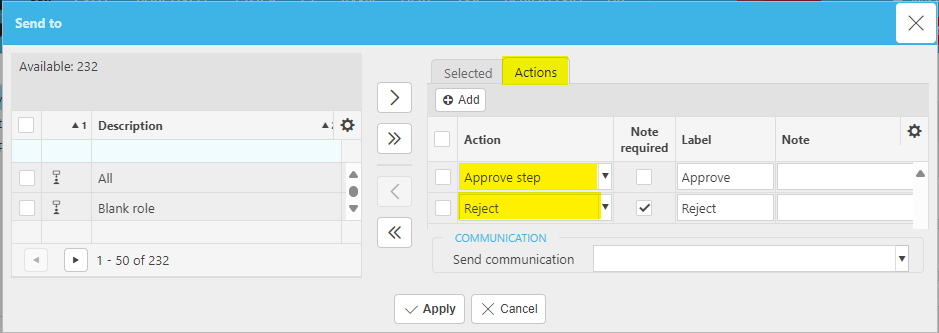
Default workflow send actions: Select the default actions to be used for NEW workflow steps. e.g.APPROVE STEP and REJECT.

Timesheet authorisation: Select appropriate action.

Workflow Substitution Date To Mandatory: Tick to make the Date to value for Workflow Substitutions mandatory.
Bank
The following defaults are used specifically for cash book related usage.

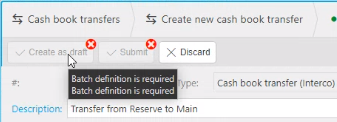
Cash book transfer batch series
A batch definition must be set before Transfers can be processed. If not, the following error will be shown.

Budget

Budgeting

Budgeting checking method: Select method of budget checking to show on Purchase Orders.

Budgeting checking level: Select level of budget checking to show on Purchase Orders.

Catalogues
Defines how customers are displayed in drop-down lists and on screen.

Contacts

Correction

Ignore period date check: Tick if you want to default to Ignore period date check when performing corrections to date/period.
Disable incl. closed periods on attribute correction: Tick if you want to disable the ability to include closed periods when performing corrections.
Currency, exchange & rounding

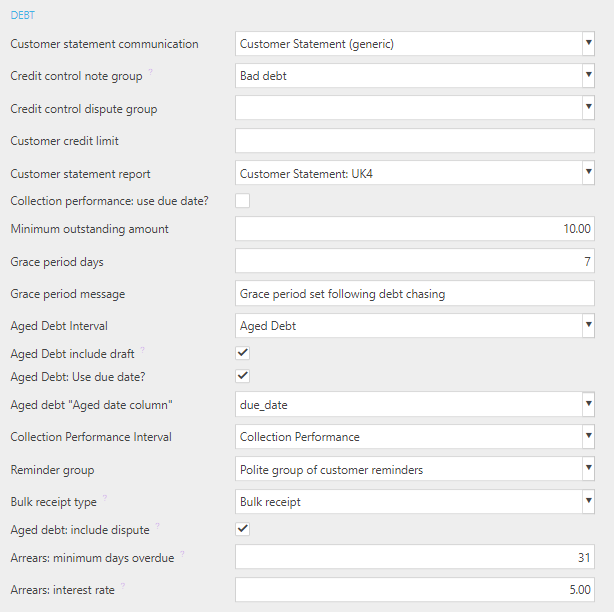
Debt
Document types
These are the default document types which are used throughout iplicit. Some of these are suggestions but some will always be used e.g. "Reversal".
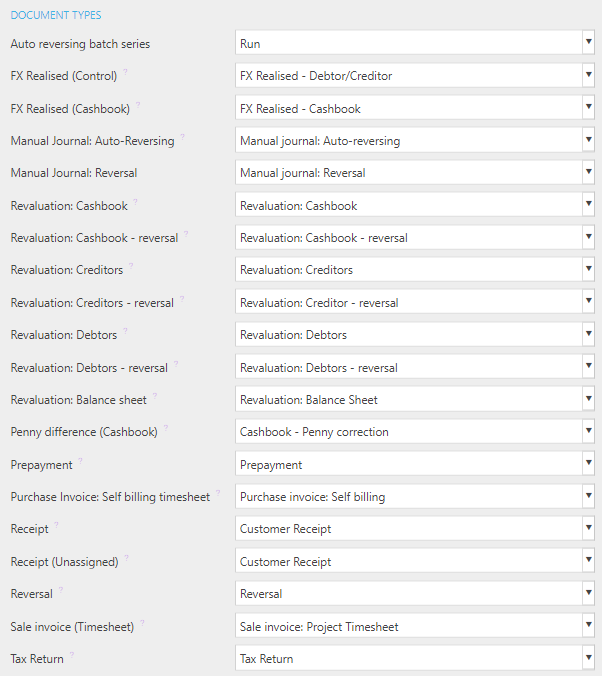
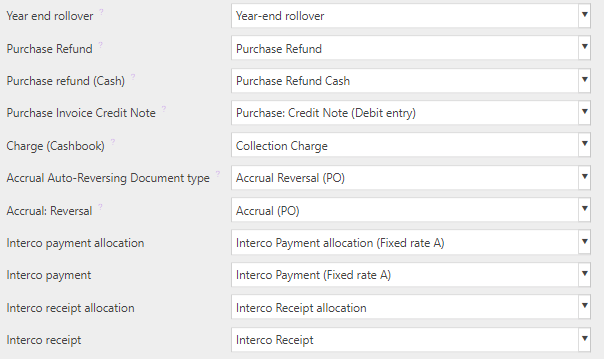
Environment

Financial Statements
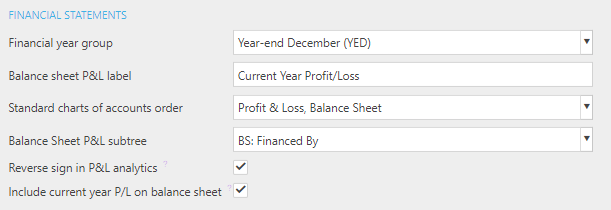
FX
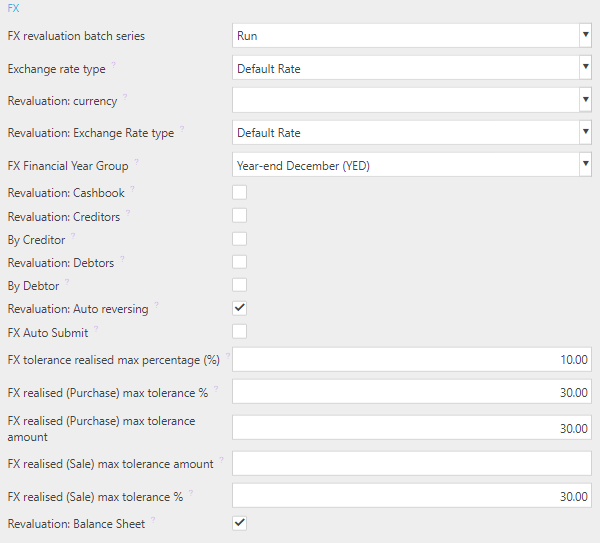
FX revaluation batch series:
Exchange rate type: This exchange rate type will be the document default unless specified otherwise on the document type.
Revaluation: Currency: This is used to set a default currency for revaluation.
Revaluation: Exchange rate type: Used to identify the revaluation exchange rate type.
FX financial year group: Used to identify a financial year group as your default.
Revaluation: Cashbook: Tick this box if you wish to revaluate cashbook.
Revaluation: Creditors: Tick this box if you wish to revaluate creditors.
By creditor: Tick this box if you wish to produce a revaluation document per creditor
Revaluation: Debtors: Tick this box if you wish to revaluate debtors.
By debtors: Tick this box if you wish to produce a revaluation document per debtor.
Revaluation: Auto reversing: Tick this box if you wish to auto reverse the revaluation document, typically in the following period.
FX auto submit: Tick this box if you wish to auto submit the generated documents for authorisation.
FX tolerance realised max percentage: Enter a default tolerance max percentage which will be used when processing automated FX realised documents where there is none specified on the legal entity.
FX realised (Purchase) max tolerance %: default maximum tolerance percentage (Purchase), used when processing automated FX realised documents.
FX realised (Purchase) max tolerance amount: default maximum tolerance amount (Purchase) used when processing automated FX realised documents.
FX realised (Sale) max tolerance amount: default maximum tolerance amount (Sale) used when processing automated FX realised documents.
FX realised (Sale) max tolerance %: default maximum tolerance percentage (Sale), used when processing automated FX realised documents.
General

Decimal places for posting balance check: The number of decimal places that amounts will be rounded to when validating that transactions balances to zero for posting.
Features:

Billing Schedule: Required in order for Billing Schedule process to work.
Payment services: Required in order for Payment services to be enabled.
Billing Schedule: Pre-requisite required so deposit / schedule options appear within Chart of accounts.
IMP Planner: Allows IMP Planner to be enabled or disabled.
Legacy Features: Default setting is unticked so that it is not shown on systems by default.

Absence: Untick to turn off the Absence module so that it is no longer shown in menus and cannot be selected - Default setting is unticked.
CRM: For existing environments being evaluated with any CRM-related data (e.g. contacts, opportunities, CRM settings) then this feature will be ticked automatically to retain access to CRM menus and functions.
When the CRM legacy feature flag is manually ticked or unticked then the CRM module will be shown or hidden accordingly in the system menus and functions.
Fixed Assets (V1): If a new environment is created, this option will be unticked as default. If an existing environment already had a setting for Fixed Assets (V1), then when migrating to the new Legacy Feature section the current ticked/unticked state of Fixed Assets (V1) will be preserved.
Task: Defaulted to unticked so that it is not shown on systems by default.
Important
This is to feature flag any modules in iplicit that will be deprecated going forward so that these can be turned on/off if required.
The access of this is restricted to the Implementation: Admin Group so that only implementors can change these settings.
AP Automation Mailbox Domain: Set this to '@ap-automation.iplicit.com' for all production and sandbox environments.
AP Automation Due Date Override: Tick this box if you want due dates to be calculated from Supplier payment terms, rather than the scanned date.
If Withholding Tax is selected in Features (see above), then the following two Professional Services Withholding Tax (PSWT) options will appear and are mandatory requirements.

PSWT Tax Registration Number: Required in order to populate ePSWT submissions.
PSWT Software Version: Required in order to populate ePSWT submissions.
System generate contact account code: Tick if you wish to enforce system generated account code. This will restrict any manual user input into the account code field when creating new contacts.
HR

Interco
Interco Supplier Contact Group: default supplier settings for related Legal Entity contact account (Interco only) are defaulted from this contact group.
Interco Customer Contact Group: default customer settings for related Legal Entity contact account (Interco only) are defaulted from this contact group.
Ignore Interco validation: Tick if you wish to ignore Interco validation as part of the GL posting process. This is not recommended as would enable Interco balances without Interco being assigned. It would only be done by exception to avoid Interco balances on e.g. legacy prior year data-take-on movements where the Interco is no longer relevant.
Loan

Maintenance

Multi-factor authentication (MFA)
There are a number of options available for MFA. Additionally, Single-sign-on (SSO) can also be used.

- Communication definition for password reset: when you auto reset an email, this will be the communication sent.
- Require MFA: tick this box to require MFA by default upon creation of a new user.
- Enable phone verification: Tick this box to enable users to use SMS as an option for verification for MFA login.
- Reset passwords & MFA: users that will receive requests to reset MFA and password.
Password policy
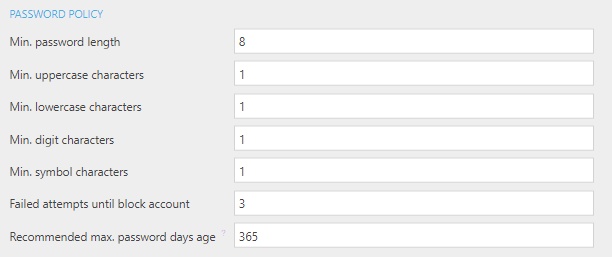
Enter values in the settings below to enforce your password policy.
Tip
If you wish to use Username and Password as a means of logging in, we recommend a strong password policy to mitigate the risk of unwanted access. However, we more strongly recommend the use of Multi-factor authentication or an SSO solution.
Payments

Period handling
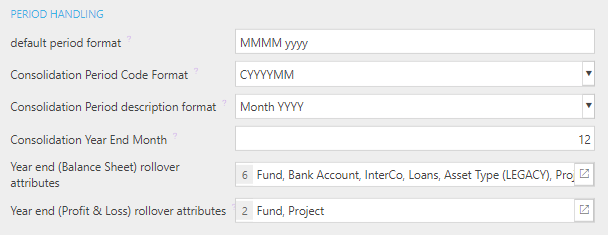
- Default period format: The date format.
- Consolidation period code format: Used to set the default code format for the consolidation period.
- Consolidation period description format: Used to set the default description for the consolidation period.
- Consolidation year end month: When the consolidation year ends.
- Year end (balance sheet) rollover attributes: The posting attributes that will be used for aggregated lines as part of the year end process.
- Year end (profit and loss) rollover attributes: The posting attributes that will be used for aggregated lines as part of the year end process.
Portal

Posting

Products

Project

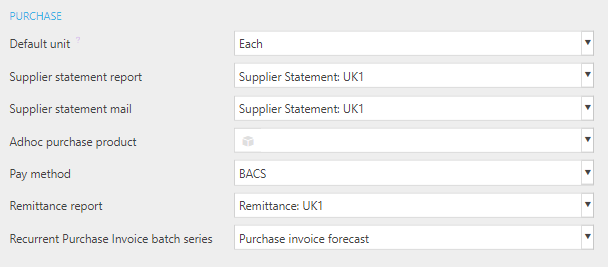
Purchase
Sales

Single sign-on (SSO)
This is a login security option which is an alternative to Username and password.

SSO doesn't require MFA.
Enabled SSO providers: select the SSO Provider(s) you wish to use. With the
 icon, you can choose more than one e.g. Microsoft Entra ID and OneLogin
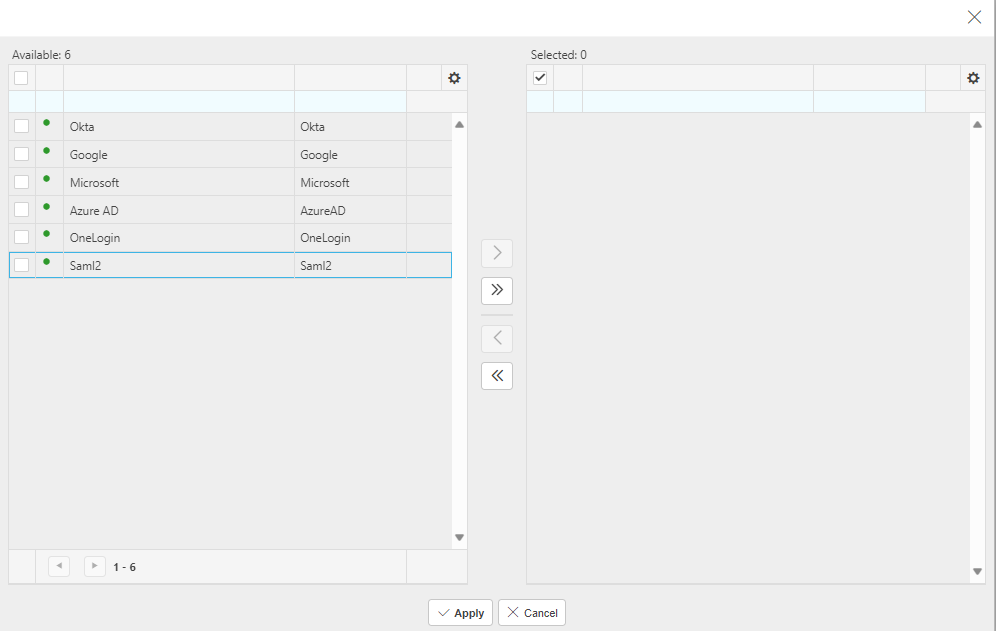
Tick the SSO provider(s) required and move to the selected box on the right.
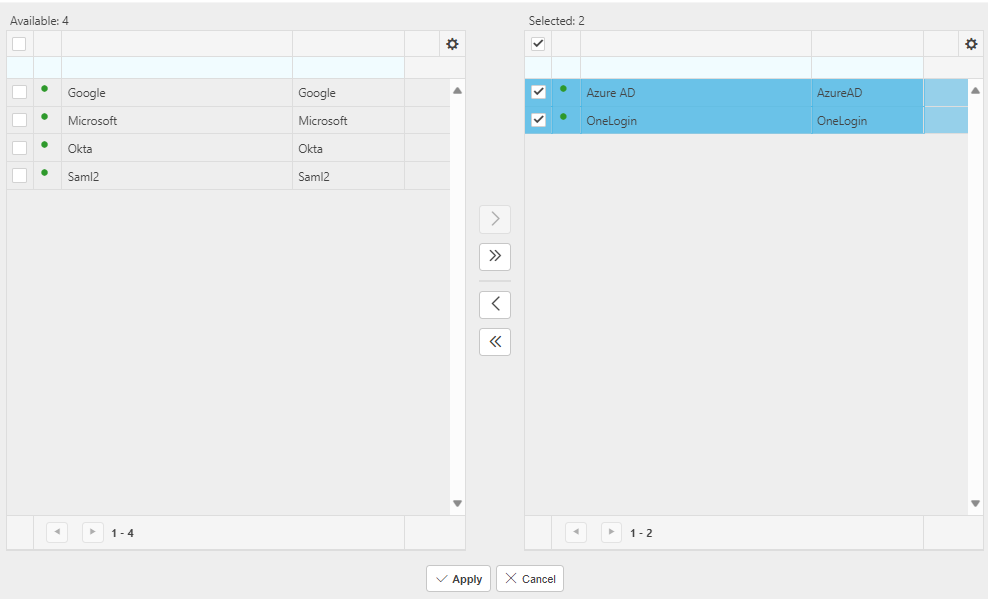
Select Apply button when completed.
The Enforce login via SSO field will now be available. Ticking this option will mean the user is forced to login via SSO only - Username and Password will no longer be available as a means of logging in.

The appearance of fields below will depend on the selected SSO provider(s).
Selecting Google and Microsoft will result in Enforce login via SSO field only.

Selecting Microsoft Entra ID will present you with one extra field.

Microsoft Entra ID Tenant (SSO): This will populate with your Tenant ID which is found in the Office 365 Admin portal - Ask your office 365 Administrator to set this up.

- Prompt SSO Login: When ticked, this will allow the User to select Microsoft Entra ID user account from SSO Login.
Selecting OneLogin will reveal the following fields -
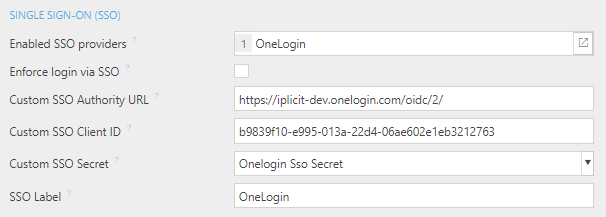
Custom SSO Authority URL: This is the URL used to authenticate with the SSO which is available in the SSO provider software.
SSO Client ID: This is a parameter setting which is available in the SSO provider software.
Custom SSO Secret: This is a parameter setting which is available in the SSO provider software.
SSO label: This is the label that will be shown on the User Account SSO login screen to identify the selected SSO provider.
Selecting Saml2 will reveal the following fields -

SSO label: This is the label that will be shown on the User Account SSO login screen to identify the selected SSO provider.
Saml2 Provider: This is your SAML provider's "Entity Id". It will be found on your provider's setup page or in their metadata file.
Saml2 Metadata Url: This is the Metadata URL provided by your SAML2 provider. In cases where the “Entity Id” doubles up as the metadata URL, leave this blank.
SAML2 Setup Notes
Our Saml2 Entity Id is https://login.iplicit.com/Saml2 (this is also our Metadata URL).
Our Assertion Consumer Service/Reply URL is https://login.iplicit.com/Saml2/Acs
We require certain claims/parameters to be included in the SAML2 message which your server will send to us. These are:
Name Identifier: This should be unique per user; we accept the following names
Object Identifier : This is only needed in cases where the Name Identifier cannot be unique per user; we accept the following names:
urn:oid:0.9.2342.19200300.100.1.1
urn:oid:1.3.6.1.4.1.5923.1.1.1.6
Name: This should use the users full name; we accept the following names:
name
urn:oid:2.16.840.1.113730.3.1.241
Email Address: This is the users email address; we accept the following names:
email
http://schemas.xmlsoap.org/ws/2005/05/identity/claims/emailaddress
urn:oid:0.9.2342.19200300.100.1.3
Note
Removing a SSO provider in Enabled SSO providers will remove the associated field from view on the Environment defaults and on the SSO login screen but you won't delete the contents of that field. So, if you reselect the SSO provider in Enabled SSO providers the original contents will return. You can add/edit the contents in these fields, but you must select the Save button to save your changes.

Tip
To quickly link users to the respective SSO provider(s), please see the SSO Link wizard in the 'How to use the SSO wizard section' in User acounts.
Stock

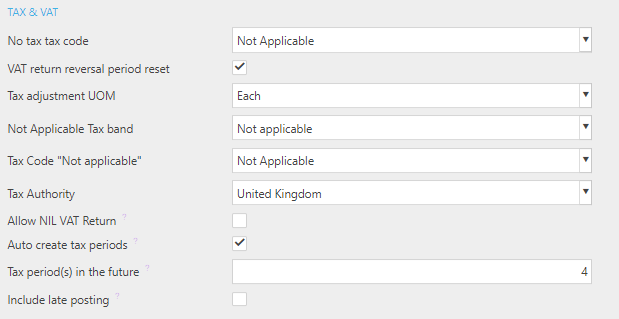
Tax & VAT
User Interface

Updated January 2026