Bulk templates
Bulk templates exist, for example, Bulk Payments and Bulk Receipts.
They are used for default setup and selection criteria, contextual to the template usage.
Consider creating more templates for frequently occurring combinations of setup and defaults.
How to view Bulk templates
Viewing Bulk templates
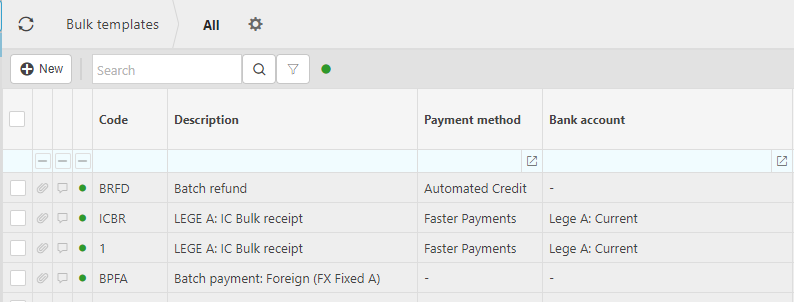
Select Purchases / Bulk templates from the Settings section of the pulse menu -

Note
This is an example screen shot of the pulse menu.
Position of the menu items within pulse will vary according to available options and dependant on personal screen resolution.
or enter Bulk templates in the Quick Launch Side Menu.

This will then show the Bulk templates on the system where normal customisation of Sets can be used.

Tip
To modify the columns displayed, select  on the top right of the page, then tick/untick the information you want to hide or display.
How to create Bulk templates
Creating Bulk templates
Templates are required for Bulk Payments.
Consider creating multiple templates for frequently occurring combinations of setup and defaults e.g per Bank Account.
Select Bulk templates from one of the options as shown above in Viewing Bulk templates.
Press New.
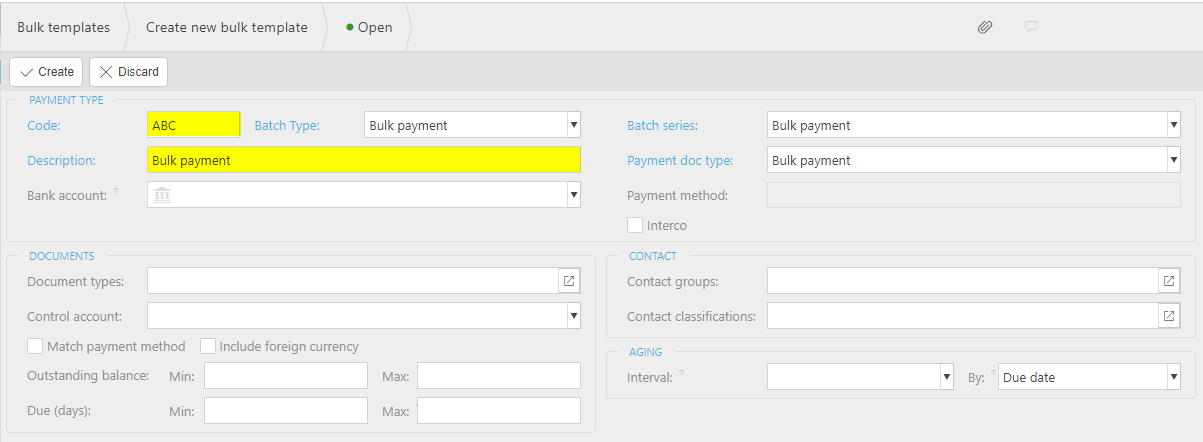
Enter a unique code and a description to uniquely describe the template

Enter a Bank account
If left blank, then the bank account must be selected upon creation of a Bulk Payment.
Enter the Payment method
This will be the default on associated Bulk payments
Enter other criteria as required.
Document types: By selecting Document Types, you will limit the batch to only be able to select documents which match that document type.
Control Account: This is the control account used on the Purchase document(s) e.g. Creditors control. More than one account can be selected.
Match payment method: By unticking this checkbox, you will be able to select documents that do not match the selected payment method (which is specified on the Payee or as an override on the document itself).
Include foreign currency: Tick this checkbox if you wish to be able to select document(s) that do not match the Legal Entity base currency.
Currency: By entering a currency, you will restrict the selectable documents to be those that match the currency.
Due date from: Enter a due date from if you wish to limit the purchase document(s) found to be only those with a due date >= the given date. Leave blank for all due dates in the past.
Contact groups: Select Contact Group(s) if you wish to restrict the selectable Payees to be those that match.
Contact classifications: Select classification(s) if you wish to restrict the selectable Payees to be those that match.
Outstanding balance Min: Enter a minimum amount if you wish restrict the selectable documents to be those with an outstanding amount >= the minimum specified.
Outstanding balance Max: Enter a maximum amount if you wish restrict the selectable documents to be those with an outstanding amount <= the maximum specified.
Aging interval: Select an interval that you wish to use to show the aged creditors in the allocation tab. This is used on the allocations tab.
Aging interval by: Select the column you wish to use as the basis of aging e.g. document due date. This is used on the allocations tab. This is used on the allocations tab.
Select Create to save the template.
How to create an Interco Bulk Payment template
Creating an Interco Bulk Payment template
Interco Bulk Payment template
The Interco Bulk Payment template differs slightly from the Bulk Payment template in that the Interco checkbox is ticked.

Note
When appropriate, specify Interco(s) on the template so that when an Interco Bulk payment is created, these Interco(s) are selected by default.
Selecting Interco option will then show the Aggregate processing flag option.

Selecting this option will aggregate Bulk payment outputs for Interco scenarios.
Updated March 2025