Interfaces
Interfaces are crucial components that allow different systems and software to communicate and share data seamlessly.
Here are some key types of interfaces you might find:
Application Programming Interfaces (APIs): These are sets of protocols and tools that allow different software applications to interact with each other. For example, an API can enable a finance package to pull data from a bank’s system or integrate with other business software like CRM or ERP systems.
User Interfaces (UIs): These are the parts of the software that users interact with directly. A good UI in a finance package will be intuitive and user-friendly, allowing accountants to easily input and retrieve financial data.
Data Integration Interfaces: These interfaces facilitate the seamless transfer of data between different systems. For instance, they can sync data like balance sheets, income statements, and cash flow statements on a regular basis.
Import/Export Interfaces: These allow users to import data from external sources (like spreadsheets) into the finance package or export data from the package to other formats or systems.
Reporting Interfaces: These are used to generate financial reports and analytics. They often integrate with other tools to provide comprehensive insights and visualisations.
Interfaces enhance efficiency, accuracy, and the overall user experience by ensuring that all necessary data is easily accessible and up-to-date.
Most Interfaces will be setup at implementation.
How to view Interfaces
Viewing Interfaces
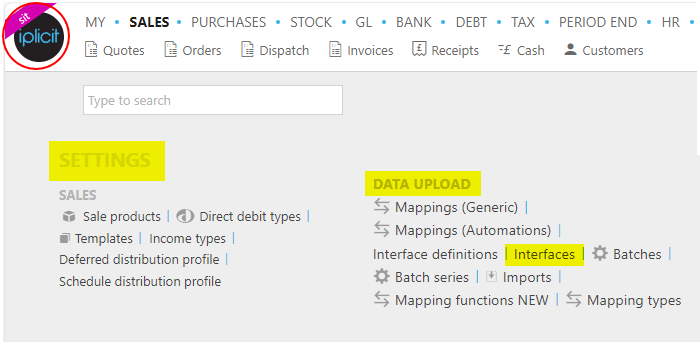
Select Data Upload / Interfaces from the Settings section of the pulse menu -
Note
This is an example screen shot of the pulse menu.
Position of the menu items within pulse will vary according to available options and dependant on personal screen resolution.
or enter Interfaces in the Quick Launch Side Menu.

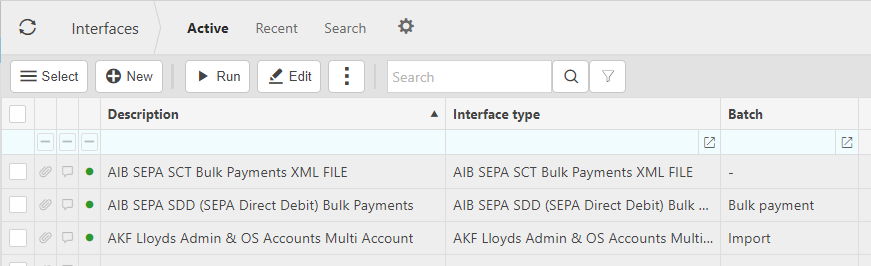
This will then show the Interfaces on the system where normal customisation of Sets can be used.
Tip
To modify the columns displayed, select  on the top right of the page, then tick/untick the information you want to hide or display.
How to edit Interfaces
Viewing Interfaces
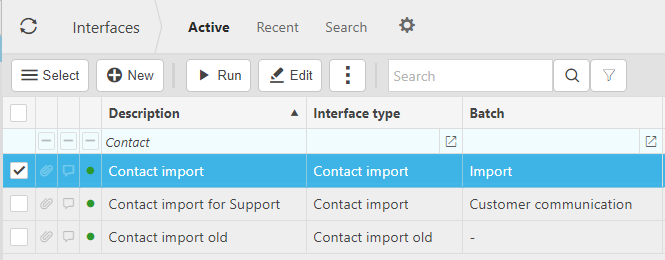
Select Interfaces from one of the options as shown above in Viewing Interfaces.
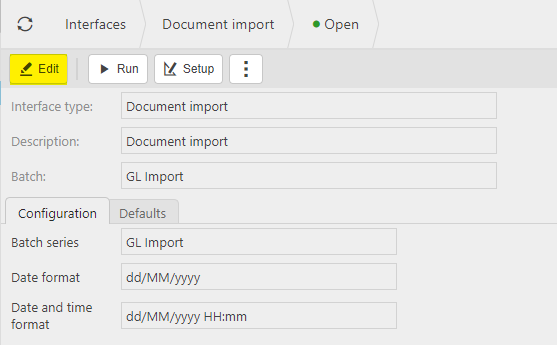
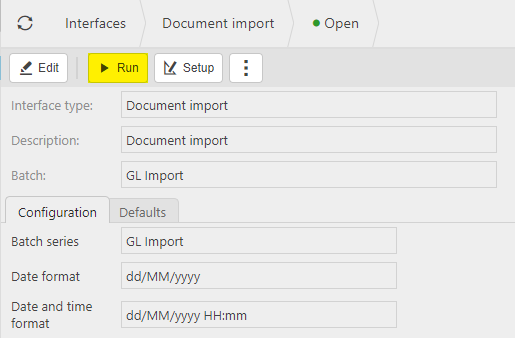
Select the Interface to edit from the list of Interfaces e.g. Document import.
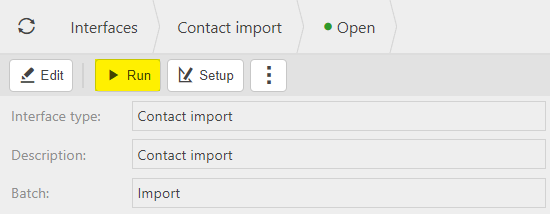
Select Edit - you can also open the selected interface and select Run.
Add changes.
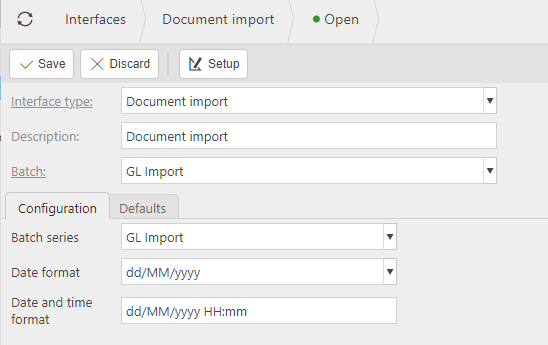
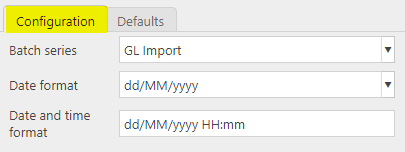
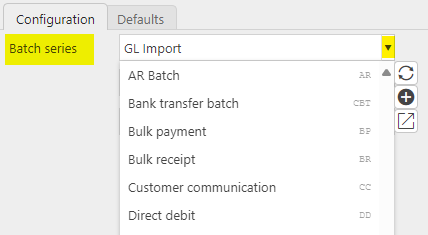
Batch series: Select the Batch series from the dropdown options.
Date format: Select the Data format from the dropdown options.
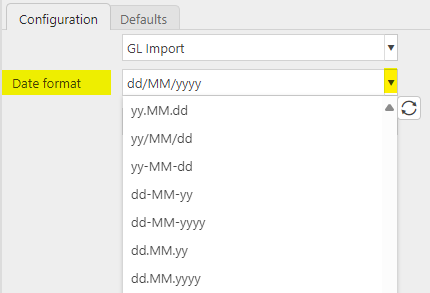
This format must match the date format in the source import file, otherwise the import will fail.

Date and time format: Enter date and time format.
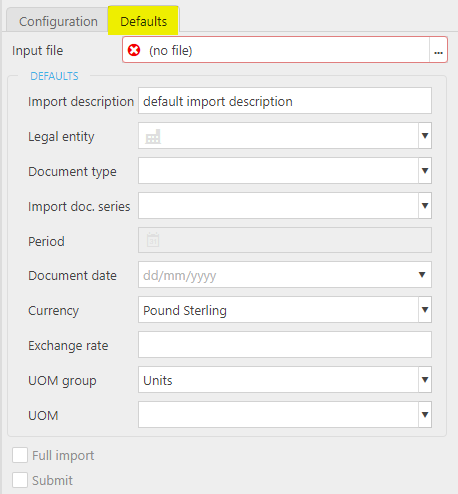
Enter default values that will be used when this Interface is run.
Select Save to complete Edit process.
Examples of Interfaces -
Note
This list is not representative of all the available Interfaces.
Select Interfaces from one of the options as shown above in Viewing Interfaces.
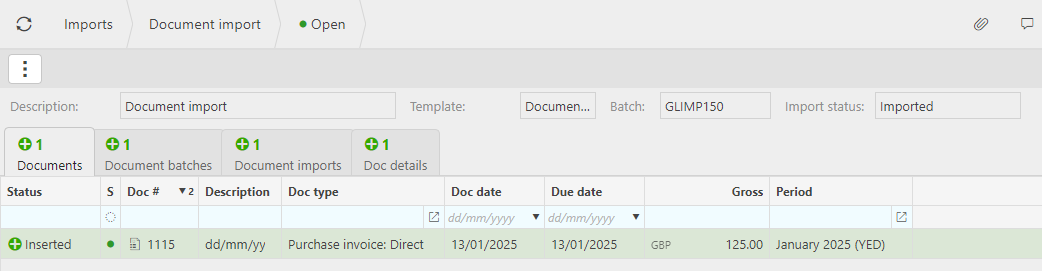
Select Document import from the list of Interfaces.

Select Run - you can also open the selected interface and select Run.
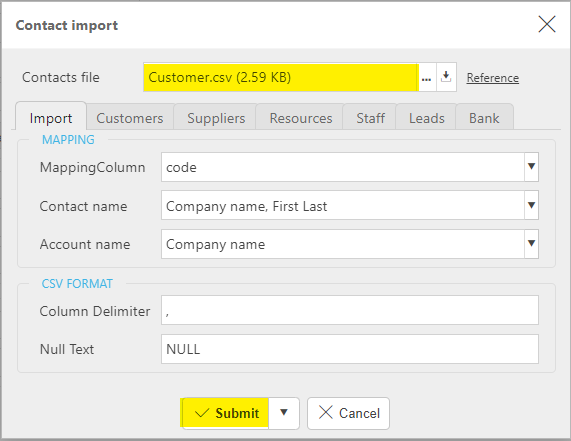
Enter the Input file and then select Submit.
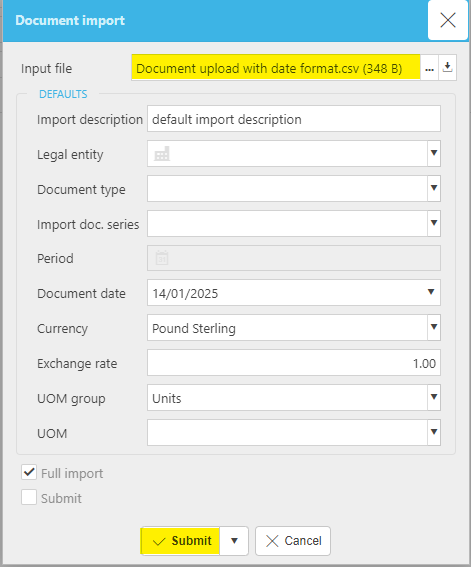
Important
The source Import file must be populated correctly with the data to be imported, otherwise it will generate an error.

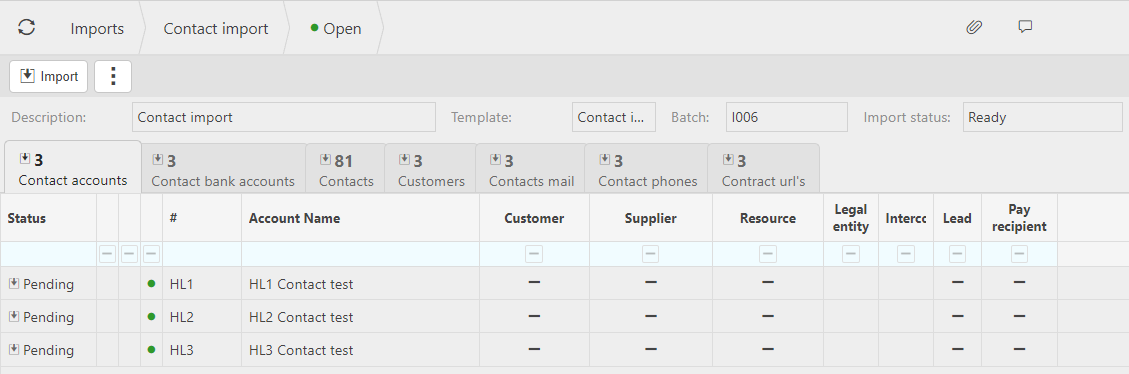
This will then produce a Document import file in the Imports folder.
Select Interfaces from one of the options as shown above in Viewing Interfaces.
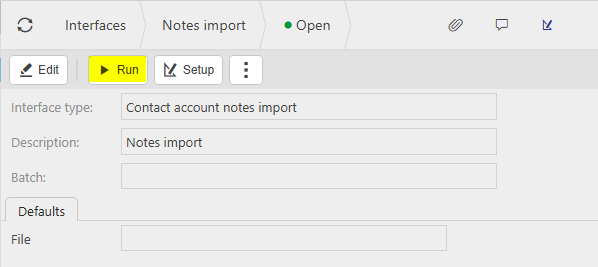
Select Notes import from the list of Interfaces.

Select Run - you can also open the selected interface and select Run.
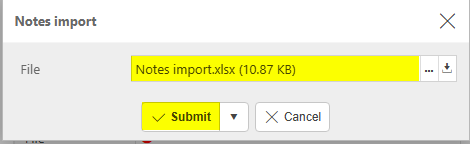
Enter the Notes file and then select Submit.
Important
The Import file must be populated correctly with the data to be imported.
This will then produce a Contact account notes import file in the Imports folder.
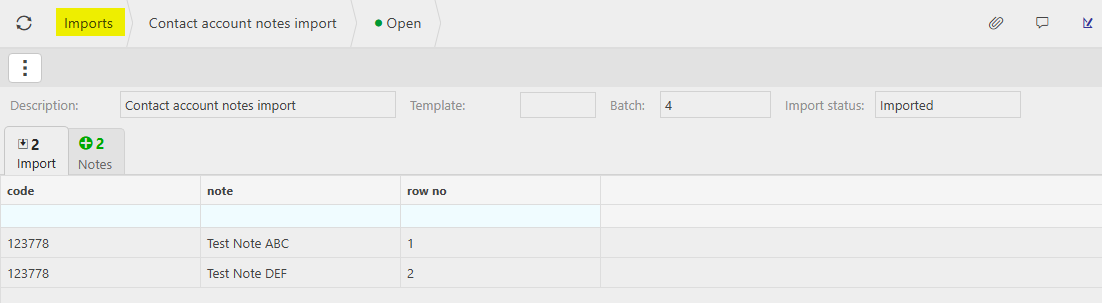
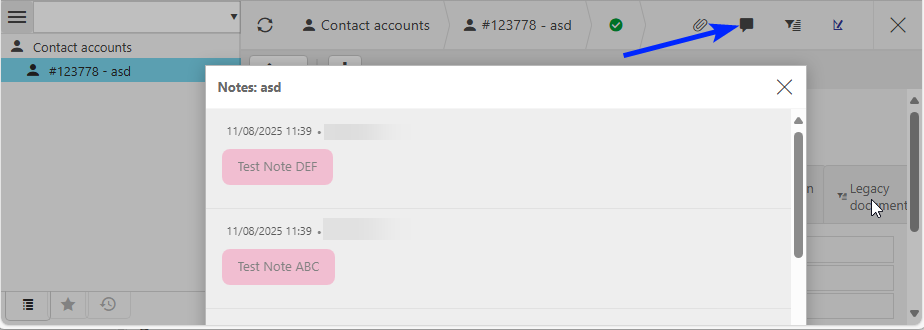
The imported notes will now show in the Contact accounts on the Contact account in the import file. Select the  icon to show the notes.
IMP Planner is a specialised budgeting, forecasting, and reporting platform designed exclusively for Multi-Academy Trusts (MATs) in the UK education sector. IMP Planner is built from the ground up to handle the complexities of managing finances across multiple schools within a trust.
If you are interested in using this integration, please contact iplicit support and our team will enable the feature for you. Once the feature is enabled, you can proceed with the set up.
Prerequisites
This integration requires permissions typically not granted to most users, so please ensure the Users within your team that will be configuring and manually running the integration have the appropriate user role/permissions.
Similarly to other integrations, the API User to whom the API Key will be associated, should have all the permissions necessary to "perform" the operations in the integration.
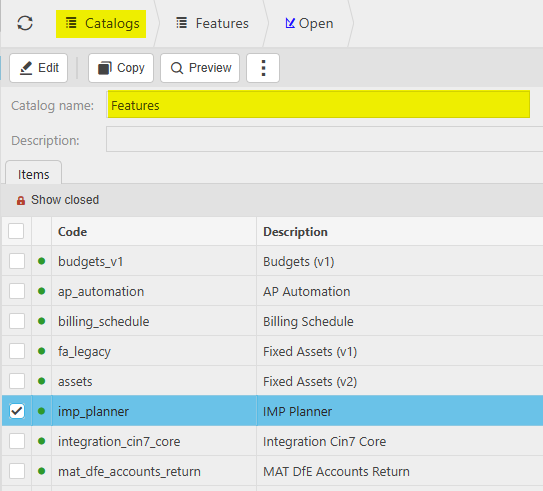
Add IMP Planner to the Features list in Catalogs.
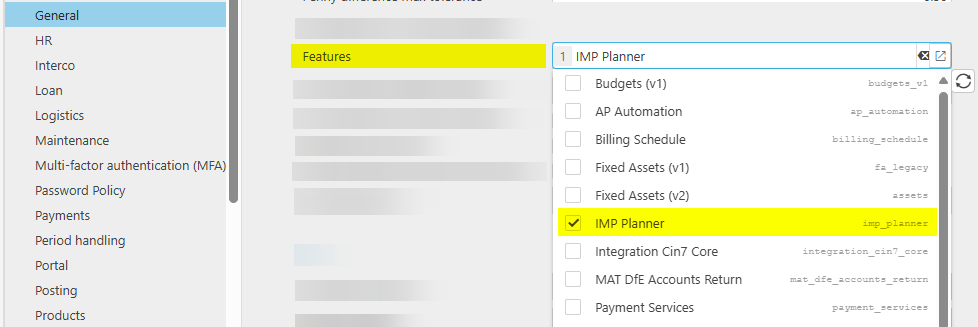
Then add this IMP Planner in the Features option on the General section in Environment defaults.
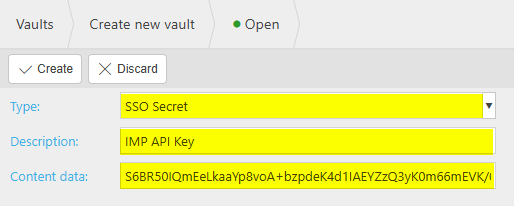
Add secure values into the Vault
IMP Planner Interface
This feature works by the User first creating an interface and then running that interface, either manually or via a schedule, to transfer the data.
Select Interfaces from one of the options as shown above in Viewing Interfaces.
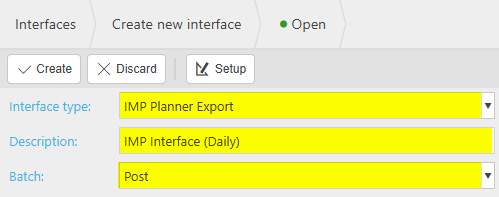
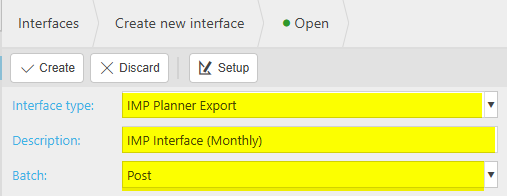
Create two IMP Interfaces - one for Daily and one for Monthly.
Tip
To ensure that any data that an Admin corrected via features, such as unpost and the other items under the corrections menu being used, it is recommended to create a monthly full synchronisation as well as a daily synchronisation, so any data that was unposted gets correctly removed from IMP Planner.
i.e.
Select New.
Enter the Interface type, unique description and batch for Daily ...
... and for Monthly - description is only an example
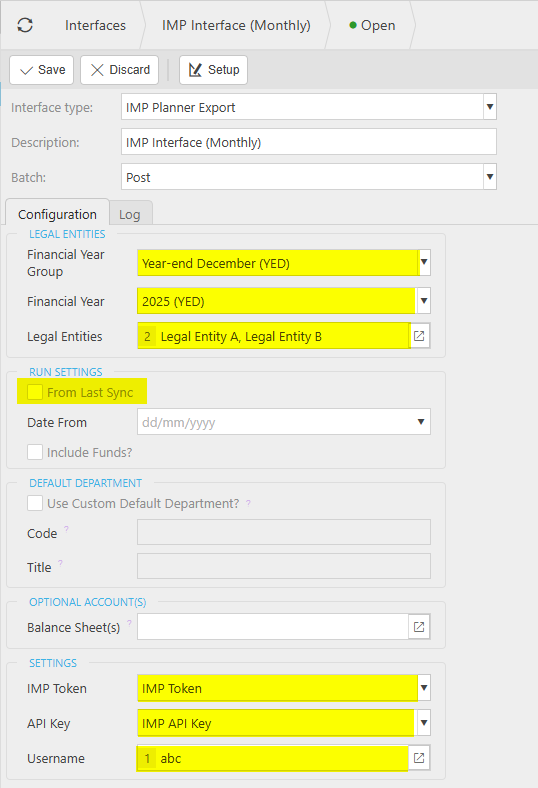
Select Create, then Edit the resulting new IMP interfaces and enter the required fields.

Legal Entities:
Run Settings
Default Department
Use Custom Default Department: Choose whether to use customer default department or the system default. This is the department which will be used by GL lines which do not contain a department. System default is DEFAULT | No Department.
Code: Default department code to be included when no department is set on an actual.
Title: Default department title to be included when no department is set on an actual.
Optional Account(s)
Settings
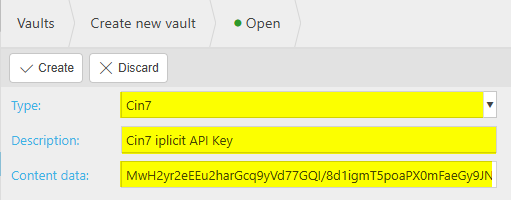
IMP Token: The IMP Bearer Token is received from IMP, and this is set up in the Vault.
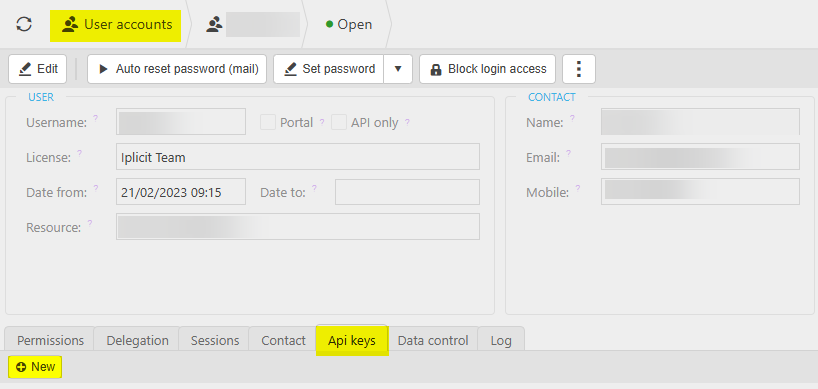
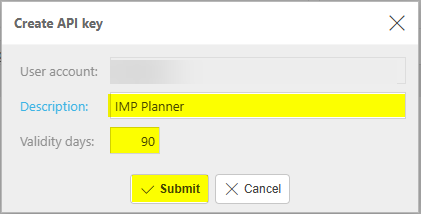
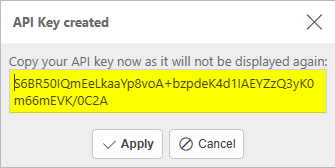
API Key: Use the key created in the Vault.
Username: Username needs to match the API Token that has been created. The User will need the correct permissions to be able to send the information to IMP.
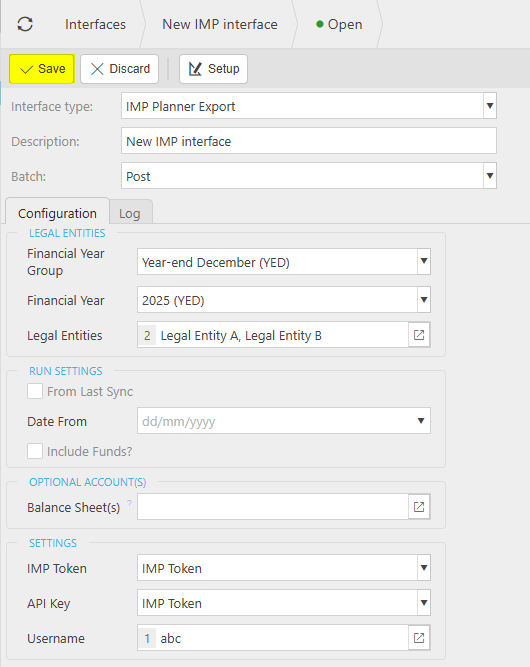
Similarly for the Monthly interface ...
Except for ...
Run Settings
From Last Sync: Do not select this option so all data will be sent, and any non-matching records will be removed on the IMP side.
Date from: Run from a specific date (only available if From Last Sync is not selected). Leaving blank and then all data will be sent.
Include Funds: Tick to include funds.
Select Save when complete.
Running the IMP Planner Interface
Select the IMP Planner interface from Interfaces.
Run Manually
Select Synchronize, which will send the information to IMP as set in the Interface created above.
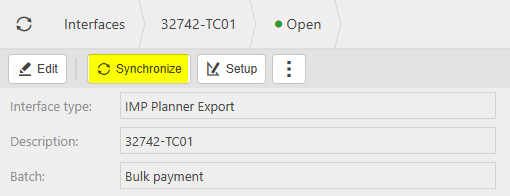
This will be the expected way to run the interface.
Note
Although the integration allows for a synchronisation to be pushed on demand, it is advised against this.
Recommendation is to utilise the Scheduler and to run a sync daily (during the night preferably) and once monthly (to automatically run a full synchronisation once a month at the end of your monthly period) - see above.
Select Scheduler from the finder menu.
Press the  option.
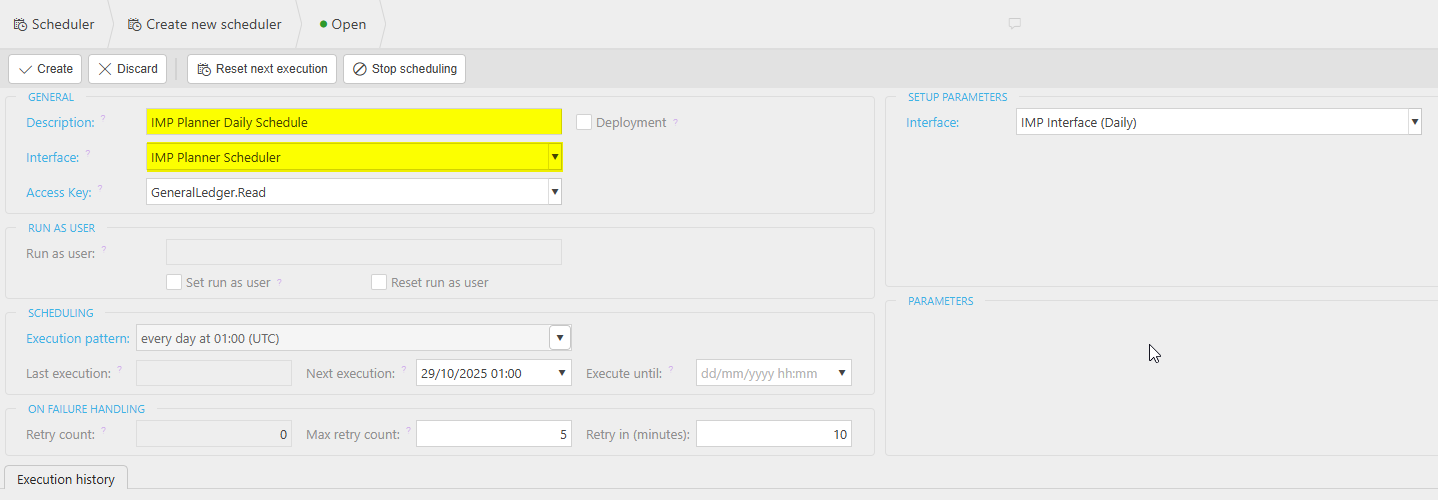
Description: Enter a unique description for the Daily scheduled task.
Interface: Select the interface that will be run by the daily scheduled task.
Access key: A user must have this access permission to be able to view the daily scheduled task.
Deployment tick box: When this is ticked the daily scheduled task will be deployed to customer environments.
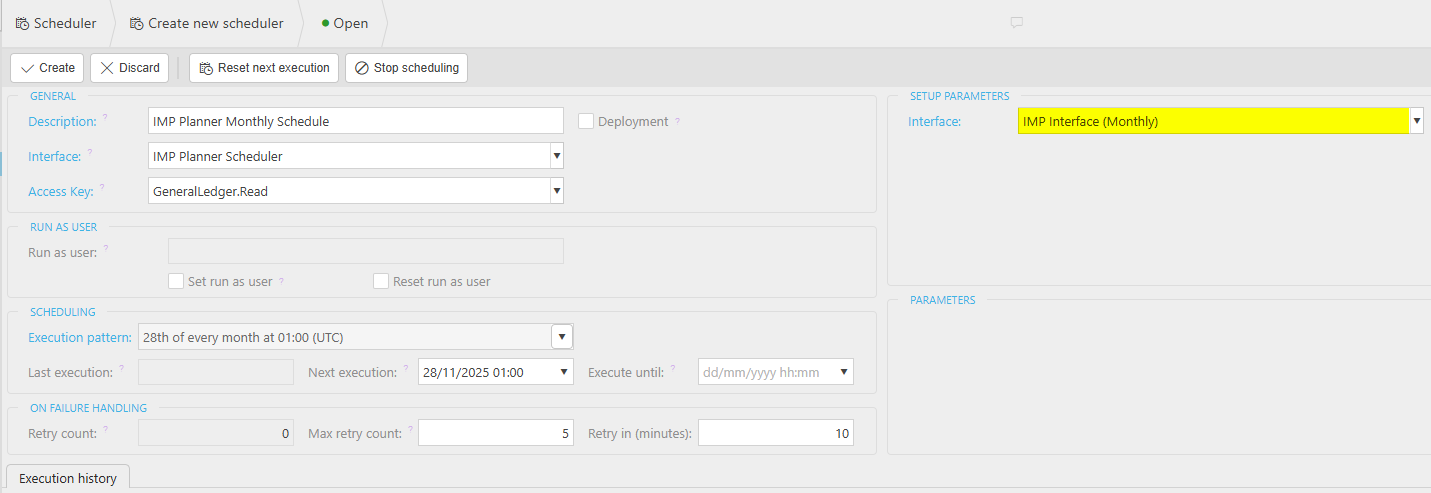
Setup Parameters - Interface:
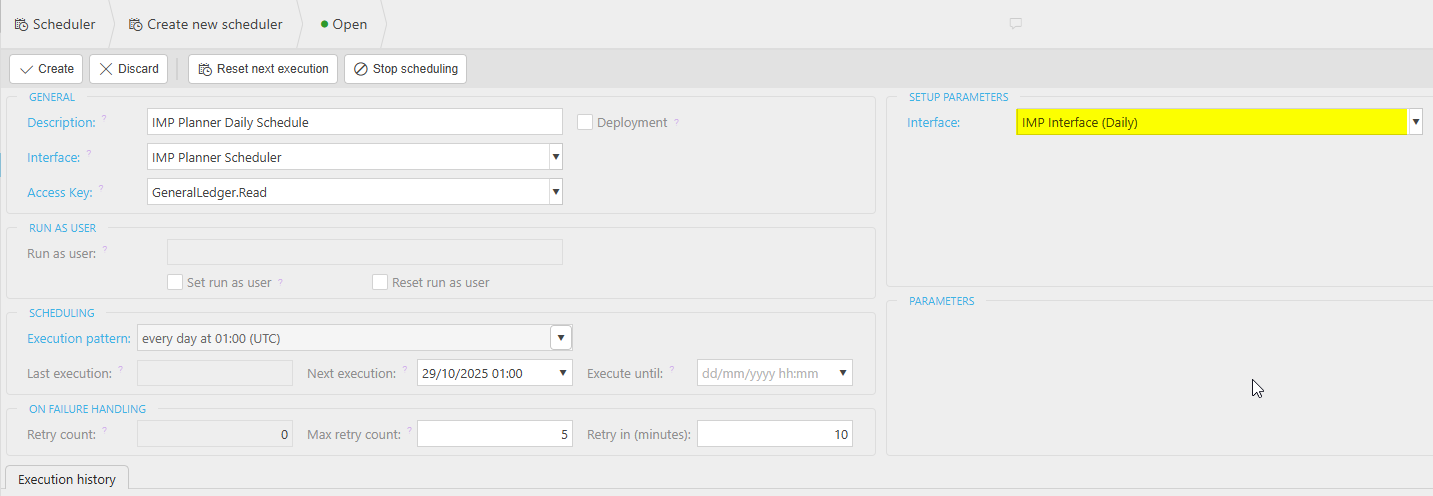
Enter the remaining fields to set the timings for when the daily schedule runs.
Execution pattern: This determines the timings of when the daily scheduled task will run automatically.
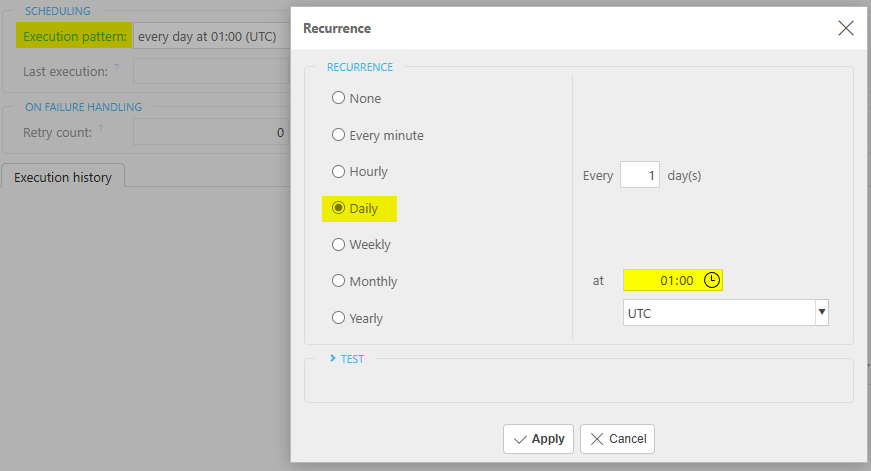
Recommendation is to set this daily time to early in the morning when few users will be on the system.
Last execution: This is the last date and time that the daily scheduled task was ran.
Next execution: This is the next date and time that the daily scheduled task is due to run.
Execute until: This is the last date that the daily scheduled task will run.
Select Create.
Press the option.
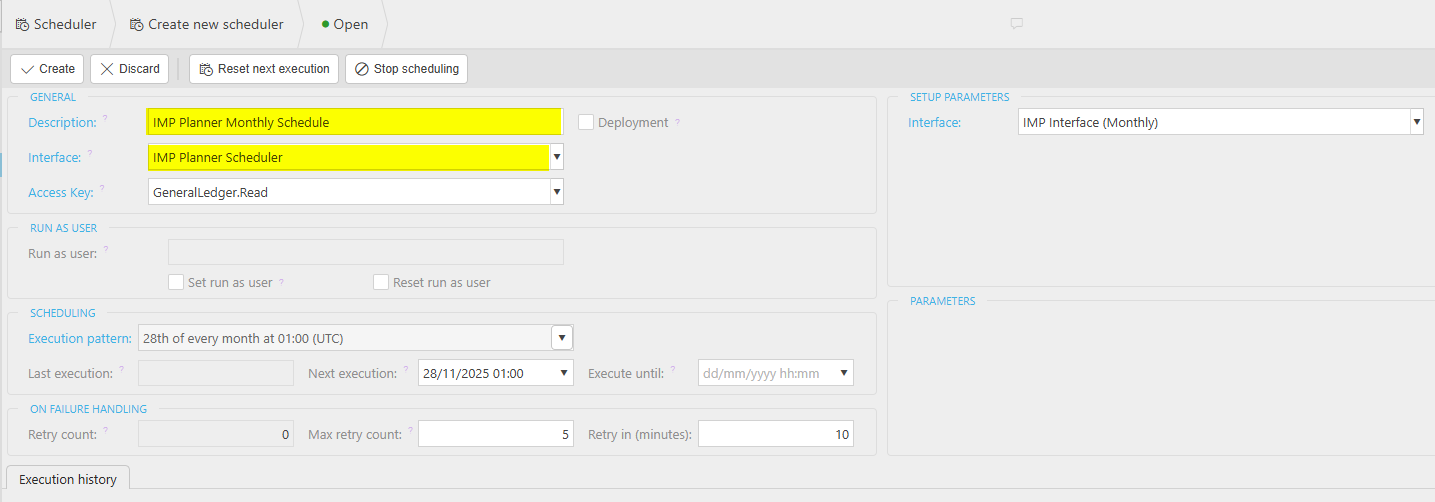
Description: Enter a unique description for the Monthly scheduled task.
Interface: Select the interface that will be run by the monthly scheduled task.
Access key: A user must have this access permission to be able to view the monthly scheduled task.
Deployment tick box: When this is ticked the monthly scheduled task will be deployed to customer environments.
Setup Parameters - Interface:
Enter the remaining fields to set the timings for when the schedule runs.
Execution pattern: This determines the timings of when the monthly scheduled task will run automatically.
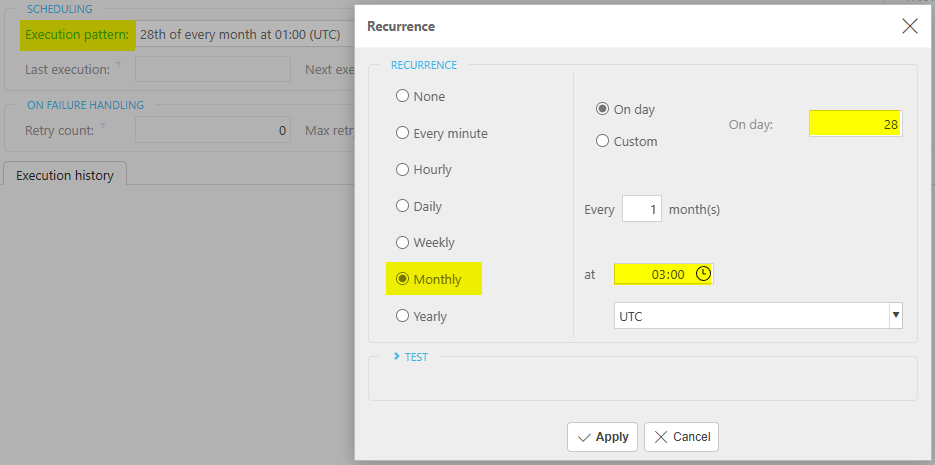
Recommendation is to set the monthly date to be a couple of days after your Accounts have closed. Also, set the time to a little later than the daily sync, say 3am, to possibly avoid running at the same time as other synchronisations.
Last execution: This is the last date and time that the monthly scheduled task was ran.
Next execution: This is the next date and time that the monthly scheduled task is due to run.
Execute until: This is the last date that the monthly scheduled task will run.
Select Create.
These scheduled tasks will now be available to run now or will run at the appropriate times.
Note
If you are using reversals, this extra monthly interface and schedule will not be necessary.
Please note, due to the integration logic, if a new legal entity is created with only one transaction, and a synchronisation is run followed by immediately unposting that transaction - leaving the legal entity with no associated transactions - then running a full synchronisation right after will still display the unposted transaction in IMP. This will be automatically corrected once another transaction is added to that legal entity and a full synchronisation is run.
Cin7 is a modern cloud-based inventory and order management solution designed to streamline operations for businesses. It integrates inventory, point-of-sale, e-commerce, and warehouse management into a single platform, enabling users to manage stock levels, sales channels, and supply chains efficiently.
Inventory Management: iplicit will not manage or store inventory-related data such as stock levels, pricing, real-time stock valuation/ cost of sales.
- CIN7 will be the source for all inventory data.
- iplicit will be source for all accounting data.
Supplier Records: Supplier records will be created automatically in iplicit as required when purchase transactions are processed in CIN7.
Customer Records: Customer records will be created automatically in iplicit as required when sales transactions are processed in CIN7.
Non-Stock Products: Sale and purchase products will be created automatically in iplicit as required in alignment with corresponding transactions in CIN7.
Purchase Invoices & Credit Notes: As purchases are made in CIN7, corresponding purchase invoices and credit notes will be created automatically in iplicit.
Sales Invoices & Credit Notes: As sales are made in CIN7, corresponding sales invoices and credit notes will be created automatically in iplicit.
Prerequisites
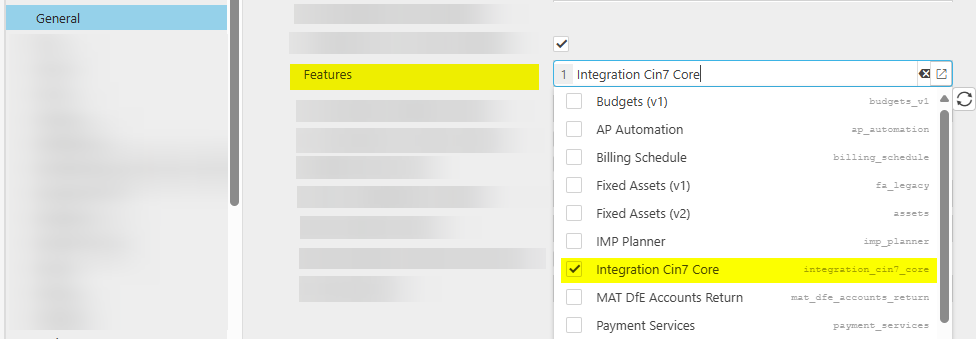
Add Integration Cin7 Core in the Features option on the General section in Environment defaults.
Stock should not be enabled in iplicit for this integration.
The Product Groups need to be set up with the appropriate Purchase and Sale Accounting. These will map to the Cin7 product categories - see Mapping below.
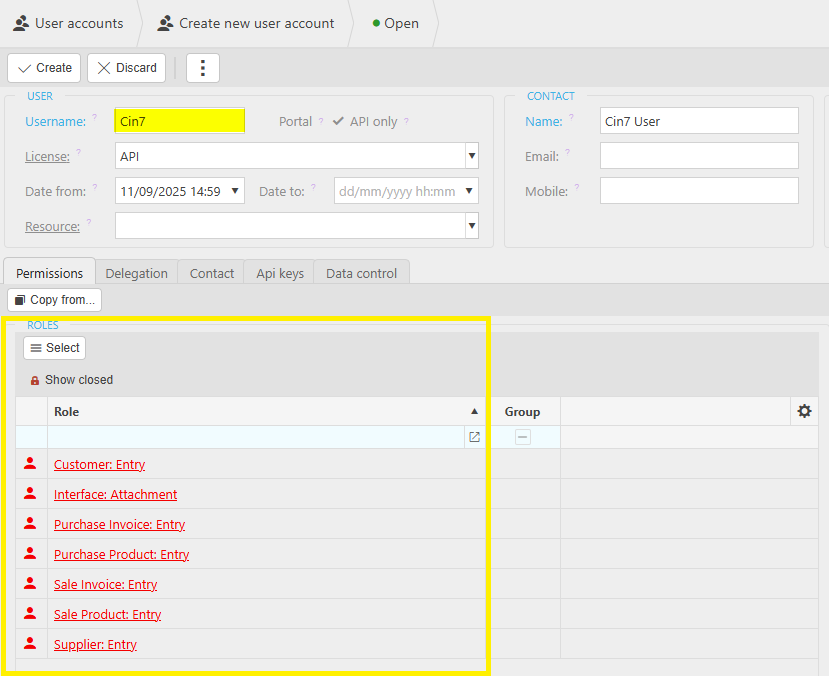
Create an Cin7 iplicit User and credentials.
Cin7 Interface
Create a Cin7 Interface
Select Interfaces from one of the options as shown above in Viewing Interfaces.
Select New.
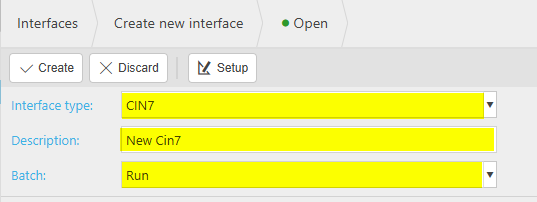
Interface type: Cin7
Description: Free text, e.g. Automation Cin7.
Batch: e.g. Run. (this is an internal sequencing series that will be used for each run of the interface).
Select Create. The Cin7 Interface must be created before any other configuration options can be added.
Selecting the Interface just created (or one that has previously be created) will now allow further options to be added.
Configuration Tab
Settings
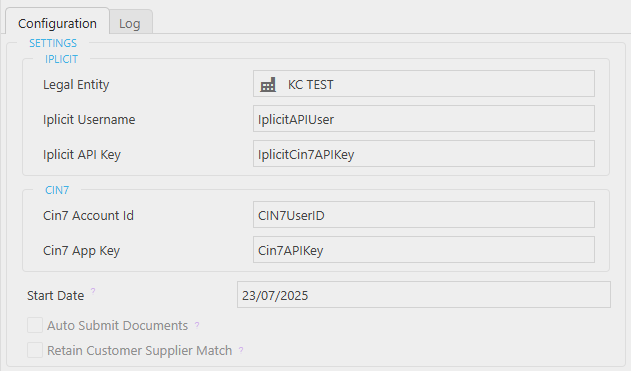
Legal entity: Enter Legal entity for this interface.
Note
In Cin7, only one Cin7 integration is allowed in an environment which relates to one Legal entity only.
Cin7 environment is one legal entity in iplicit, you can only have one Cin7 integration.
iplicit Username: This is the Cin7 User Account created in User accounts.

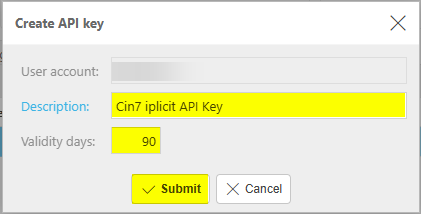
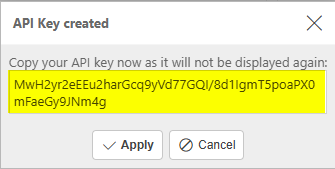
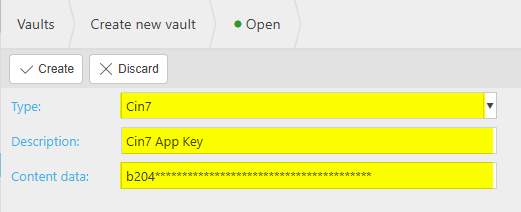
iplicit API Key: The API Key created in Vaults using the API key created in the above User account, see above.
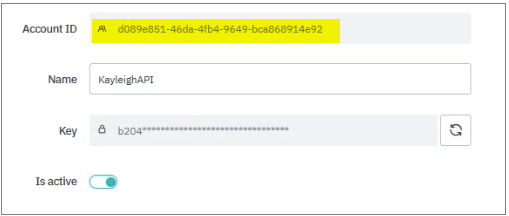
The Cin7 values come from the CIN7 Core API account.
Cin7 Account Id: The Cin7 Account ID field can only be set before the Customer Supplier Match process has been run. To change it afterwards, a reset of the integration is required.
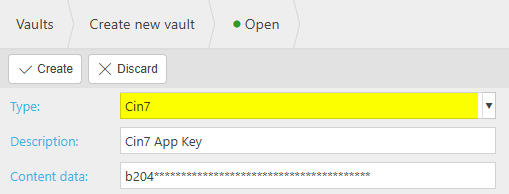
Cin7 App Key:
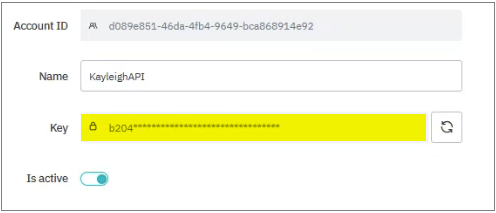
This key has to be added to the Vault in a similar way to the Cin7 iplicit API Key.
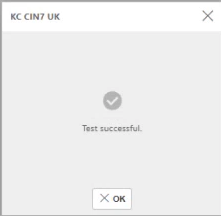
Note
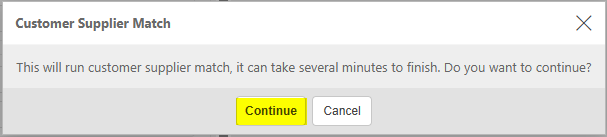
To confirm that the details are all correct, select the Test connection option in the main menu bar.
If successful, the following message will show.
If unsuccessful, the message will show which field has failed.
Start Date: Cin7 Sales Invoices, Sales Credit Notes, Purchase Invoices, and Purchase Credit Notes with an invoice date before this date will not be transferred to iplicit, even if they are modified later.
Auto Submit Documents: When ticked, documents will be automatically submitted in iplicit when created from the integration. When unticked, the documents will be created in a draft state and must be submitted manually.
Retain Customer Supplier Match:
When selected, all previous matches will be retained and adds any new matches.
When unselected, all previous matches will be discarded, and all records will be matched again.
Defaults
This section shows the default values when records and documents are created from Cin7.
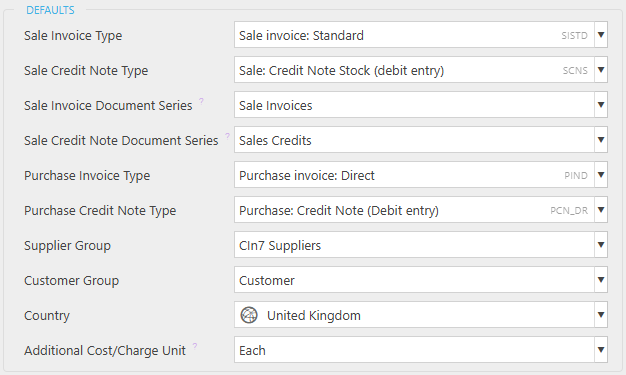
Sale Invoice Document Series: Document numbers from this series will be used when creating records from Cin7, the original sale invoice number from Cin7 will be preserved.
Sale Credit Note Document Series: Document numbers from this series will be used when creating records from Cin7, the original credit note number from Cin7 will be preserved.
Additional Cost/Charge Unit: Any additional costs are not populated with a unit, so this field holds the default field where these costs go to.
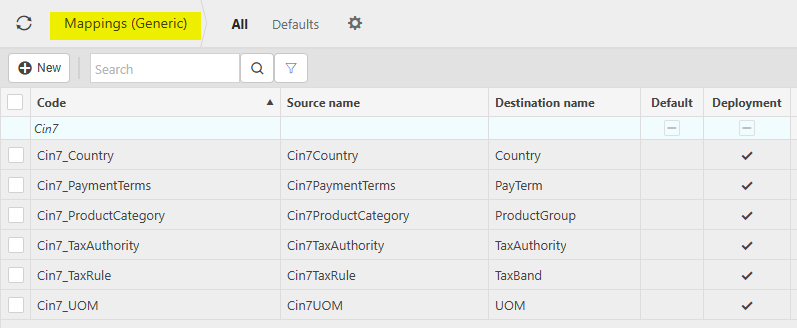
Mappings
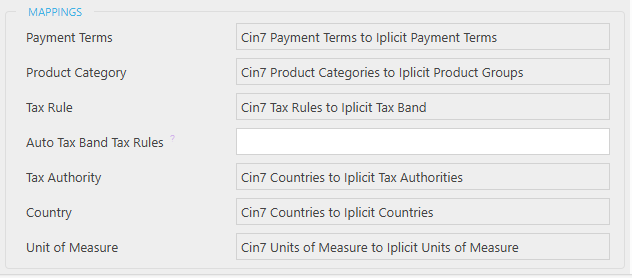
These values are set in Mappings (Generic) under the Cin7 codes.
Tip
Selecting and holding the CTRL button will underscore the Mapping values.
Selecting any of these underscored mapping values will take you directly to the appropriate entry in the Mappings (Generic) finder.
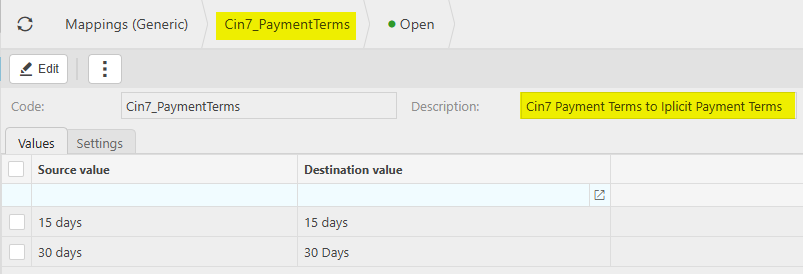
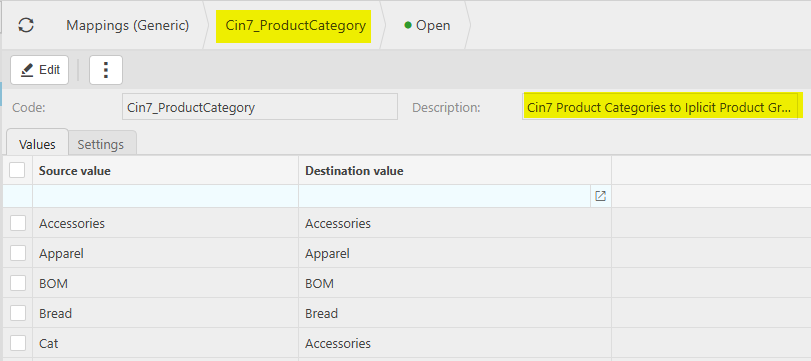
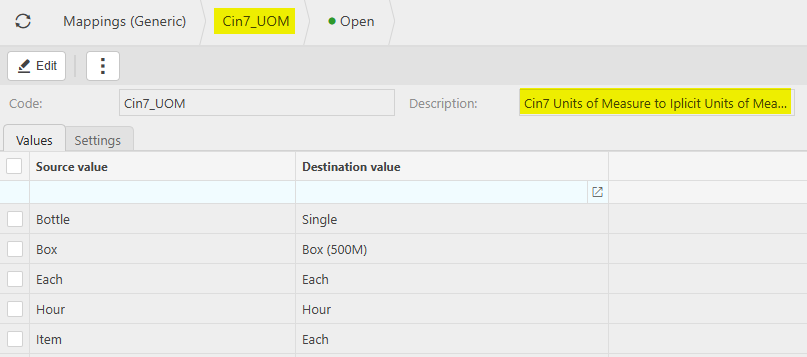
Go into each of the Mapping types and configure the Source value (which is the Cin7 value) to the Destination value (which is how you want it to show in iplicit).
Payment Terms:
Product Category:
Tax Rule:
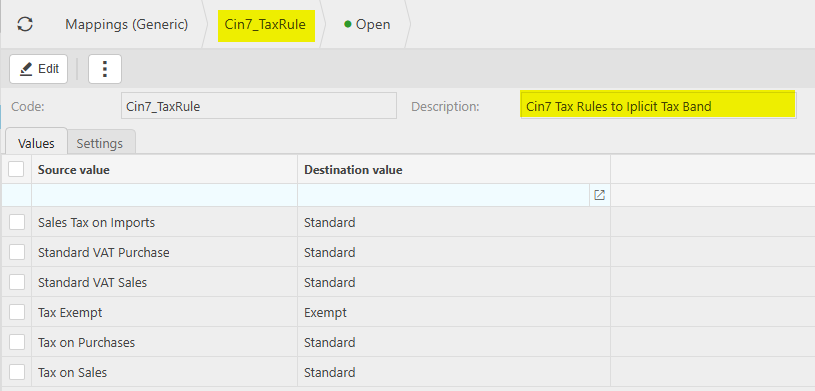
Auto Tax Band Tax Rules: Enter Cin7 tax rules that cannot map to an iplicit tax band (typically automatic tax rules applied to purchase/sales invoices or credit notes).
This will apply the following logic:
If tax amount is not zero, then coded to the Standard tax band.
If tax amount is zero, then coded to the Zero-Rated tax band.
Tax Authority: These values are already populated.
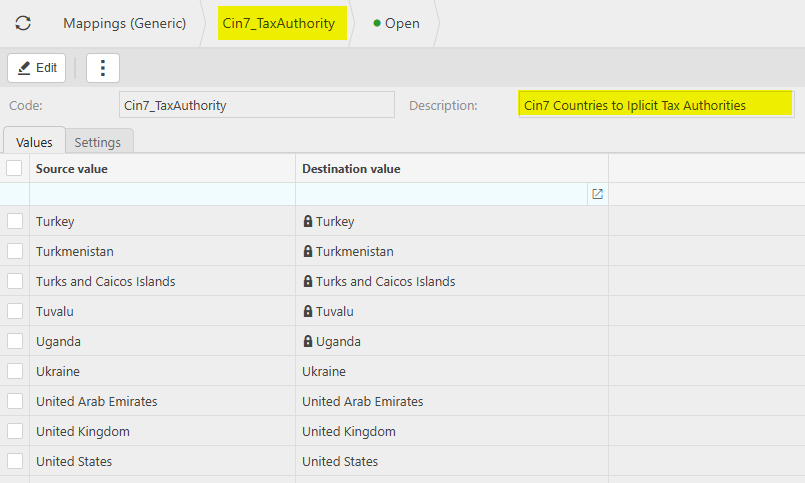
Country: These values are already populated.

Unit of Measure:
Running the Cin7 Interface
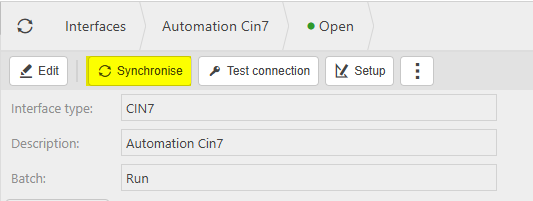
Select the Cin7 interface from Interfaces.
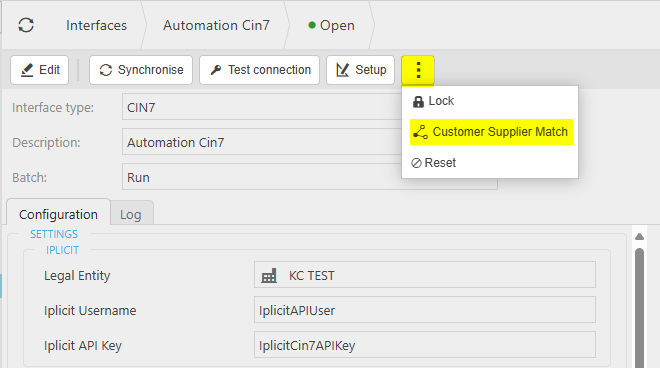
Customer Supplier Match
Customer and Supplier matching must be run prior to the first run of the integration. This matches Customer and Supplier records between Cin7 and iplicit based on Name and Tax number.
If one Cin7 Customer or Supplier matches more than one iplicit Customer or Supplier, then the records will not get transferred over to iplicit.
If more than one Cin7 Customer or Supplier matches one iplicit Customer or Supplier, then the records will not get transferred over to iplicit.
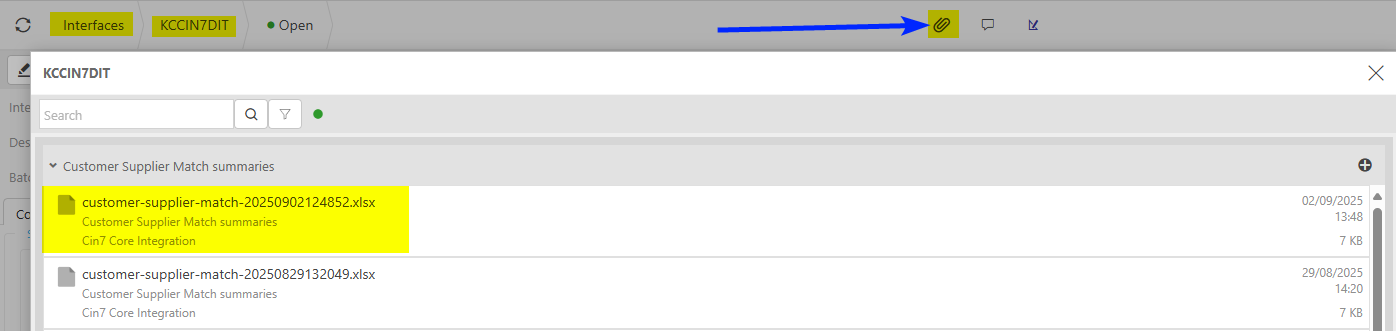
These duplicates will be detailed in the attachment output which shows all matching records and all non-matching records.
When it has run successfully, there will be an attachment in the interface with the process outcome.
The matching process can be run multiple times, each time the records are corrected in either iplicit or Cin7 to get all the records that you want to be matched.
If Customers or Suppliers in Cin7 are not matched to an iplicit record, then they will be created. So, when running the integration, if Sales or Purchases are made against Customers and Suppliers that are not set up, it will just create them automatically.
Run Manually
Select Synchronise, which will run the Cin7 process as set in the Interface created above.
Selecting Retry Failed Items will retry the failed items since the date you enter - this will be ticked by default.

Retry Failed Items Since: The date will default to the start date/time of the last scheduled run, as scheduled runs always retry failed items. If no previous scheduled run exists it will default to the start date/time of the previous manual run.
Otherwise, it will only process all the new records in Cin7.
Note
There must be at least 15 minutes between Manual runs. If 15 minutes have not elapsed or a run is currently in progress, then the run will be skipped.
This will be the expected way to run the interface.
Select Scheduler from the finder menu.
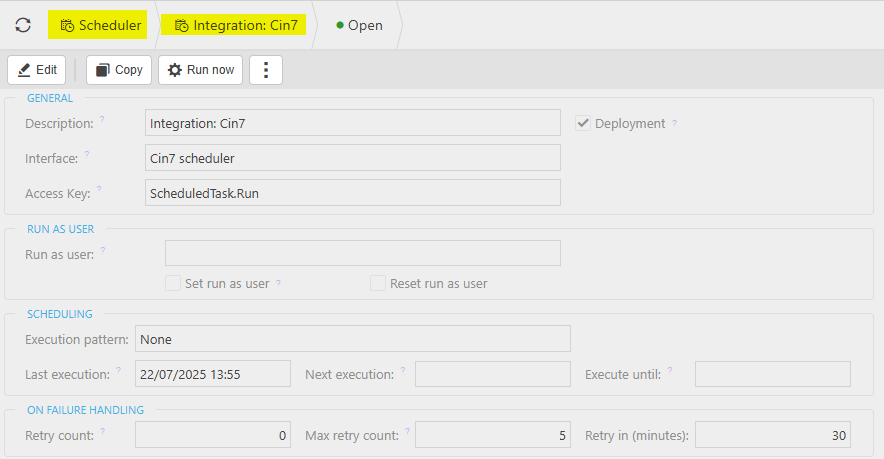
Select Edit to set the schedule to your requirements.
For example, setting the Execution pattern to Weekly -
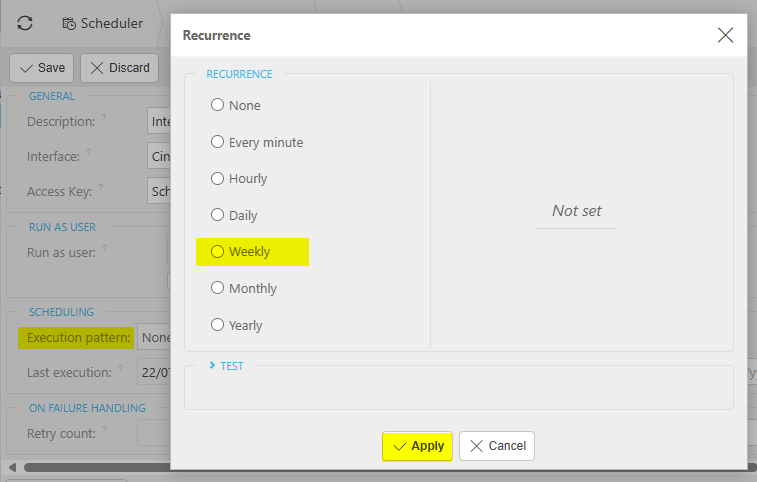
Important
Although the Execution pattern option Every minute is available (as Scheduler is a generic process), if this is set to Every minute, the Cin7 synchronisation will only allow a maximum run of one an hour - see Run Manually notes above to run more frequently. If an hour has not elapsed or a run is currently in progress, then the run will be skipped.
Select Save.
The scheduled task will run at the appropriate times.
Checking successful Synchronisation.
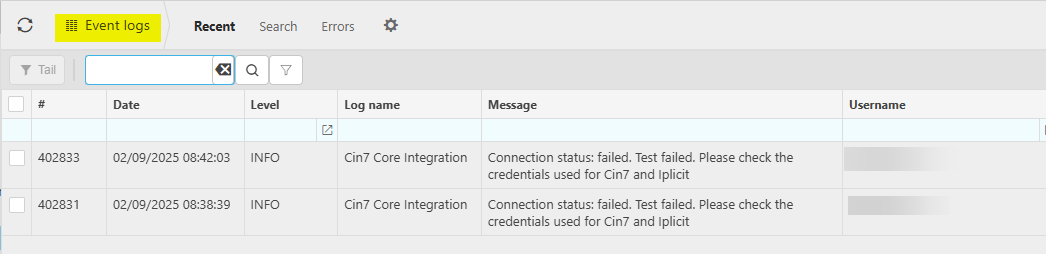
Either check the Log tab on the Interface -
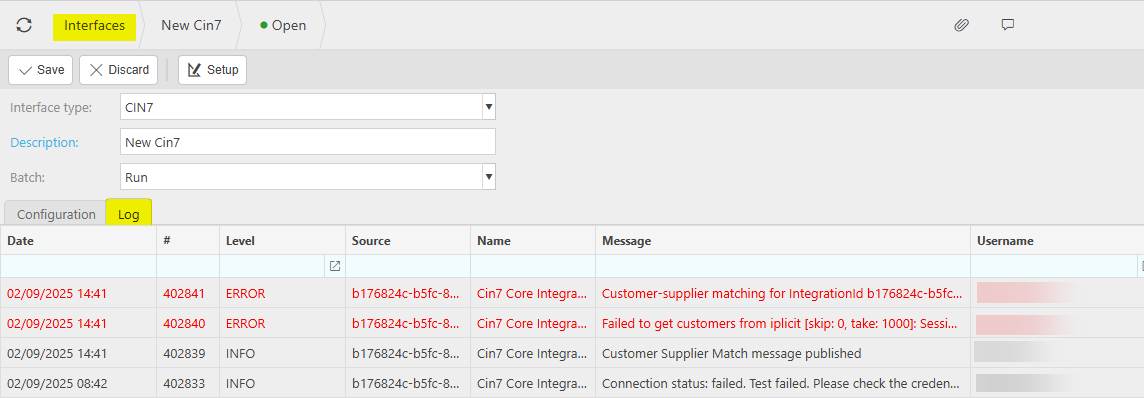
or select the Event logs finder menu to check to see if the Integration has run successfully, or, if not, what errors have been found.
Cin7 Stock Valuation - Import Interface
This Interface will import the Products Stock Level Report created in CIN7 as an Excel file (.xlsx).
The interface generates an auto-reversing manual journal in iplicit, ensuring stock valuation aligns with Cin7 data. It includes fields for file upload, journal metadata (description, legal entity, document type, period, reversing period, dates), and submission options. Dependencies include Cin7 export structure, iplicit’s journal posting rules, and legal entity currency configuration.
How to run Import Interface
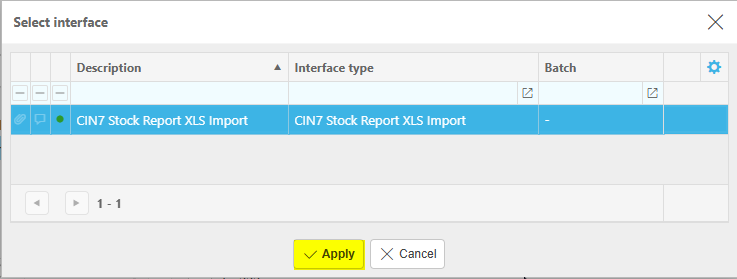
Select the Document imports from the finder menu.
Select New.
Select CIN7 Stock Report XLS Import interface.
Fill in the appropriate fields.
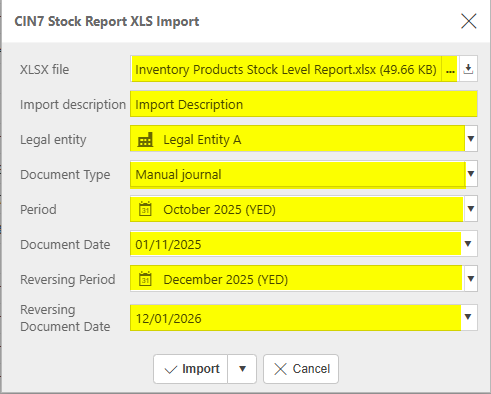
XLSX file: Select the attached Excel Products Stock Level Report previously created in CIN7.
Import description: Enter a unique description.
Legal entity: Select Legal Entity from dropdown option showing list of all active legal entities.
Document Type: Select Document type from dropdown option showing only enabled manual journal document types.
Period: Select a valid open period; invalid periods will trigger an error message.
Document Date: Enter a valid date.
Reversing Period: This Reversing period must be later than the Period.
Reversing Document Date: This date must be later than the Document date.
Select Import.
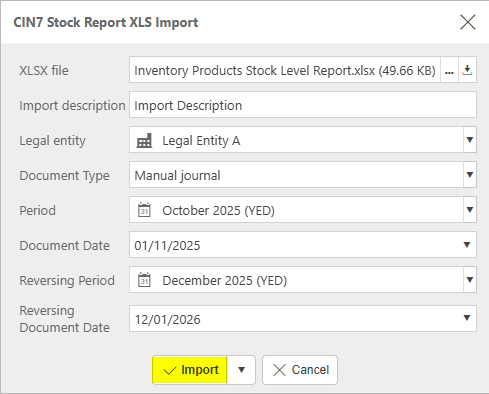
Two documents are created in draft status, one Manual journal document, and one Manual journal: Reversal document.
Select Interfaces from one of the options as shown above in Viewing Interfaces.
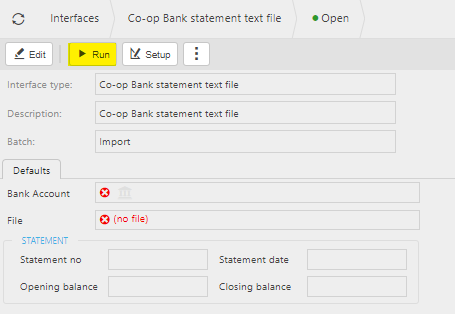
Select Co-op Bank statement text file from the list of Interfaces.

Select Run - you can also open the selected interface and select Run.
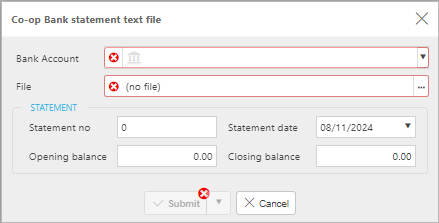
Enter the Contacts file and then select Submit.
Important
The Import file must be populated correctly with the data to be imported, including date formatting.
See Co-op Bank statement fields for the correct attributes and formatting.
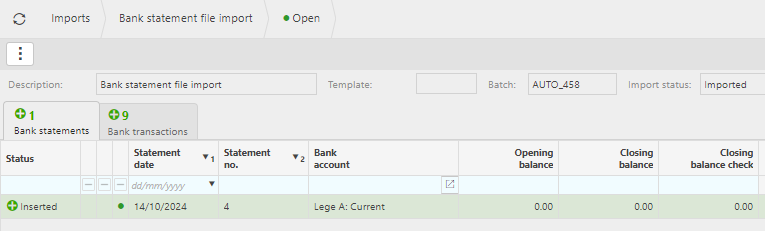
This will then produce a Bank Statement File Import file in the Imports folder.
Select Interfaces from one of the options as shown above in Viewing Interfaces.
Select Barclays.NET Bank statement text file from the list of Interfaces.

Select Run - you can also open the selected interface and select Run.
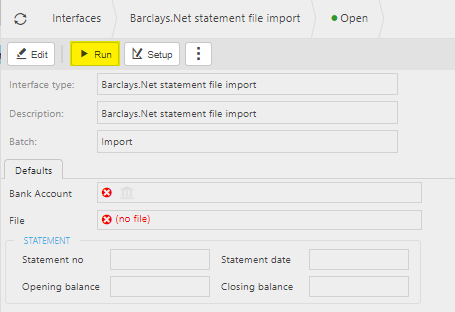
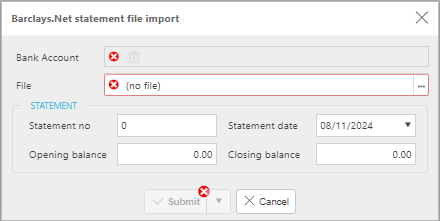
Enter the Barclays.NET file and then select Submit.
Important
The Import file must be populated correctly with the data to be imported.
See Barclay.NET statement fields for the correct attributes and formatting.
This will then produce a Bank Statement File Import file in the Imports folder.
Updated June 2026