Import and Export
Typically importing Assets will be an action undertaken when a customer starts their journey with iplicit but is also an option for an existing Customer who wishes to transfer their Asset Register from another source.
How to create Import File
Creating Import File containing Assets
If you haven't already created a compatible Import/Export File, the easiest way is to first create an Export file from the Assets menu.
See Exporting Assets below.
A compatible Excel spreadsheet will have all the correct columns that correspond to the available fields in the iplicit Assets.

Warning
- Import only supports single Tabs on a spreadsheet. Therefore, if your data is spread over multi tabs you will have to create a separate spreadsheet for each Tab.
In the spreadsheet you can -
- Add new Asset - just add a new row and add data in the appropriate columns.
- Edit Assets that are already showing.
Specific Field operations in the spreadsheet
Code
- If changed on existing Asset row, then a new Asset will be imported.
- If left blank, the Import process will create a new Code using the next available sequential number.
- If left the same, Import will overwrite/update the Asset.
Asset Group
- A valid Asset Group must be entered - see Asset Groups
Asset Depreciation Method
A valid Asset Depreciation Method can be entered.
If no Method is entered, then the default value will be entered from Asset Groups when the file is Imported.
Note
Other fields, if left blank, will be populated when the file is Imported only if there has been default values set up within iplicit.
Once you have added/edited all your Assets, save the file ready to be imported.
Note
Extra Custom fields can be added to the Excel file, so that this information is included in the Import.
Custom fields need to be added in the following format - ext.NewField, where NewField is free form text for the new field.
How to Import Assets
Importing Assets
Select Assets option from either the Pulse menu, from the Main menu or by entering Assets in the Quick Launch Side Menu.

To Import Assets from your pre created source spreadsheet, select Import from the dropdown three-dot button
 .
.
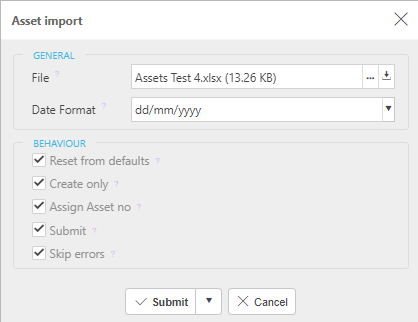
Enter options for Import.

- File - the source file created and saved previously.
- Date format - in case you are using American format for example.
- Submit - to automatically submit the Asset for authorisation after the Import.
- Skip Errors - import without errors.
Tip
If you hover your mouse over any of the Behaviour options, text will appear giving you further help on that option.
Select Submit
Once the Import has completed, the following Asset import screen will show Assets imported and ones that haven't.

Any Custom fields that were added will now show on the Asset import screen.

Note
The following Assets will not Import -
- Assets already been Capitalised.
- Assets missing or invalid data in the source file, such as incorrect Asset Group.
How to Export Assets
Exporting Assets
Select Assets option from either the Pulse menu, from the Main menu or by entering Assets in the Quick Launch Side Menu.

To Export Assets, select Export from the dropdown three-dot button
 .
.
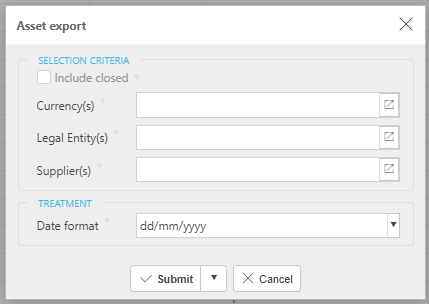
Enter options for Export.

Select Submit.
The Export file is created as an Excel spreadsheet.

This file can now be opened.
Updated February 2025