Access permissions
Access permissions refer to the individual permissions found within User Roles.
How to view Access Permissions
Select User Access / Access permissions from the Settings section of the pulse menu -

Note
This is an example screen shot of the pulse menu.
Position of the menu items within pulse will vary according to available options and dependant on personal screen resolution.
or enter Access permissions in the Quick Launch Side Menu.

This will then show the Access permissions screen where the User need to enter at least one filter criteria to continue.

Tip
To modify the columns displayed, select  on the top right of the page, then tick/untick the information you want to hide or display.
Within the role, there are tick boxes which identify what operations can be performed against the attribute. (Using Supplier: read only as an example).
![]() Browse: This allows the user to search for the items in a list. In the example above, browse is ticked on supplier meaning that this role would allow the user to search for a list of the suppliers.
Browse: This allows the user to search for the items in a list. In the example above, browse is ticked on supplier meaning that this role would allow the user to search for a list of the suppliers.
![]() Read This allows the user to click into a single item provided they can read it. You can use the control click feature wherever you may see any item linked to the attribute that you have read on. In the example above, read is ticked on supplier group but browse is not. This means that the user could control click to a supplier group but only from a supplier, payment recipient or contact account. They would not be able to search for a full list of supplier groups.
Read This allows the user to click into a single item provided they can read it. You can use the control click feature wherever you may see any item linked to the attribute that you have read on. In the example above, read is ticked on supplier group but browse is not. This means that the user could control click to a supplier group but only from a supplier, payment recipient or contact account. They would not be able to search for a full list of supplier groups.
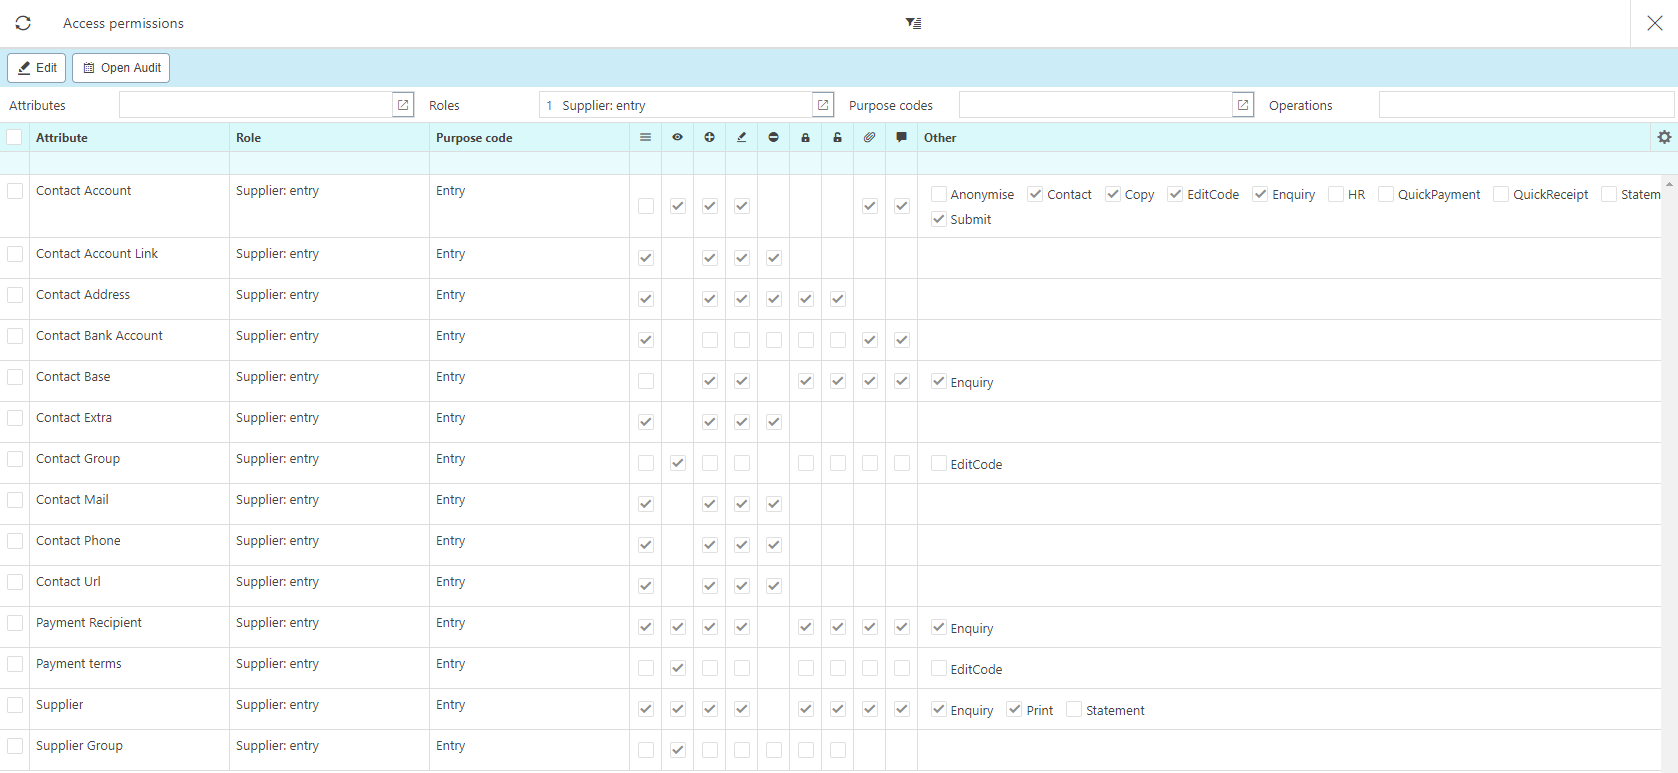
![]() Create has not been ticked for any attribute because this supplier: read only is a read only User Roles. Below is an example of an entry role: Supplier: entry.
Create has not been ticked for any attribute because this supplier: read only is a read only User Roles. Below is an example of an entry role: Supplier: entry.

Note
This entry role has the create box ticked on a range of different attributes. This allows the user to create everything necessary to create a supplier. The User Roles Supplier: entry inherits everything from it's read only counterpart and builds upon it. This means when assigning User Roles there is no need to assign both a read only and an entry role for the same thing.
The create tick box gives the role the access to the "New" button on finders.
![]() Update works in conjunction with the create operation. Update allows us to edit already created documents. This means someone with the Supplier: entry is able to go and edit new and existing suppliers.
Update works in conjunction with the create operation. Update allows us to edit already created documents. This means someone with the Supplier: entry is able to go and edit new and existing suppliers.
![]() Delete has not been used in all of the same places as create nor update. Delete's within the system are only used on the details within the editors, very rarely is the delete operation used on the records or documents themselves. This is because you can lock records away but they have existed at some point in time.
Delete has not been used in all of the same places as create nor update. Delete's within the system are only used on the details within the editors, very rarely is the delete operation used on the records or documents themselves. This is because you can lock records away but they have existed at some point in time.
Both ![]() Lock and
Lock and ![]() Unlock are typically used in conjunction with on and other. These operations are used to hide documents, not to delete them.
Unlock are typically used in conjunction with on and other. These operations are used to hide documents, not to delete them.
![]() Attachment operation tick box allows the user to enter attachments against documents and records. Typically both Read only and Entry User Roles will have both the attachment and note operations ticked.
Attachment operation tick box allows the user to enter attachments against documents and records. Typically both Read only and Entry User Roles will have both the attachment and note operations ticked.
![]() Note operation tick box allows users to enter notes against a record. The Note operation tick box is typically ticked against the same attributes that the Attachment tick box is ticked against within a User Roles. You can delete a note but all notes are recorded in the history/log tab of a document/record.
Note operation tick box allows users to enter notes against a record. The Note operation tick box is typically ticked against the same attributes that the Attachment tick box is ticked against within a User Roles. You can delete a note but all notes are recorded in the history/log tab of a document/record.
Other operations are in most cases attribute specific. Typically you can find operations such as Enquiry and Abandon in this section.
Updated January 2025